Use IKEA's BILLY Bookcases To Give Your Fridge A Chic Built-In Transformation

When planning a kitchen remodel, cabinetry eats up a large chunk of the budget, especially if you opt to go custom. Custom kitchen cabinets, though optimal for getting exactly the functionality and aesthetics you want, will cost you a pretty penny. However, what if you could pull off the "custom" look of a unique, upscale fridge surround with inexpensive stocked shelving frames and some elbow grease? That's right, enter IKEA. Emma Hill (@emmahillhome) shared on Instagram how she used the ever-popular and affordable IKEA BILLY bookcases to create a luxe glass door fridge surround that looks like an expensive built-in.
To get started, purchase two BILLY bookshelves, available in a 15.75-inch wide version as used on Instagram, or a wider 31.5-inch wide frame. In addition, you'll need the matching OXBERG glass doors and a middle shelving unit to run across the top of the fridge (more on this later).
A quick note about finish: the IKEA BILLY series comes in six finishes, so while Hill covered her white BILLY frame in a charcoal woodgrain vinyl wrap, you could select a stocked finish to save yourself serious time and effort while still complementing or closely matching your cabinetry. In fact, the Black Oak Effect finish is very close to the final look of the one on Instagram, especially considering the fridge surround is separated from the other cabinets in this case. Otherwise, the white bookshelf frame is $10 less expensive than other finish options if you plan to paint your IKEA furniture or customize it with a vinyl wrap to match your cabinets. Refinish the components while still unassembled for the most seamless process and best results. Once you have the IKEA pieces refinished as desired, assemble the units according to the instructions, and get ready to create the beautiful custom fridge surround of your dreams!
Planning proper IKEA BILLY bookcase placement is key to a successful fridge surround
To create your own gorgeous IKEA BILLY fridge surround, it is crucial to plan the space with your particular fridge size and room setup. In the case of the Instagram video, the fridge had its own devoted recessed niche in a wall completely separate from the other cabinets. In this case, you'll need to make sure you can fit the fridge and BILLY units within the opening. If your fridge opening is adjacent to other cabinets, you will need to remove the cabinet(s) next to the fridge to make space for the BILLY surround. Alternatively, if you're building an IKEA kitchen from scratch (or other cabinet brand), you can simply plan the width of the BILLY surround into your cabinet plan.
The second thing you'll need to keep in mind is that the bookcases, at 11 inches deep, are significantly shallower than your fridge. A counter-depth fridge is around 24 to 30 inches deep (excluding handles) while a standard depth model will be about 30-36 inches deep. This means that you need to float the BILLY units forward away from the wall to have them appear flush with the front of the fridge. Be sure to test fully opening your fridge doors before finalizing how far out to place your bookshelves.
Lastly, finalize the side-to-side placement of the BILLY bookcases on either side of the fridge, being sure to leave a small gap between the appliance and each bookcase for both ventilation and getting the appliance in and out. The gap is usually about ½ inch on either side but consult the fridge's user guide for the manufacturer's recommended clearances). Once you've finalized the BILLY bookcase placement, it's time to connect everything together in a customized surround.
Add upper shelving and trim out the IKEA BILLY fridge surround for a built-in look
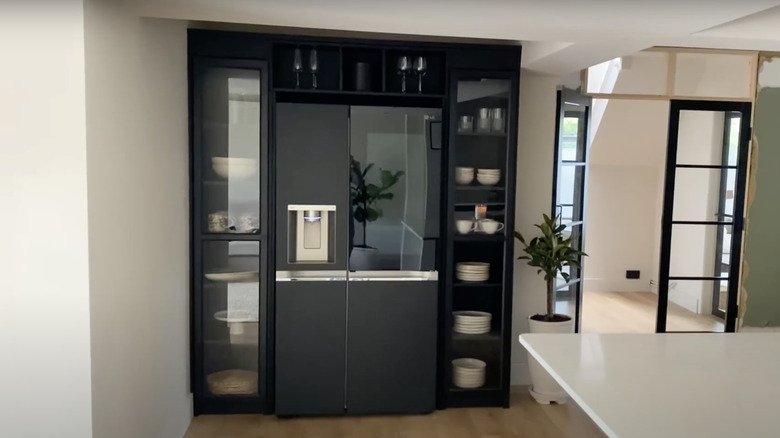
Now the BILLYs are in place, upper shelving will bridge the bookcases. Depending on the required opening size in your fridge manual, you may be able to find a cubby-style shelf in the right measurements. If you can't, or if you're moderately handy with a saw, you can alternatively custom-build a simple plywood box with center dividers. While it's a little extra effort, the custom route will ensure you capture every inch of usable space and streamline the trim process since it's made to your preferred measurements. The shelving unit will float away from the wall like the bookshelves, so secure it to both BILLYs and add support from below. In the Instagram video, the upper unit sat on two end panels that functioned both as shelf support and a fridge-depth decorative surface for the surround interior.
Once your shelving is secured, trim will ensure a polished final look. Fill any gaps on the outer sides of the BILLY bookcases with pre-finished spacer boards. Additionally, you'll want to trim the top of the shelves, especially if there's a height discrepancy between the middle one and BILLYs like on Instagram. Cut boards to bring the BILLYs to the same height as the middle shelf if necessary, and then run a trim or crown piece across the top of the whole surround to tie everything together. To take it a step further, bring the trim to the ceiling before topping with a crown for a luxe, full-height look. Caulk and paint all trim to finish the refined installation. Add the OXBERG doors per the instructions, accessorize with chic kitchenware, and your stunning new glass door IKEA fridge surround is ready to be the star of your kitchen.