Before You Toss That Wine Bottle, Try This Creative DIY Upcycle For Your Yard

What's the old expression? One minute you're a young, fun twentysomething, and the next thing you know, you're a thirtysomething drinking wine on the porch while watching the birds. Sound familiar? Well then, boy, do we have the perfect DIY for you!
Content creator HowToLou shared how he created a self-filling gravity bird feeder out of only a recycled wine bottle (drink up, friends!) and some lumber. By creating a wood frame with a backboard to support an upside-down wine bottle filled with bird food floating about ¾ of an inch above a seed tray base, the content creator was able to let gravity do the refilling for him. As birds eat from the seeds in the tray, the food tray automatically replenishes to the level of the mouth of the bottle. And when the food runs out, the system of screws allows the bottle to be popped right out for easy filling and replacement. Pretty genius, huh? While this DIY normally requires a reasonable working knowledge of power tools, we're sharing alternate approaches so you can customize this project to your skillset.
An important note before you begin: As you're planning your project and buying materials, avoid using pressure-treated lumber or paint on the interior of the feeder where it comes into contact with wildlife. The chemicals in these finishes could be harmful to birds. Instead, choose an outdoor-friendly untreated lumber that's naturally rot resistant to withstand the elements, like teak, cedar, redwood, cypress, mahogany, or Brazilian walnut (ipe). Any decorative paint should be reserved for the outside of the frame. Now that the wine has been enjoyed and the wood is bought, let's walk through this clever bird feeder project step by step, so you can start attracting feathered friends right away.
Build a wooden frame to support the wine bottle bird feeder
To create the wooden frame for your bird feeder, begin by marking two 45-degree angles using a speed square at one end of a 1-by-6-inch board to create a point. Lay the bottle on the board with the bottom nestled into the point like on the video and mark a straight line across the board about 1½ inches down from the narrow, open end of the bottle. Using a miter saw, make the marked cuts to create the tall, house-shaped backboard. Next, make another cut straight across the board to create the base. Considering the diameter of a wine bottle is around 3 to 3½ inches, the base should be deep enough to clear the backboard and the wine bottle, or about 4 inches (you can alter this dimension as desired).
Next, it's time to trim around the backboard and base with a 1-by-2-inch plank (or rip some of your leftover 1-by-6 board to size). Measure out pieces to surround the frame and create the tray. Once all pieces are cut, use wood glue and brad nails to secure everything together. You can bolster the support of the tray by attaching L brackets where the base and backboard meet.
While you can certainly follow the bird feeder design from the video above, feel free to get creative with your own style. If you're not well versed with the saw, you could keep things super simple with just a backboard and a base piece that holds an attached dish at the bottom for the seed. On the other hand, if you're a woodworking wiz, you could create a more ornate frame and even custom wood bottle supports for a high-end look.
Secure the wine bottle to the frame with a system of screws
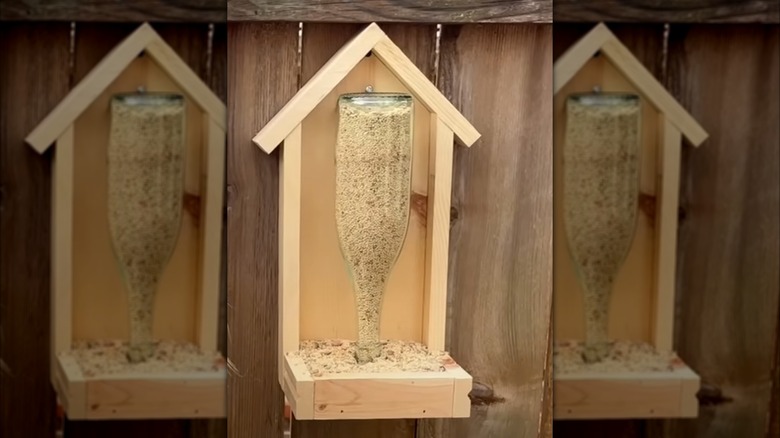
Once the frame is built, it's time to attach the wine bottle. In the video above, the bottle's supported by a series of screws that elevate and hold it in place. To fashion this support system, mark a circle where the neck of your upside-down bottle will sit in the tray. Install three screws, with the middle one screwed in directly on the circle so it sticks up about ¾ of an inch above the tray base. The outer two screws should be installed immediately next to the first, one inside the circle and the other outside, so they stick up about an inch. Zip-tie the screws together for extra support. Place the edge of the upside-down bottle on the lower middle screw, so the taller side screws brace the neck from either side. Add another screw at the other (bottom) end of the bottle to clip it snuggly in place. Then install two additional stabilizer screws about a ½ inch down from your top clip screw on either side to keep the bottle from sliding.
This screw system allows the bottle to be clipped in and out from the front for easy filling. However, if the process seems too complicated, you can always use hose clamps or sturdy wire fed through slits in the backboard. Again, woodworking pros could also create custom wood supports for the bottle.
Finally, add a hook at the top to hang the feeder or insert screws through the backboard for wall or fence mounting. Fill the bottle and tray with seeds to watch gravity work its magic. And, voila: With only a recycled wine bottle and 1-by-6 board, you've created a one-of-a-kind gravity bird feeder to attract feathered friends to your yard.