How To Install A Roof Vent With Existing Shingles
We may receive a commission on purchases made from links.
If you need one, it's a fairly easy job to add an extra vent on a roof with existing roof shingles. The caveat, of course, is that working on the roof is inherently dangerous, and it's important to follow all safety precautions. If you don't feel comfortable working on the roof, by all means call in a pro, as installing a roof vent is a simple procedure that shouldn't set you back more than a couple hundred dollars.
Although it isn't a difficult do-it-yourself job and it doesn't cost much to hire a roofer to do it if you're not up to the task, the importance of improving your roof ventilation by adding roof vents can't be overstated. An improperly ventilated roof can overheat in summer, which shortens the life of the shingles, and in winter, it can cause ice dams to form, which is also bad for the shingles and the roof in general.
Calculating the amount of venting your roof should have is a straightforward process; you won't need to hire a pro for that. If you do determine that you have insufficient roof ventilation, you have a choice of vents, and they all install in pretty much the same way. The installation process is most feasible for homeowners to DIY on a roof with wood or asphalt shingles; you should hire a roofing contractor to install vents on a metal roof or one with slate shingles or terra-cotta tiles.
Deciding Whether You Need Vents
Deciding Whether You Need Vents
The total area of venting your roof and attic need are a ratio of the attic floor space, but before you pull out your calculator, look for these visual clues:
- Deterioration of the shingles before their warranty period has expired: Shingles are generally guaranteed to last from 20 to 30 years — more for architectural shingles — and if they fail before that, it's usually because the roof overheats in the sun, typically because of poor ventilation. One sign of premature deterioration is excessive buildup of shingle granules in the gutters.
- Frequent ice dams in the winter: When the attic doesn't have enough ventilation, warm air from the house rises to the roof and warms the snow that has collected on it. The snow drips down to the eaves, and because that part of the roof is cooler, it refreezes to form ice dams and icicles.
- Mold in the attic: Another important function of venting is to maintain airflow in the attic so condensation doesn't form. If there isn't enough ventilation and condensation does form, it can collect in the attic insulation, clumping it and promoting mold growth. Mold and mildew give the attic a musty odor and discolor the insulation.
- Rotted wood and rusty metal: If the attic has been inadequately ventilated for long enough, the framing and underside of the roof decking can rot, and steel recessed lighting brackets and electrical boxes can rust.
Any of these visual indications should prompt you to calculate the amount of open venting space the attic has to determine if there's enough. The total venting area should be 1/300 the total floor space of the attic, and it should be equally divided between the intake vents in the soffits or eaves and the exhaust vents at or near the roof ridge. If the roof pitch is greater than 6/12, add 20 percent, and if it's greater than 11/12 — which is very steep — add 30 percent. This is because an attic with a steep roof has more air space.
Sizing Your Roof Vents
Sizing Your Roof Vents
Once you determine the roof needs more ventilation, you'll want a vent or combination of vents that provides the requisite net free area (NFA) of ventilation, assuming you already have enough soffit vents. Manufacturers specify the NFA on each vent, and this number is more accurate than you can determine by measuring the dimensions of the vent opening because it takes into account built-in obstructions, like louvers and grilles. The NFA of a low-profile ridge vent (if you have one) is usually 18 square inches per foot, so just measure the length of the ridge vent and multiply by 18 to get the total NFA.
NFA is typically displayed in square inches, while you'll measure the attic space in square feet. Rather than going through a conversion calculation, you can use a trick used by builders: Divide the square footage of the attic space (in square feet) by 4, and that number gives you the required exhaust venting area in square inches. It also gives you the required area of the soffit vents (which should be equal). The number is actually an overestimation. but a little extra venting area won't hurt as long as it's equally divided between the roof vents and the soffit vents.
Tip
If there is no vapor barrier between the attic floor and the living space and the separation of the roof vents and soffit vents is less than 3 feet, building codes require you to double the NFA of both the intake and exhaust vents.
Now that you know how much exhaust venting area your attic is supposed to have, determine the amount you already have by checking the NFA of each of the roof vents already installed and buy enough roof vents to make up the difference. To keep the system balanced, the intake area should be equal to or greater than the exhaust area, so if a roof vent provides more area than you actually need, you're better off choosing a slightly smaller one.
How to Install a Vent on Existing Shingles
How to Install a Vent on Existing Shingles
This procedure requires working on the roof, and some roofs are too steep to walk on safely. If the roof pitch is 7:12 or more, you should hire a professional with the required safety equipment. Similarly, consult a professional if you have a flat roof with a pitch less than 3:12 because you may need a special ventilation design. You can determine the pitch by taking measurements in the attic. It's the number of inches the slope rises for every 12 inches of horizontal distance.
1. Mark the Location
Go in the attic and choose a location for the vent as close to the roof ridge as possible, being sure to leave enough space for the vent flashing, which should go under a row of shingles and not the ridge cap. The opening should ideally be midway between a pair of rafters. Drive a roofing nail or drill a 1/4-inch hole through the center of the section you want to cut out and leave the nail or drill bit in place so you can see it from the other side of the roof.
2. Mark the Vent Outline
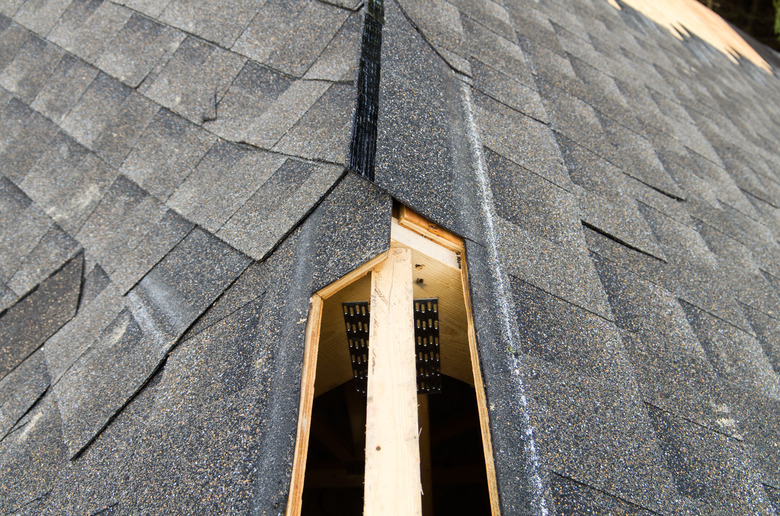
Set up an extension ladder and go on the roof. Find the nail or drill bit and mark the outline of the vent opening on the shingles around it using a grease pencil and a ruler. The outline should not include the vent flange, just the vent opening. Some builders like to remove the shingles before marking the outline, but you don't have to do so. A saw will cut right through roof shingles.
3. Cut Out the Vent Opening
Use a jigsaw or reciprocating saw to cut around the outline and then remove the cutout, shingles and all.
4. Loosen the Shingles Around the Vent Opening
Use a pry bar to loosen the shingles at the top of the vent opening and along the sides. Leave the shingles at the bottom edge in place because the vent flashing goes right over them. You want the shingles to be loose enough to allow you to pull them back and slide the vent flashing underneath them.
5. Prepare the Vent for Installation
Apply roof and flashing sealant to the underside of the vent flange on all sides with a caulk gun. You want to make a complete seal, so two or three beads of sealant are better than one.
6. Set the Vent in Position
Slide the top edge of the vent underneath the shingles. Pull back the shingles and underlayment on the sides so you can set the flange underneath them and onto the underlayment covering the roof decking. The flange on the bottom edge goes over the shingles and remains exposed.
7. Secure the Vent
Drive 1-inch roofing nails into the flange on all sides, spacing them by 2 to 3 inches. Replace the singles, re-nailing the ones that you pried loose. Put a dab of roof sealant on the nail heads on the bottom flange. Since they remain exposed, you need the sealant to prevent them from leaking.
Alternatives to Static Roof Vents
Alternatives to Static Roof Vents
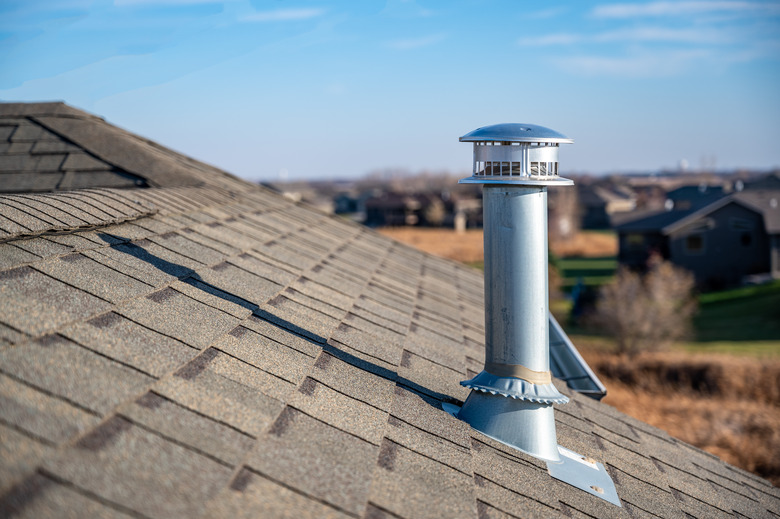
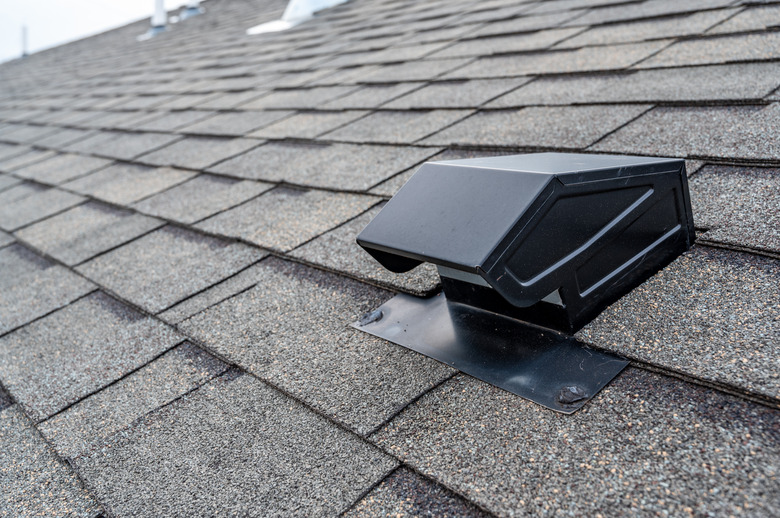
A square or round roof vent that consists of no more than a vent opening and a cover is known as a static roof vent. In an attic with a properly designed ventilation system, it exhausts hot air that comes in through the soffit vents and rises to the roof by convection. Two other types of static vents can also do this:
- Ridge vents straddle the roof ridge and are as long as necessary to get the proper venting area. To install one, you cut away the roof decking at the ridge, set the vent over the opening, and nail it in place. Some ridge vents are designed to remain uncovered, while others are covered with ridge cap shingles to make them low profile and virtually invisible from the ground.
- Gable vents go in the gable walls of the building as close to the ridge as possible. Gable vents are a bit more difficult to install than roof vents, and there is some controversy as to how effective they are. They can act as both intake and exhaust vents, but they work best as part of a balanced system with intake vents installed in the soffits.
Attics with low-pitch roofs sometimes need more ventilation than a passive system can deliver, and they benefit from the use of active ventilation. This can take the form of an attic fan, a vent with its own exhaust fan (sometimes powered by the sun), or a turbine vent, which creates an updraft when the wind is blowing. Installation of vents with built-in exhaust fans and turbine vents is similar to that for static vents, but the units are larger and heavier, so more care is needed when transporting them across the roof and securing them in place.