How To Hook Up A Sink For An Outdoor Kitchen
We may receive a commission on purchases made from links.
When summer rolls around and temperatures begin to soar, there's no better way to beat the heat than to do your cooking in an outdoor kitchen. Not only does it get you out of the heat of your indoor kitchen but it gets you closer to the pool, the patio, or the yard where family and guests are hanging out.
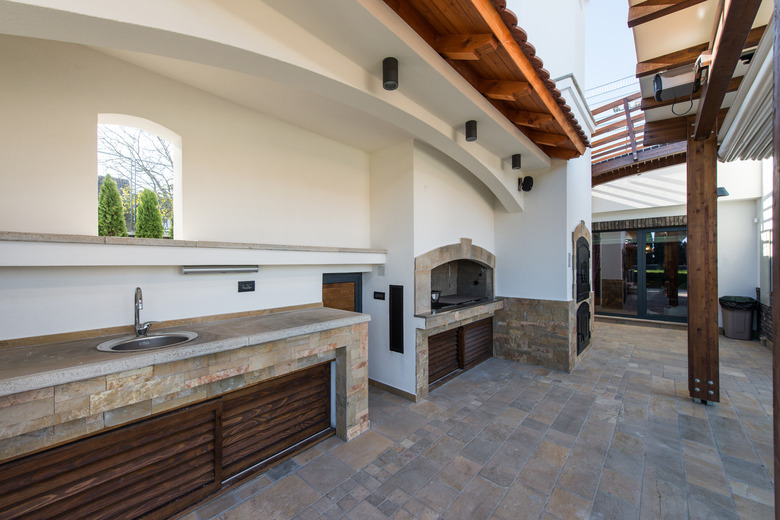
An outdoor kitchen can have many amenities, including a grill, a refrigerator with an ice maker, or even a pizza oven, but one thing it almost has to have is a sink, and a prerequisite for that is a base cabinet. Once you've installed the sink and faucet, you need to run water supply lines and figure out what to do with the water that drains. DIY homeowners can avoid problems only a plumber can solve by keeping things simple and skipping the garbage disposal.
Considerations for Outdoor Kitchen Sink Plumbing
Considerations for Outdoor Kitchen Sink Plumbing
Depending on where you live, the local building authorities may be very interested in how you build the kitchen and how you plumb the sink, and you may need a permit. It isn't a good idea to sidestep the permitting process for your project. Building inspectors probably won't show up to shut down your kitchen, but you could run into issues when you sell your house. The main area of concern will be how you handle the sink drainage, and unless the inspector insists that you tie the drain to the building's plumbing system, the dry well method is the most common strategy.
Also of importance is the type of pipe you use to supply water. PEX is easy to use and is less likely than copper or CPVC to burst in the winter if you forget to drain the pipes, but it has to be buried because UV sunlight degrades it. If your setup calls for above-ground pipes, you're stuck with copper or CPVC, and both materials need to be well insulated to resist freezing.
One more thing to consider is hot water. You can, of course, run two water supply pipes from the house — one for hot and one for cold water — but that will mean waiting for the water to turn hot (and wasting water) when you turn on the faucet. To avoid this, install an inexpensive on-demand water heater on the sink cabinet. If you choose a battery-powered propane unit as opposed to an electric natural gas one, you won't need to run an electrical cable or a gas line, and all you'll need for instant and unlimited hot water is a 5-gallon propane tank stationed near the sink cabinet or inside it.
Things Needed
How to Plumb an Outdoor Kitchen Sink
How to Plumb an Outdoor Kitchen Sink
In a nutshell, the procedure for plumbing an outdoor kitchen sink involves installing a faucet on the sink or countertop of the base cabinet, installing a drain on the sink, running water supply pipes to the faucet, and dealing with drainage.
1. Establish the Water Supply
If you go with a battery-powered, on-demand water heater, you only need one water supply line. You can tie it to a 1/2-inch supply line in the house by installing a 1/2-inch copper tee and an adapter for the type of pipe you're using, but if you have a nearby outdoor hose bib, that may be a more convenient source. It's easy to screw a multiport outlet onto the hose bib and add a 3/4-inch hose thread to 1/2-inch threaded adapter to which you can screw an adapter for the type of pipe you're using. This is a temporary setup that can be easily disconnected when temperatures turn cold.
If you want a more permanent connection, you can install a tee in the water line somewhere before the hose bib. If the hose bib is located on the side of the house, it's best to install the tee inside the wall, where it will stay warm in the winter. If you choose a spigot in the yard, dig down to expose the horizontal pipe running from the house and install the tee there so it will be protected from the cold when you bury it.
2. Run the Supply Line
If you plan to bury the supply line, make your life easier and use PEX, which is flexible enough to bend around gentle curves without extra fittings. Otherwise, run copper or CPVC above ground using a CPVC-to-copper adapter if necessary. Wrap pipe insulation around exposed portions of copper or CPVC pipe to prevent winter freezing. Terminate the supply line inside the sink cabinet, install a 1/2-inch shutoff ball valve, and then add a tee so you can branch the line into hot and cold. Most faucets need two shutoff valves, but with this method, you only need one.
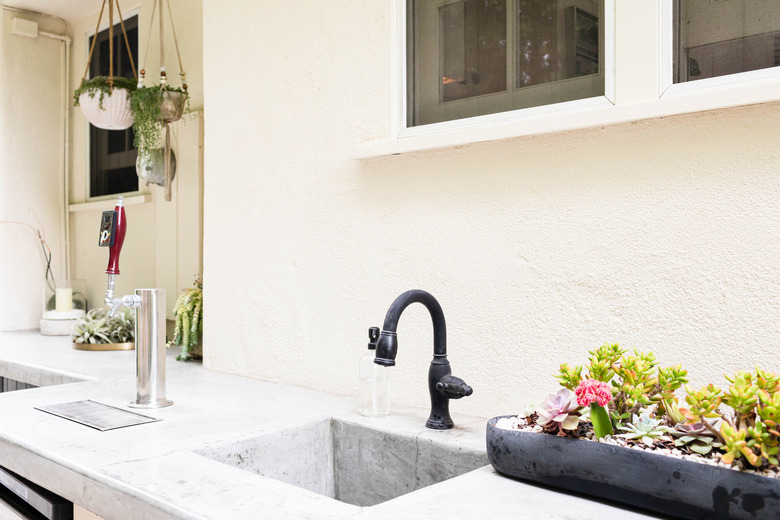
3. Connect the Faucet
Install an on-demand water heater to the back of the sink cabinet, run pipe from one of the tee outlets, and connect it to the water heater inlet port. Run a braided stainless steel flexible supply hose long enough to reach back to the faucet hot water inlet from the water heater outlet port. You'll need to drill two holes in the cabinet to do this using a drill and a 1-inch hole saw. Connect the cold water inlet on the faucet directly to the tee using an appropriate adapter. It's a good idea to purchase a stainless steel faucet. It lasts longer in outdoor living spaces than other types.
4. Install the Sink Drain Assembly
Separate the drain assembly and pack the underside of the strainer flange with plumbers' putty. Insert the tailpiece through the drain opening and push down on the strainer to compress the putty. Slip the rubber gasket over the strainer threads from under the sink, screw on the lock nut, and tighten it with slip-joint pliers. Clean up excess putty from the bottom of the sink with a putty knife.
5. Run the Drain Line
Because the sink is for outdoor use and is not connected to the sewer, it doesn't need a P-trap, and it's better to omit it anyway because water in the trap will freeze in the winter. Instead, run a more or less straight length of 1 1/2-inch PVC pipe from the drain tailpiece to a place on the ground where you can dig a drain.
6. Dig a Dry Well
Choose a place in the yard at least 10 feet from the sink for the dry well. Using a shovel, dig an 18-inch or deeper trench from the drain termination to the well location, ensuring it slopes at least 1/4 inch per foot toward the well. Fill the bottom of the trench with about 1 inch of 1/2-inch drain rock, lay a length of 3-inch perforated drain pipe, top it off with landscape fabric and another inch of drain rock, and cover the trench with topsoil.
At the other end of the trench, dig a hole deep and wide enough to accommodate a 5-gallon bucket. Drill a series of drainage holes in the bucket, drop it into the hole, and fill it with drain rock. It should be deep enough to allow the lip of the bucket to sit deeper than the trench. After placing the bucket, fill in the well with topsoil.