How To Install A Surface-Mount Medicine Cabinet
We may receive a commission on purchases made from links.
A surface-mount medicine cabinet installation is an easy task to DIY and a quick way to add more storage space to any bathroom. Installation of this kind of cabinet is a simple, straightforward process that you can complete in less than an hour with a few tools and one helper.
By doing this project yourself, you'll potentially save hundreds of dollars. According to Homewyse, basic labor for medicine cabinet installation ranges from $184 to $599, and, of course, completing the labor yourself is free (minus any tools you may have to procure for the task).
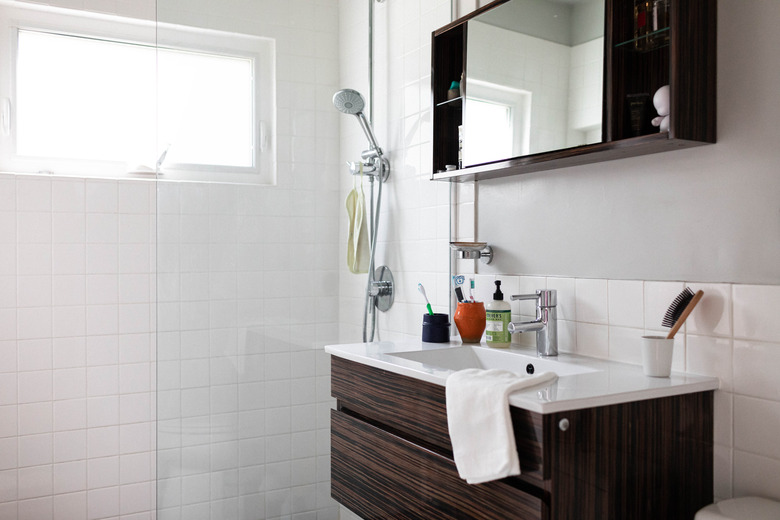
Choose a Spot for your Cabinet
Choose a Spot for your Cabinet
Decide where the cabinet will go. Generally, medicine cabinets are mounted above the bathroom sink. However, you'll still need to choose how high the cabinet should be. In most designs, the cabinet door swings outward, so make sure it has plenty of clearance.
Most surface-mount medicine cabinet designs are 18 to 72 inches wide and come in various heights and depths. Choose your medicine cabinet carefully to fit the space you have. Think about where you will stand in front of it because the cabinet and everything in it must be within reach.
Typically, medicine cabinets are mounted so their top edge is around 72 inches above the floor. You want to be able to see your full face in the mirror as you stand before it, but you still want clearance between the cabinet and the bathroom sink.
Things Needed
-
Medicine cabinet
-
Painters' tape
-
(4+) toggle bolts (optional)
-
(4+) 1/2-inch drywall screws (optional)
-
Stud finder tool
-
Pencil
-
Level
-
Power drill
-
Screwdriver (optional)
 Stephen Paul for Hunker
How to Install a Surface-Mount Medicine Cabinet
1. Find the Support
Line up the cabinet with wall studs so it can be mounted directly to them when possible. The wall where a surface-mount medicine cabinet hangs must be capable of supporting a lot of weight. Most wall studs are placed about 16 inches apart. Find studs using a stud finder tool and mark both side edges of each stud with a pencil because you want to anchor into its center for the strongest connection.
2. Mark the Spot
Tape the door of the medicine cabinet closed with painters' tape or remove the door while you work. Get at least one helper to assist in the installation of a surface-mount medicine cabinet. Have the helper hold the cabinet up to the wall so it's exactly where you want it. Use a level to ensure it's straight.
Use a pencil to mark on the wall around the cabinet, drawing lines for the top, bottom and sides of the cabinet. Set the cabinet aside.
3. Use Toggle Bolts
If the spot where your surface-mount medicine cabinet will be hung isn't lined up with wall studs, drill toggle bolts into the wall. Toggle bolts are designed to support a lot of weight. Use a minimum of four toggle bolts for installation, one for each corner.
- Mark a small X on the wall with painters' tape where you plan to place your toggle bolts if you have plaster walls. This keeps plaster walls from cracking during drilling. Place the bolt at the center of the X. Otherwise, use a pencil to mark the spot where you will drill your holes. The holes in the wall must line up with the holes in the back of the medicine cabinet.
- Attach a bit
to your power drill that's slightly larger than the butterfly of the toggle bolt and drill a hole through the tape (if present) and the wall beneath it. - Pull the bit straight out of the wall and remove the tape. Push the bolt sleeve through the hole in the cabinet and into the wall until you feel the butterfly open on the other side of the wall.
- Drill through the holes in the back of the medicine cabinet using the same drill bit to make the holes large enough for the toggle bolts.
- Place the fastener (which comes included) onto the toggle bolt.
- Have your helper hold the cabinet up to the wall again, lining it up precisely where you want it placed. Line up the holes in the wall with the holes in the back of the cabinet.
- Tighten the bolts with your fingers first and then use a screwdriver to tighten them securely. Don't overtighten or you could crack the wall or the cabinet during this installation process. Some surface-mount medicine cabinet designs have more than four mounting holes. You do not have to use toggle bolts for every one of these holes, but you do need to have at least one bolt in each corner.
4. Install onto Studs
Take out the hardware that came with your medicine cabinet (typically, small drywall screws) and match it up with a drill bit of the same size. Be careful when choosing a bit, as you don't want your drill holes to be any bigger than the screws. If the holes are larger than the screws, the cabinet will be wobbly and could fall.
- Have your helper hold up the cabinet to the wall again. Check the top, bottom and sides with the level to be sure the cabinet is perfectly straight.
- Using a power drill drill in a screw everywhere there's a hole in the cabinet that lines up with a stud. Drill the screw until the head is flush with the back surface of the cabinet. Not every medicine cabinet comes with drywall screws or even with installation holes already drilled. In this case, use cabinet screws. These are 1/2-inch drywall screws specifically designed for cabinets.
- Drill your own installation holes in the back of the medicine cabinet if needed, using a 1/8-inch drill bit. Drill a hole in each corner of the cabinet and then drill the cabinet screws through the cabinet and into the wall to mount.
References
- Homewyse: Cost to Install a Bathroom Medicine Cabinet
- Pure Bathrooms: Easy DIY: How To Install a Medicine Cabinet
- Wayfair: How to Install a Medicine Cabinet
- Home Depot: Glacier Bay 23-1/8 in. W x 27-7/8 in. H Framed Surface-Mount Bathroom Medicine Cabinet in White
- Home Depot: How to Install a Medicine Cabinet
- Home Depot: Glacier Bay Use and Care Guide – Bath Storage Cabinet
- Wayfair: Taryn 20" x 24" Surface Mount Framed 1 Door Medicine Cabinet with 1 Adjustable Shelf