Removing A Bathroom Vanity: A How-To Guide
If you're doing a bathroom remodel, you may want to install a new bathroom vanity as part of the project. Your existing vanity, with its old vanity countertop that has turned dull and uninteresting, probably won't fit well with your updated décor scheme. Because installing a bathroom vanity is a relatively easy DIY home improvement project, the only reason to keep your old one is to save money—and luckily bathroom vanities aren't that expensive, so it won't be too costly to replace it.
Before you install a new sink or a new vanity, you first have to remove your old bathroom vanity. The job may look daunting because many vanities look like they are integral parts of the wall, but as Willow Lane Cabinetry advises, the job only involves six steps and is a simple DIY project.
Special Circumstances You Might Encounter
Special Circumstances You Might Encounter
Most bathroom vanities, no matter how integrated with the wall they might appear, are actually separate, and part of the removal procedure involves breaking the seal between the countertop and the wall that makes them appear attached. The seal is usually formed by caulk that you can cut with a knife, but if the countertop and wall or backsplash are both tiled, you may have to separate the cabinet at the point at which the countertop stops and the wall or backsplash begins. The best way to do this is to cut all the way through the grout line at the transition point with a rotary tool and a grinder attachment.
Some of the plumbing for an old vanity may be rusted, and you could have a hard time shutting off the water or disconnecting the faucet hoses. Spray lubricant is your friend in such circumstances, but if the shut-off valves are that old and corroded, you're probably going to want to replace them before you install another vanity. Be sure to remove the vanity before you try to replace the valves, because the job will be much easier, and you'll end up paying less if you have to call a plumber.
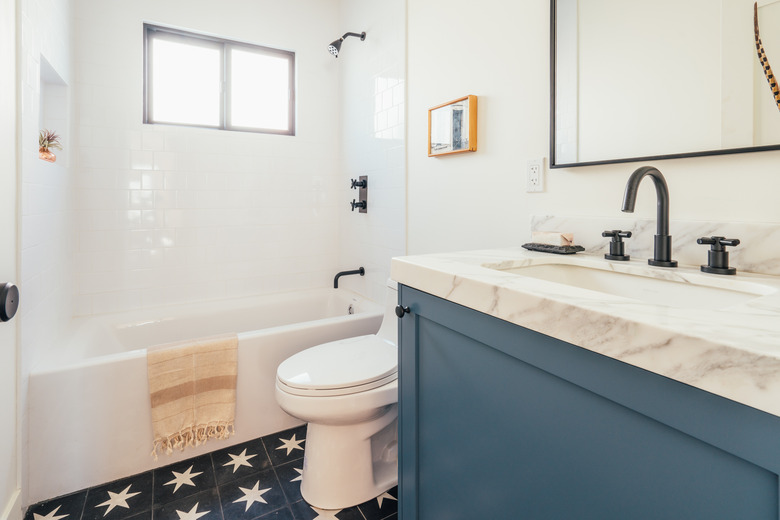
 Hunker in partnership with Acme Real Estate
If the bathroom vanity was sitting on the subfloor and the floor covering was installed around it, removing the vanity is going to leave a footprint. That's no problem if you're going to install a new cabinet with the same or a larger footprint in the same place, but it's something to address if you're installing a vanity with a smaller footprint, changing the location of the vanity or replacing the vanity with a pedestal sink or wall-hung lavatory. Unless the floor is tiled, the best strategy is to install new floor covering in the bathroom, so be prepared for that extra expense.
Things Needed
-
Tongue-and-groove pliers
-
Bucket
-
Adjustable wrench
-
Utility knife
-
Screwdriver
-
Putty knife
-
Hammer
-
Pry bar
-
Drill
-
Screwdriver bit
How to Remove a Bathroom Vanity
1. Prepare the Cabinet
Removing the drawers is a common-sense step that's easy to forget if you're in a hurry or if the bathroom vanity isn't very big. Don't forget to clear out the vanity cabinet. You should also remove the doors because that will give you more room to work inside the cabinet.
2. Disconnect the Pop-Up Stopper
Look at the vertical pipe coming down from the bottom of the sink. That's the drain tailpiece, and on the back you'll find the lever that controls the pop-up stopper. To disconnect this lever from the perforated piece of metal that connects to the stopper lift rod (which is called the clevis), grasp the metal clamp on the lever, squeeze it and slide it toward the end of the lever and off. It's not necessary to remove the clevis from the lift rod or the stopper lever from the tailpiece.
3. Remove the Drain P-Trap
The P-trap is the curved pipe attached to the end of the tailpiece. Loosen the nut holding the mouth of the trap to the tailpiece—which you can usually do by hand, but you may need tongue-and-groove pliers—slide the trap down and swivel it away. Loosen the nut on the other end of the trap, which connects it to the drain inlet in the wall, and pull the trap toward you to free it. Be careful because it's full of water. Dump the water in a bucket or take the trap outside to empty it.
4. Disconnect the Faucet
Turn off the water supply shut-off valves and open the faucet to release pressure in the water supply lines. Loosen the compression nuts on the shut-off valves with pliers or an adjustable wrench and remove the water supply lines. If you want, you can also remove the water supply lines from the faucet at this time, and you can even remove the faucet and sink, but these jobs are typically easier to do after you remove the vanity top.
5. Cut the Caulking Around the Vanity Top and Cabinet
Use a sharp utility knife to slice through the caulk sealing the countertop backsplash and cabinet to the wall. Do this carefully if you want to minimize drywall repairs after you've finished removing the bathroom vanity.
6. Remove the Vanity Top
The top may be held to the cabinet with screws, and you'll probably have to reach into the drawer cavities with a screwdriver to remove some of them. If you can't find screws or any other type of fasteners, the top is probably glued to the cabinet with caulking or some other sealant, and it may be glued even if there are screws.
Break the sealant bond by tapping a putty knife between the countertop and the cabinet frame using a hammer. After working your way around the cabinet, use a pry bar to pry the top up and then lift it off with a helper. Turn it over and lay it face down on the cabinet with the faucet hanging over the edge so you can remove the sink and faucet if you haven't done that already.
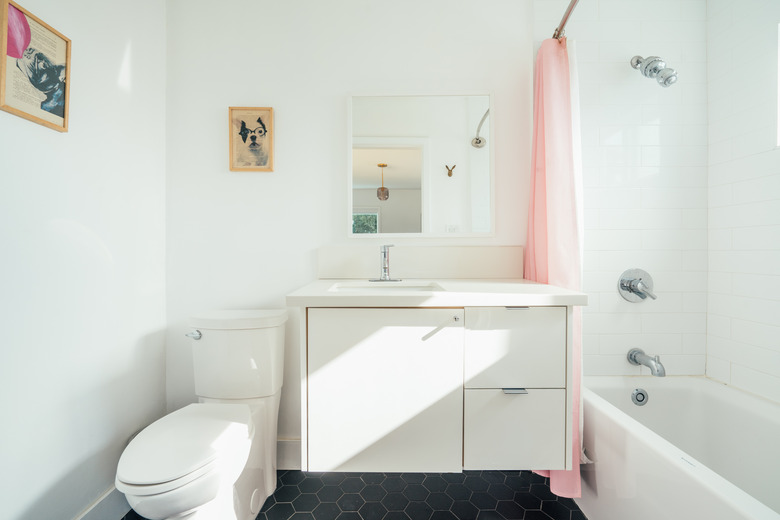
 Stephen Paul for Hunker
7. Unscrew the Vanity and Remove It
Locate the screws holding the cabinet to the wall and back them out using a drill and a screwdriver bit. Once the vanity cabinet is free, get someone to help you lift it away from the wall. Pick up any leveling shims you find on the floor and the job is done.
What to Do With the Bathroom Vanity After Removal
What to Do With the Bathroom Vanity After Removal
If you intend to use the vanity in another spot, you can always just set it aside and transport it when you're ready. If you're planning to put it in storage or dump it, you might want to disassemble it first, but that could be challenging if it's glued together.
To check for glue, remove the screws holding the front of the vanity to one of the sides and see if the joint separates on its own. If it does, disassembling the bathroom vanity into its component parts saves you storage space and makes it easier to put in your vehicle for disposal. If the joints are glued and you don't want to save the vanity, you can always knock it apart with a mallet after removing all the screws.
When you take your old vanity to the dump, be sure to ask how to properly dispose of it. If it isn't made of wood, they'll probably instruct you to put it in the landfill rather than in the recycled wood pile. If you really want to recycle it, it's best to leave the vanity assembled and sell it or donate it — sink, faucet and all — to a charity, such as a Habitat for Humanity ReStore outlet.