Bar Faucets: What You Need To Know

All kitchens contain at least one main sink and kitchen faucet, but many homeowners today are expanding and installing a secondary sink with a bar faucet (or bar/prep faucet) in their kitchens. The extra sink does not work in every kitchen, especially small ones, but people who have a bar sink and faucet often wonder how they ever got along without them.
Bar Faucet Uses
Bar Faucet Uses
A prep or bar faucet and the sink that goes with it usually serve as a workstation, especially if more than one person is cooking in the kitchen at the same time. It improves the functionality of the room because it allows for two sink-related tasks to happen simultaneously. For example, while one person may be washing pots at the large main sink, another can use the bar faucet to prep vegetables. If it is installed on an island, the island becomes a more useful work space.
A well-positioned bar faucet and sink can help correct an inefficient kitchen layout. Most kitchen activity happens between the kitchen sink and the cooktop or range. A large primary sink placed on the opposite side of the room from the cooking zone means too many steps between fixtures. Installing a secondary faucet and sink near the cooktop makes the cooking and meal prep area more compact and efficient.
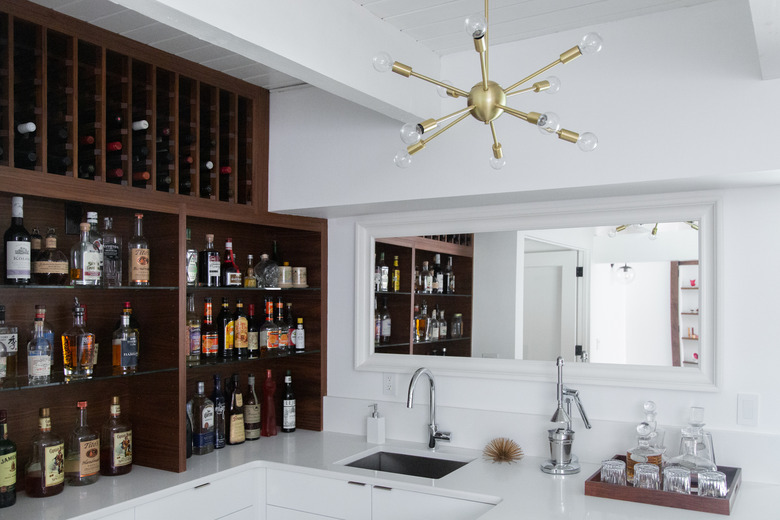
When placed at the end of a run of countertop or the end of an island, the bar faucet can be part of a beverage center. When accompanied by an under-counter beverage refrigerator and the appropriate glassware, the faucet becomes the center of a drinks station when entertaining. By being in a relatively out-of-the-way location, it can help direct traffic away from the main work centers of the kitchen, especially if someone just wants a drink of water or to wash off an apple.
Bar Faucets vs. Main Kitchen Faucets
Bar Faucets vs. Main Kitchen Faucets
Because the sinks are smaller, bar/prep faucets tend to be smaller versions of faucets you would find on the main kitchen sink. Manufacturers recognize the popularity of secondary faucets and offer bar faucets that match some of the products they sell for main sinks. That means you can find the bar faucet that will complement any kitchen style, from contemporary to transitional to traditional.
While bar faucets are smaller, they are in proportion to the sinks with which they are installed. A quick nonscientific survey of some available products shows that the spout of a standard single-handle, pull-down bar faucet is about 16 inches high. That is the distance from the sink deck to the top of the spout's arc. The same faucet in the prep sink model is a little over 14 inches high. There's not a big difference.
The difference is more pronounced in two-handle bar faucets. Prep sink faucets typically have 4-inch installation requirements, meaning the hot and cold water valves are 4 inches apart. The sink holes must have the same spacing (and this happens to the typical spacing for bathroom faucets). By contrast, valves for the same model faucet for a main kitchen sink may be 8 inches apart.
 Nicole Mason
Bar Faucet Characteristics
Bar Faucet Characteristics
Bar prep faucets come in single-handle and two-handle traditional models. They are also available with pull-out or pull-down spray spouts. These feature a spray head attached to a hose that is inside the spout of the faucet. To use them, you either pull the spray head out toward you or down into the kitchen sink. From there, you can move it anywhere you want the spray of water. Spray heads have fingertip controls that let you change the flow of water.
Some bar faucets operate by touchless controls where sensors in the spout react to touch to control the flow of water. Some models have sensors in the spout and the base of the faucet that react to motion in front of the faucet.
One of the latest advances is voice activation. The bar faucet responds to your voice to control the flow of water. You can start or stop the flow, or you can tell the faucet to dispense a specific amount of water. Most touchless and voice-activated bar faucets have lights that indicate water temperature as a safety measure.
In addition to choosing a faucet style, you will have to match the faucet to the kitchen sink. As with the main sink, prep sinks come in drop-in types, where a hole is cut into the countertop and the sink is dropped into place. The rim of a drop-in sink rests on the countertop. With this type, you will need to match the faucet requirements with the holes cut into the sink rim.
The alternative is an undermount installation, where the sink basin is installed under the counter. This provides a clean look because there is no rim on the counter. The faucet is usually installed into one or more holes cut into the countertop, a job best left to a professional countertop fabricator. Many people simply match the prep sink style to the main kitchen sink to tie the room's design together.
When matching the bar faucet to the sink, consider how far the spout reaches over the sink. Some prep sinks are small, and some bar faucets have long spouts. Choose a spout that lands over the center of the sink. A round prep sink may look out of proportion when paired with a faucet that has a very long spout.
Choosing a Bar Faucet
Choosing a Bar Faucet
Solid brass and stainless steel bar faucets are the most durable and trouble-free. Stainless steel faucets are becoming more popular because they are completely lead-free. Some faucets contain plastic and zinc alloy components. These products are usually less expensive, but they won't last as long as brass or stainless steel products.
Old-time compression valves that used rubber washers to prevent leaks have given way to cartridge-style mixing valves. They are more reliable, and some are easy to repair. The most reliable models use ceramic disks to regulate the water flow.
The finish on the faucet is a matter of personal taste and is what works with the rest of the room. Most people pick the same finish for the bar faucet and the main faucet. Many people like to match the faucet finish with the cabinet hardware.
There's a lot from which to choose in kitchen faucet finishes. There are the traditional polished chrome and brass finishes in high gloss as well as brushed versions that have a matte appearance. Both are tough, long-lasting finishes. Bronze or nickel finishes can provide a number of looks. Some finishes do a better job of hiding fingerprints and water spots than others.
If possible, try to actually handle the kitchen faucets before buying one. Touching the materials and using the controls can help you judge quality, and it can prevent you from buying a model that just doesn't feel right. Also remember to consider the needs and capabilities of everyone who will be using the bar faucet. People with limited mobility find large levers easier to operate than small handles or knobs.
You can expect to pay anywhere from $100 to close to $950 and up for a bar faucet. Those in the mid- and upper-price ranges often have long-lasting, trouble-free components, such as ceramic disk valves. They also have extras like touchless controls and pull-down spouts.
Bar Faucet Installation
Bar Faucet Installation
The steps needed to install a bar/prep faucet are much the same as a main kitchen faucet, and manufacturers try to make their faucets easy to install. Unless there is a problem with the plumbing, there is no soldering involved.
A professional installation will cost about $200 to $400. Sink installation and correcting any plumbing problems, such as replacing shutoff valves that don't work, will increase the fee. Shutoff valves are located under the sink. When they don't work or they are missing, you usually have to turn off the water where it enters the house to make repairs.
Installing a secondary sink and bar faucet is usually part of a large kitchen remodel. In large projects that involve removing walls and flooring, it is easier to make changes to the plumbing, and a prep sink faucet will require running water lines and drain lines to the new sink. For houses built on slabs, the water and drain lines may need to be installed in trenches cut into the concrete.
Sinks for bar faucets are smaller than main kitchen sinks and are usually about 15 to 20 inches long, so the space under the sink can be more cramped than under a normal-size sink. They also have either a single hole, two or three holes for the faucet, and very few of them have extra spaces for soap dispensers or hot water dispensers. Most have the faucet holes on the back rim, but some have the holes offset in the corner of the sink.
Some general guidelines for new faucet installations include:
- When replacing an existing kitchen faucet, install new supply lines. Braided lines are durable and can help prevent leaks.
- Flush the line before connecting the supply lines to the kitchen faucet. Connect one end of the supply line to the shutoff valve, and with a bucket handy, turn on the valve for a few seconds. This is especially important if new water lines were run to the faucet.
- Use two wrenches to attach the supply lines to the faucet shanks — one to tighten the supply line nut and the other to hold the shank in place. This will prevent twisting the faucet's copper tubes.
- Pull-out and pull-down faucets have long hoses, so there must be unobstructed space in the cabinet so that the hoses don't become tangled.
 Peter Schweitzer
Maintaining a Bar Faucet
Maintaining a Bar Faucet
Bar faucets are made by the same manufacturers as full-size kitchen faucets. Follow the company's directions for cleaning and spot removal. Doing something not recommended by the company will void the faucet's warranty. Some manufacturers produce cleaning products designed for their faucets. There are also third-party faucet-cleaning products.
In general, cleaning with mild soap and warm water can handle everyday use. Avoid harsh detergents, those that contain ammonia or bleach and any material that can scratch the finish. To prevent water spots on some finishes, dry the faucets with a soft cloth. Some finishes benefit from a light coating of wax, such as car wax, but check with the manufacturer first. Wax can change the color of the faucet slightly. It's also not likely to be a food-grade material, so you might not want it rubbing off the faucet onto your hands when you're prepping food.
Calcium deposits caused by hard water can be treated with a 50/50 solution of white vinegar and water. Stubborn deposits, especially those that develop around the base of the faucet, can be soaked in the solution. Wet a cloth with the solution and apply it to the faucet for about one hour. When the deposits are removed, rinse with clean water and dry with a soft cloth.