How To Install Plywood Underlayment
Most flooring materials can't be laid directly on the subfloor and should instead be installed on an underlayment that separates it from the subfloor. One of the most commonly used varieties is plywood underlayment, which can be used under an array of flooring materials such as laminate, vinyl, carpeting, hardwood and linoleum — but because plywood expands and contracts based on the weather, it is not advised for flooring materials that need to be mortared directly to the underlayment, such as ceramic tile. As far as DIY projects go, it's fairly simple to install plywood underlayment on a wooden subfloor.
Why Install Underlayment?
Why Install Underlayment?
All types of flooring require different underlayment, which may provide a moisture barrier, soundproofing, stability and more. When installing laminate flooring or other thin flooring materials like vinyl or linoleum, the most important thing is that the floor is laid on a uniformly smooth surface, which is why plywood underlayment is a popular option. While you can install these types of flooring materials directly on an oriented strandboard or plywood subfloor, if yours is not in perfect condition, it is often best to simply install underlayment made from 1/4-inch-thick plywood.
When buying plywood underlayment, it's important to recognize that you can't use just any piece of plywood from a home-improvement store, as it is critical that the panels are smooth and dent-resistant enough to use for underlayment. Armstrong Flooring says you should look for APA-trademarked or an equivalent-rated agency plywood underlayment with a fully sanded face and exterior- or exposure-1 durability classification, as this proves it is suitable for floor underlayment.
A Note About Underlayment Fasteners
A Note About Underlayment Fasteners
Before moving on to the underlayment-installation process, you need to ensure you have the right fastener for the job. While staples are the quickest and easiest fastening option, it is best to use ring-shank and spiral-shank nails for installing plywood subfloors, as they feature grooves that resist withdrawal and increase friction. These nails have been proven to have twice the holding ability of smooth-shank staples and nails.
 JulNichols/iStock/GettyImages
Patriot Timber further suggests that nails for installing underlayment should always have a 3/16-inch-diameter head and be a minimum of 5/8 inch but never be so long that they penetrate all the way through the bottom of the subfloor. Never use nails that are uncoated or coated in rosin or cement, as these can rust and stain your floor.
As for tools, Patriot Timber recommends using a pneumatic fastener tool that has an adjustable-depth drive so you do not nail through the subfloor. If this is not possible, adjust the air pressure of your tool to ensure it shoots nails at the right depth. Confirm the proper depth setting by shooting a few nails through a scrap of plywood before continuing with the underlayment installation.
Things Needed
-
Self-leveling compound
-
Sandpaper
-
Nails
-
Seam filler
-
Broom
-
Vacuum
-
Plywood underlayment panels (use 4-x-4-foot panels for small areas and 4-x-8-foot panels for larger rooms)
-
Tape measure
-
Circular saw
-
Jigsaw
-
Pneumatic nailing tool
-
Belt or floor sander
How to Install Plywood Underlayment
How to Install Plywood Underlayment
After buying your plywood underlayment, be sure to allow it to acclimate in your home's temperature and humidity levels by storing it in the room where it will be installed for two days beforehand. Store the panels on their long edges without stacking them to let air flow over both sides.
1. Prepare Your Installation Area
Remove baseboard trim from around the edges of the walls and then remove your existing finish flooring until you get down to the wood subfloor. Sweep and vacuum the subfloor and then look for any uneven areas. Use a self-leveling compound to even out any dents or dips and sand any raised edges. Then, sweep and vacuum the floor again. Ensure the subfloor is dry before proceeding.
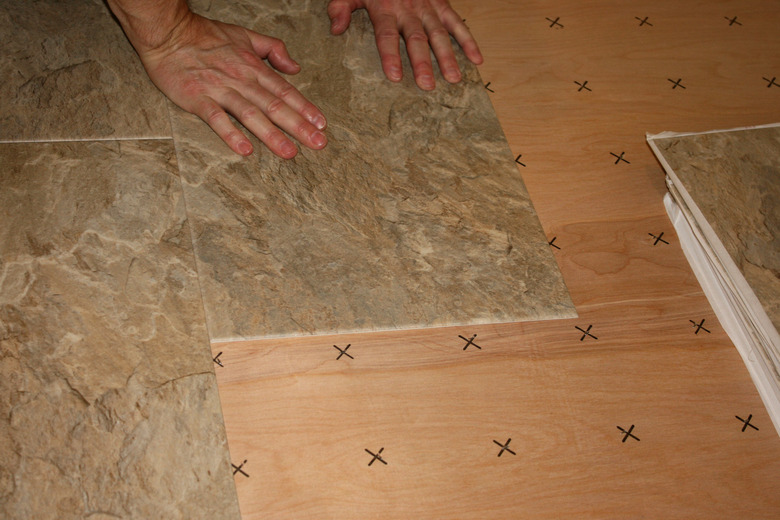
2. Position the Underlayment Panels
Lay your panels perpendicular to the floor joists starting with the first sheet, which should be placed in a corner of the room where you can hopefully lay the panel flat without having to cut it. If your panel features a fastener pattern, like those sold by Patriot Timber, lay the panel with this side up; otherwise, leave the smooth side up. Space the panels between 1/8 and 1/4 of an inch away from the wall. Gently set each panel next to the previous one so they are lightly touching but there is no pressure pushing them together.
 Jacqueline Marque
Cut the end panels as needed so the seams are at least 2 inches from the seams of the subfloor. Lay your second row of panels so they are offset a half panel from the first row, similar to bricks, so no ends line up from row to row. Use a circular saw or table saw to cut straight edges, or use a jigsaw to make curved cuts to to cut around obstacles such as pipes or toilets.
Arrange all panels on the floor before fastening them. Do not use glue or an adhesive strip to stick panels to the subfloor.
3. Fasten the Panels
While fastening panels, sit on the panel you are securing to ensure full contact with the subfloor. Starting with a panel in the corner of the room, nail down the longest side 1/2 inch from the edge, adding more nails every 2 inches. Then, nail the other side of the panel, also going in a line 1/2 inch from the edge, nailing every 2 inches. All nails should be countersunk just below the surface of the underlayment but not too deeply.
Measure a straight line from one corner of the panel to the next and then nail every 4 inches down the line. Draw diagonal lines parallel to this line 4 inches apart and then add more nails every 4 inches along these lines. If you have underlayment with a premarked fastener pattern, make sure to put a nail in each "X." Finally, nail along the last two sides 1/2 inch from each edge, nailing every 2 inches.
Repeat this process for all panels, moving row to row as you go.
4. Use Seam Filler
While you should use seam filler to cover nail heads that are countersunk below the surface of the underlayment, many professionals advise against using seam filler between seams because the hard filling material does not allow the boards to contract and expand naturally. Additionally, adding too much filler or failing to fully sand the seam filler can result in bumps along the seams that can cause unsightly defects in your finish flooring.
If your flooring or underlayment manufacturer recommends using seam filler, do not lay the underlayment panels flush with one another. Instead, leave a 5/16-inch gap (about the width of a nickel's edge) between the panels and then fasten.
Once the panels are fully fastened, use seam filler to fill holes above nail heads and in gaps between boards (as applicable), following the manufacturer's instructions. Allow it to cure according to the instructions and then sand the filler with a belt or floor sander until the floor is sufficiently smoothed and flush. Do not over sand.
5. Install Your Finish Flooring
Fully sweep and vacuum the area and then move on to the installation of your flooring material. It is best to do this as soon as possible to avoid dents or other damage to the underlayment that may result in a less-than-perfect appearance in your finish floor.
References
- APA – The Engineered Wood Association: Proper Handling and Installation of APA Plywood Underlayment
- Home Flooring Pros: Find the Best Underlayment for Each Type of Flooring
- Patriot Timber: SurePly ® Plywood Underlayment Installation Instructions
- Patriot Timber: Choosing the Proper Fasteners for Installing Plywood Underlayment