How To Remove Tile Floor

The bad news about removing an old tile floor? It is one of the most tedious, time-consuming and dusty DIY home improvement projects one can undertake. The good news is that it's not complicated to remove tile. With the right tools and a little elbow grease, even the most inexperienced handyperson can tackle the job and save a ton of money in the process.
Before you make that first hammer swing on demolition day, though, take heed of an important safety warning, especially for novice tile removers: Broken ceramic tile shards are the equivalent of broken glass. They are extremely sharp, and through the process of removing them, tile pieces not only can cut you when you pick them up but they may also fly through the air and potentially cut you or injure your eyes if you aren't properly protected. In addition to long sleeves and pants, safety goggles and a dust mask as well as leather construction gloves are essential for this project. It's also best to keep kids and pets safely away.
Things Needed
-
Plastic sheets
-
Painters' tape
-
Contractor-grade garbage bags
-
Adhesive stripper
-
Long sleeves and pants
-
Heavy-duty work gloves (preferably leather)
-
Closed-toe shoes
-
Knee pads
-
Safety goggles
-
Dust mask
-
Hammer or sledgehammer
-
Cold chisel
-
Pry bar
-
Chipping hammer
-
Floor scraper
-
Shovel
-
Rolling garbage can or wheelbarrow
-
Putty knife or paint scraper
-
Sander
-
Shop vac with
HEPA filter
How to Remove Tile Floor
1. Prepare the Room
There is no way around it. Removing a tile floor is dusty project, says Justin Krzyston, principal at Stonehurst Group, a design studio located in Studio City, California. Due to the mess made by removing a tile floor, it's crucial to take measures to protect everything in the room that you can't remove.
- Remove all decorative items, furniture and anything inside cabinets.
- Remove all baseboards and door trim, labeling the backs with their location if you plan to reattach them.
- Secure plastic sheets on the walls and doorways with painters' tape to seal the room and contain as much of the dust as possible. Make sure to cover all heating registers and grates. This will prevent dust from getting pulled from the demo room into other parts of the house.
- Dress the part. Don long sleeves and pants, heavy-duty work gloves, closed-toe shoes and knee pads. Make sure to put on safety goggles and a dust mask.
 Jens_Lambert_Photography/iStock/GettyImages
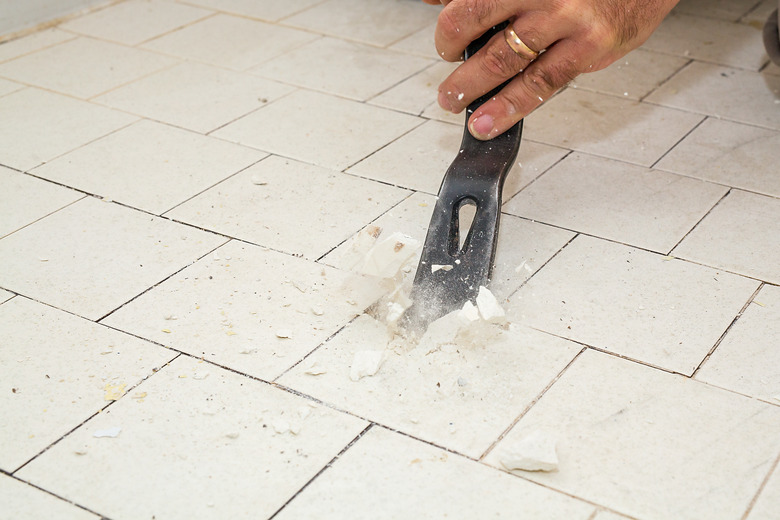
2. Break the First Tile With a Hammer
If you are curious about whether that old tile floor is hiding a gem of a wood floor, you'll need to be cautious with your tile removal. Krzyston says it is possible to save it if you are careful.
- Look for a floor tile that has cracked or chipped or locate a tile where the grout lines are broken. If you can't find any, choose a floor tile in the middle of the room.
- Hit the tile at a slight angle with a sledgehammer or regular hammer until it breaks.
- If the tile doesn't come up easily, break and dig out the grout and surrounding grout lines with a cold chisel to help loosen the tile.
- With the chisel, remove the ceramic tile and inspect the subfloor.
- If there is a wood floor under the tile and you would like to try and salvage it, use a pry bar to try to lift and remove each subsequent tile, taking care not to gouge the wood in the process.
3. Remove the Remaining Floor Tile
For subfloors made of cement board or concrete, you don't need to worry about damaging the underlayment, as you'll most likely fix or replace it. If the tile still isn't coming up easily and you are finding yourself hammering more tile than you expected, Krzyston suggests using a chipping hammer.
He says, "This will save so much time and actual energy while completing the demo. It is much faster and efficient as long as you aren't planning on trying to salvage the tile or underlayment." If this is your only tile-removal job, purchasing a chipping hammer might be cost prohibitive, but you can rent one from a local home center or rental outlet.
- Continue removing tiles with a combination of hammering and sliding a pry bar or floor scraper under the tiles to lift them and remove them. The tiles should pop up fairly easily.
- Use a shovel to sweep up and discard broken tile flooring into contractor bags inside of a rolling garbage can. This is a much easier way to transport heavy, broken tile to the dumpster than carrying it. If you don't have a rolling garbage can, a wheelbarrow will work just as well.
4. Remove the Old Adhesive
In order to install new flooring, especially new tile, much of the old adhesive needs to be removed, and the floor needs to be smoothed out and leveled as much as possible. Thankfully, according to Krzyston, most adhesives under a tile floor, such as thinset and mastic, typically come up with the tile when you chisel off the tiles.
- Once all of the tile has been removed, tackle any remaining thinset mortar and adhesives by using a pry bar to peel off large chunks of the glue or mortar. If the adhesive is still not coming up, try removing the adhesive with a chisel.
- Apply a floor stripper to remove stubborn mastic (no thinset) adhesive, following the manufacturer's instructions. Use a putty knife or paint scraper to scrape up the remaining adhesive.
- Once the adhesive is removed, use a floor scraper or sander to smooth out any raised areas.
 Sanford Creative
5. Cleaning Up
Now that the demolition portion of your DIY tile removal project is complete, and you are finished creating the mess, it's time to clean up all the debris, including the dust. The dust created from this demolition project will be insidious. Make the job easier by adding a HEPA filter to your shop vac. According to the Environmental Protection Agency, a HEPA filter removes 99.97 percent of airborne particles.
- Scoop up and sweep any remaining tiles pieces and debris into the rolling garbage can.
- Use a shop vac to vacuum the dust from the floors.
- Make multiple passes in the room with the shop vac, even waiting 30 minutes between passes to allow more dust to settle so that you can eliminate as much dust as possible.
- Remove the plastic sheeting from the walls and other areas, carefully folding the sheets into themselves to contain the dust as much as possible.