Subfloor For Tile: What You Should Know

Perhaps more than any other flooring material, ceramic and porcelain tile need a stable subfloor because any flexing or other movements will crack the tile grout and maybe even the tiles. This is why it's vital to evaluate the subfloor before you decide to install new tile. If the subfloor doesn't have enough stability, you can usually (but not always) remedy the situation by installing cement backer board, also called cementboard.
When installing a ceramic tile floor on a concrete subfloor, you don't have to worry about flexing as long as the concrete slab is at least 1 1/8-inch thick, which most slabs are. However, you're not out of the woods: Concrete expands and contracts, and that type of movement can also crack the tiles and the grout. The solution may be to install an uncoupling membrane, such as Schluter-DITRA, which is also a good underlayment for other subflooring materials with sufficient stability.
Evaluating Your Existing Subfloor
Evaluating Your Existing Subfloor
Your subfloor may or may not be a good candidate for tile, which is one of the least flexible floor coverings you can install. Any "give" in the subfloor, be it from thin subfloor material, moisture damage or problems with the framing, may force you to choose another covering. A thorough inspection of the subfloor, which may involve going into the crawl space to check the framing and moisture conditions, should include the following checklist items:
- Subfloor material: Conrete, plywood and orient strandboard
are all suitable, but don't proceed with your tiling project if the
subfloor is particleboard, chipboard, Masonite or sheet metal unless you
can replace these flexible materials with plywood or oriented
strandboard.
- Joist spacing: The spacing of the floor joists is also an important factor, but you can usually compensate for wide spacing by adding extra layers of subflooring. A spacing of 16 inches is great, but joists are often spaced by 24 inches, and that's more dicey, usually requiring an extra layer of subflooring.
- Joist length: Joist length and material also enter into the equation because long joists flex more than shorter ones. The joists shouldn't be longer than 16 or 17 feet and should be made from #1 structural lumber or steel.
- Subfloor condition: The subfloor must be free of moisture damage, including rot and sponginess, and must be securely fastened to the joists and squeak-free. Don't lay tiles on a concrete slab with cracks that appear to be spreading or irregularities that prevent you from leveling it. The substrate for tiles shorter than 15 inches must be so flat that it varies no more than 1/16 inch per foot, according to the Ceramic Tile Education Foundation.
 Natalia Baran/iStock/GettyImages
How to Fix a Bad Subfloor
How to Fix a Bad Subfloor
If your subfloor doesn't pass the flex test, either because it's a bathroom floor and has sustained moisture damage or it's the wrong material, you can and should replace the damaged section. This adds to the cost of the project, but it's better to pay a little extra during installation than it is to tear up a failing tile floor that has already been installed. Sometimes, all that's needed is to replace one or two sheets of plywood.
If you have to replace part of the subfloor because of moisture damage, be sure to inspect the joists. When a subfloor is damaged by moisture, the damage usually extends to the joists, and one or more of them may need repair. Hopefully, you won't have to replace an entire joist. As long as the source of the moisture is under control, you can usually reinforce a joist by gluing and screwing on a piece of lumber that has the same dimensions as the joist and spans the damaged area.
Do You Want to Raise the Floor Level?
Do You Want to Raise the Floor Level?
In most cases, you'll have to add an underlayment to the subfloor to make it stable enough to support tiles, and all underlayments add height to the finished floor, although in the case of an uncoupling membrane, this increase can be as little as 1/8 inch. If you add a layer of plywood or cementboard, however, you could raise the floor by as much as 3/4 inch, not including the extra height added by the tiles themselves.
Increasing the floor height can create problems in a room with cabinets or a toilet, and it may cause headaches at transitions to other rooms with different flooring. In some cases, it may not be feasible, and you may need to settle for a thinner floor covering than ceramic tile, such as vinyl tiles or laminate planks.
Backer Board vs. Uncoupling Membrane
Backer Board vs. Uncoupling Membrane
Cementboard has replaced a manually applied mortar bed to emerge as the standard underlayment for a tile floor. In many ways, however, an uncoupling membrane such as Schluter-DITRA is an even better backing material for reasons other than the fact that it doesn't raise the height of the floor as much as cementboard.
- The membrane is waterproof, not just water-resistant. It won't allow moisture from the subfloor to weaken the bond of the tiles to the floor.
- It allows the tile layer to move independently of the subfloor, so expansion and contraction caused by moisture and thermal gradients won't cause the grout or tiles to crack.
- A membrane is easier to install than cementboard.
 Home Depot
You don't always need an underlayment when installing a tile floor on a concrete subfloor, but when the concrete is below grade and susceptible to groundwater seepage, is outdoors or subject to heavy loads, an uncoupling membrane is recommended. An uncoupling membrane also works well on floors with radiant heat because it prevents damage to the tile layer as the concrete expands and contracts with changing temperatures.
On the other hand, an uncoupling membrane isn't the best choice when you need added stability. A 3/4-inch plywood subfloor on a joist structure with 24-inch spacing needs the extra thickness of cementboard or the floor will flex and the tiles will crack. Uncoupling membranes aren't recommended for tiles smaller than 2-inches square and should not be used when covering old hardwood flooring due to adhesion problems.
Installing Tiles Over Existing Flooring
Installing Tiles Over Existing Flooring
Removing existing flooring can be a tough job, and it's one you may want to avoid, especially if the flooring is glued down. The good news is that you can lay tile flooring over many other types of flooring materials (carpet excluded) as long as you use an appropriate underlayment. Because it raises the height of the floor by the smallest amount, an uncoupling membrane may be preferable to cementboard, but there are some conditions for which a membrane is unsuitable:
- Do not install an uncoupling membrane over cushioned vinyl or multiple layers of sheet vinyl or vinyl tiles. You can, however, use an uncoupling membrane over a single layer of sheet vinyl or vinyl tile.
- Do not use an uncoupling membrane if the floor squeaks or has any give when you walk on it. If you don't want to use cementboard, install another layer of plywood before using an uncoupling membrane.
- Do not use an uncoupling membrane on finished hardwood flooring. Schluter Systems warns that thinset doesn't adhere well to such a surface.
Because of their construction and the materials from which they are made, uncoupling membranes offer a small degree of sound and thermal insulation. It's not enough to meet code standards, but it's better than nothing. Like the foam underlayment for laminate flooring, an uncoupling membrane also provides cushioning to reduce the sound of footsteps in the room below the tiled one.
 Grant Faint/Photodisc/GettyImages
You can lay new tiles over existing ones, provided the existing ones are in good condition with no cracked or loose tiles. You should rough up the surface of the existing tile with sandpaper to aid adhesion, and it's a good idea to spread two coats of thinset. The first coat fills the grout lines and brings the floor flush with the tops of the tiles, and the second coat bonds the underlayment.
How to Install Cement Backer Board
How to Install Cement Backer Board
Cementboard comes in 3 x 5-foot or 4 x 6-foot sheets with brand names such as Durock, WonderBoard and HardieBacker. You can cut it by scoring with a carbide-tipped blade or by using a circular saw or jigsaw. Cutting with a power saw raises copious amounts of silica dust, so you need to wear goggles and a respirator. One way to minimize dust is to use a circular saw blade with as few teeth as possible. A blade with six teeth is ideal.
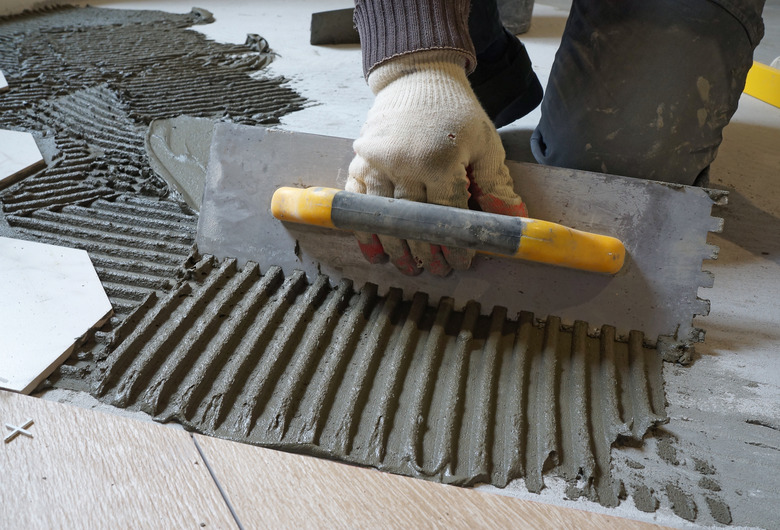
Installation of cement backerboard is always preceded by application of thinset mortar, which fills low spots in the subfloor and anchors the backer-board sheets. Use a trowel to spread the thinset, but before you do that, be sure you've scraped off old adhesive from any existing flooring you removed and vacuumed and cleaned well.
The seams between the cementboard sheets must be offset from the plywood seams by at least 2 inches, and the end joints of the cementboard sheets should also be staggered by at least that much with respect to each other. Screw the sheets to the subfloor, using rust-resistant screws and spacing them 6 inches apart. When the sheets are secure, spread thinset mortar on the seams, cover it with fiberglass cementboard joint tape and trowel another layer of thinset on top of the tape as if you were taping drywall seams.
How to Install an Uncoupling Membrane
How to Install an Uncoupling Membrane
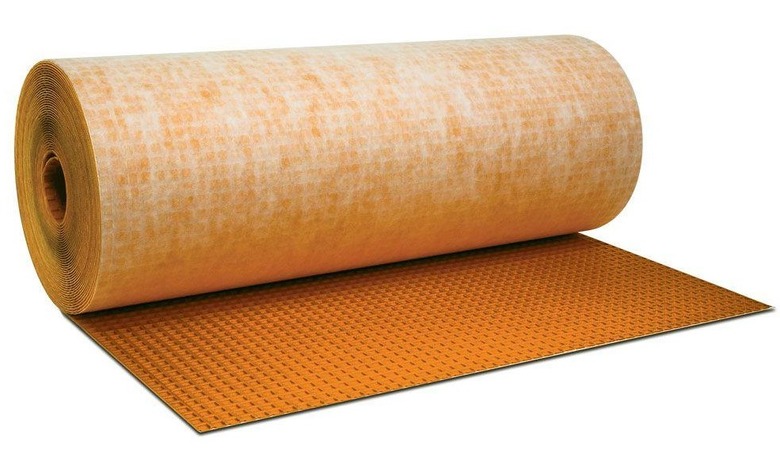
Like cementboard, an uncoupling membrane such as Schluter-DITRA must be set on a layer of thinset. The side of the membrane that faces the subfloor has a fabric backing for better adhesion to the thinset. The other side of the membrane is covered with square cavities to hold the tile adhesive.
To install the membrane, start by scraping any old adhesive off the subfloor and cleaning the floor with a vacuum and a damp rag. Spread enough thinset to fill low spots, seams and other irregularities and leave a smooth, flat surface. Unroll the membrane directly into the fresh mortar, making sure it extends all the way to the walls, and tamp it down with a float.
Schluter-DITRA and comparable products come in 36- to 39-inch rolls, so you'll have to unroll more than one sheet to cover a typical room. The sheets should be placed flush against each other without overlapping. There's no need to tape the seams.
When Is the Subfloor Ready, and What's Next?
When Is the Subfloor Ready, and What's Next?
When the tile installer enters the room and is ready to begin working, the subfloor must be completely flat and clean, and all mortar used to install the underlayment must be dry. It's usually a good idea to vacuum the floor just prior to spreading the thinset for the tiles. When these conditions are met, the installer will begin spreading a bed of thinset for the tiles.
 yunava1/iStock/GettyImages
The actual procedure for tile installation is a subject for another time, but it's worth mentioning an overview.
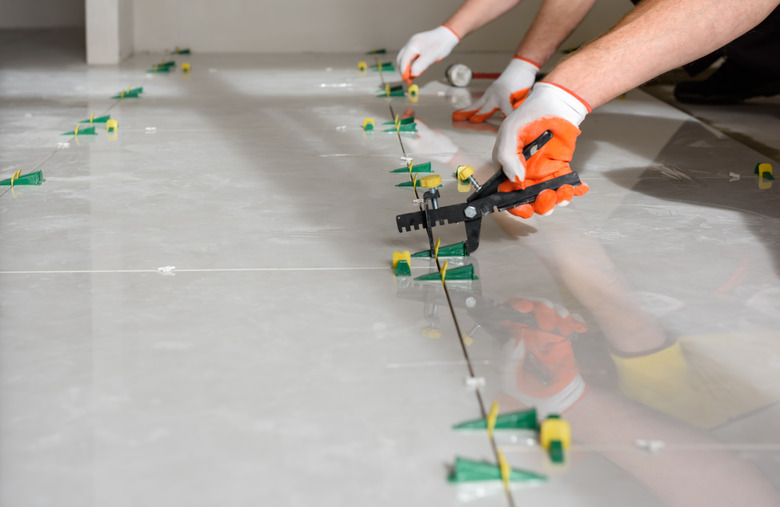
To achieve a symmetric layout, most pros start laying the tiles in the middle of the room and splay out from there toward the walls, leaving all the tile cutting at the perimeter for last. After the thinset has had a chance to harden, which takes from 24 to 48 hours, the next step is to spread grout to fill the gaps between the tiles, which have been kept uniform by the use of spacers. When the grout dries, the final step is to apply a polyurethane or acrylic sealer to the grout to protect it from moisture and mold.