How To Cut Plywood, OSB, And Particleboard
Every woodworker, builder or handyperson has to come to terms with manufactured wood products at some point, and it's not just because solid lumber is expensive and becoming increasingly more so. Manufactured wood, which includes plywood, oriented strand board (OSB) and particleboard, is more stable than natural wood, and it has superior resistance to warping, splitting and shrinking. Manufactured wood typically comes in 4-by 8-foot sheets, which are more suitable than wooden planks for siding, roof decking and subfloors. There are fewer joints between them, and the joints are unlikely to widen.
You don't lose much in appearance either. Top-grade plywood can look as attractive as real wood, and the funky texture of OSB is appealing enough to entice some homeowners to use it for paneling and even furniture. Particle board doesn't share the appeal of its cousins, but that doesn't matter if you paint it.
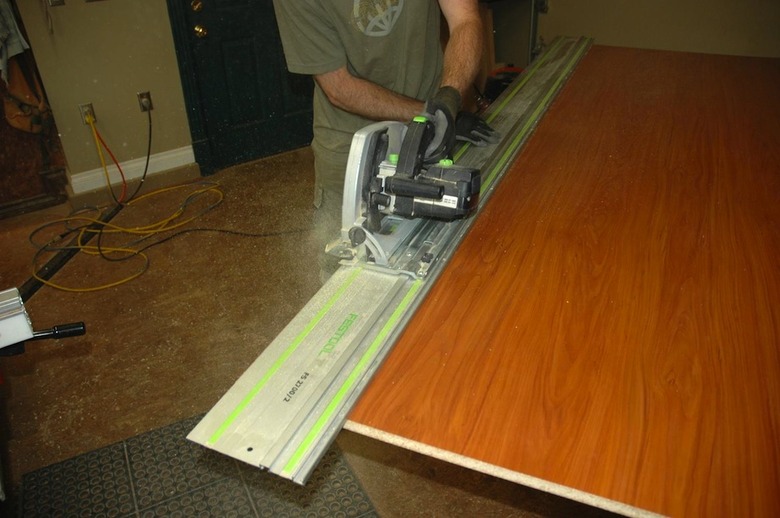
One problem you'll encounter when building with any of these products is that they aren't as easy to cut as regular lumber. Large sheets are heavy and difficult to manipulate onto a table saw, and chip-out is a problem if you cut impatiently or with the wrong blade. Cutting with a circular saw can be equally tricky, such as when you have to reach across a wide expanse to cut a panel in half. These problems are easy to overcome, though, if you use proper cutting techniques and a few tricks.
Tip
Not every homeowner owns a table saw, and buying one—or any number of specialty tools—may not be practical if the tool will only be used occasionally. In this instance, renting a tool may be the better option.
Whether DIYers are completing a weekend project or major renovation, renting allows them to focus time and money on the project, not acquiring tools. To help DIYers find rental equipment quickly and easily, the American Rental Association (ARA) offers RentalHQ.com, an online rental store locator. Site visitors can enter the type of equipment needed and their ZIP code to obtain a list of nearby ARA-member rental companies that can assist with meeting their specific needs. DIYers unsure of what is available for rent can explore the vast array of rental equipment available locally.
The More Teeth, the Better

The More Teeth, the Better
Attack a piece of top-grade plywood with your 24-tooth utility blade and you're going to be disappointed with the result, whether you are cutting with a table saw or a circular saw. A utility blade has a deep gullet (the curved area underneath the tooth), and this allows each tooth to rip off a substantial amount of material as it passes through the wood. This causes splintering, and it isn't unusual for 1/2 inch or more of the plywood facing to chip away. This amount of chip-out is virtually impossible to mask, and it makes for unattractive, amateurish edges on furniture and cabinets.
A better solution is to use a blade designed for what you're cutting. A plywood blade should have at least 80 teeth, and some have as many as 120. A blade designed specifically for plywood alone usually does not have carbide-tipped teeth, because carbide tips increase the width of the _kerf_— the amount of material each tooth removes. However, the life of a plywood blade can be shortened if you use it to cut materials other than plywood, such as particle board or OSB, so for these materials stick with a carbide-tipped blade.
More Ways to Prevent Chip-Out
More Ways to Prevent Chip-Out
You may not have a plywood blade in your tool chest nor time to go buy one. That doesn't mean you can't get clean cuts, even across the grain. Pros use a number of simple techniques to avoid splintered and chipped-out edges.
- Increase the blade cutting depth. You may have heard that setting the cutting depth to just slightly more than the thickness of the material makes a cleaner cut, but pros do the opposite. When the blade is cutting at full depth, the teeth exit the wood at a steep, nearly vertical angle and are less likely to take extra material with them. When cutting on a table saw, set the blade height to its maximum. You'll get a cleaner edge and have an easier time controlling the sheet at the end of the cut.
- Tape the cut line. Use painter's tape, which is easier to remove than regular masking tape and less likely to pull off material. Lay the tape, draw the cut line on the tape with a straightedge and pencil and cut through the tape. The tape tends to hold the material together and prevent the saw blade from chipping out pieces.
- Score the cut line. Instead of marking the cut line with a pencil, score a line with a sharp knife. The knife cuts through the facing so the saw doesn't have to. The result is a super clean edge. You can score the sheet on both sides if necessary.
When cutting with a circular saw, the blade teeth enter the wood from the bottom and exits from the top, and the point of exit is the one most likely to chip out. For this reason, it's a good idea to turn the sheet over to cut it, so the finish face is down. When cutting on a table saw, the good side should be face up on the table, since the blade's teeth enter from the top and cut downward.
Mark Your Line or Set the Fence and Take Your Time
Mark Your Line or Set the Fence and Take Your Time
Whether you're cutting plywood, OSB or particle board, it's always important to get a straight edge. Even minimal wandering of the saw blade can produce curves that will result in gaps in subfloor or siding material or poor cabinet edges.
If you're cutting with a circular saw, take the time to measure accurately and draw a straight and easy-to-follow line with a straightedge and a pencil. Feed the saw slowly while cutting, and keep the arrow on the foot of the saw centered on the line. On saws that project a laser guideline, keep the light carefully aligned with your marked cutting line. If you lose track of the cutting line, stop and brush off sawdust. Don't keep cutting if you can't see the line because once you make a mistake, you can't undo it.
When cutting on a table saw, set the fence at the proper distance from the inside edge of the blade and make sure it's secure before you start the saw. Push the sheet through the blade, keeping forward pressure with one hand and sideways pressure against the fence with the other. Shift your hands as you near the end of the cut so that you're pushing both the piece you want and the off-cut portion with equal pressure. If you aren't using an out-feed table, you'll also have to keep downward pressure to finish the cut. This can be difficult when cutting a full sheet, so it's a good idea to enlist the aid of a helper to catch and support the sheet it on the other end.
Cutting Curves
Cutting Curves
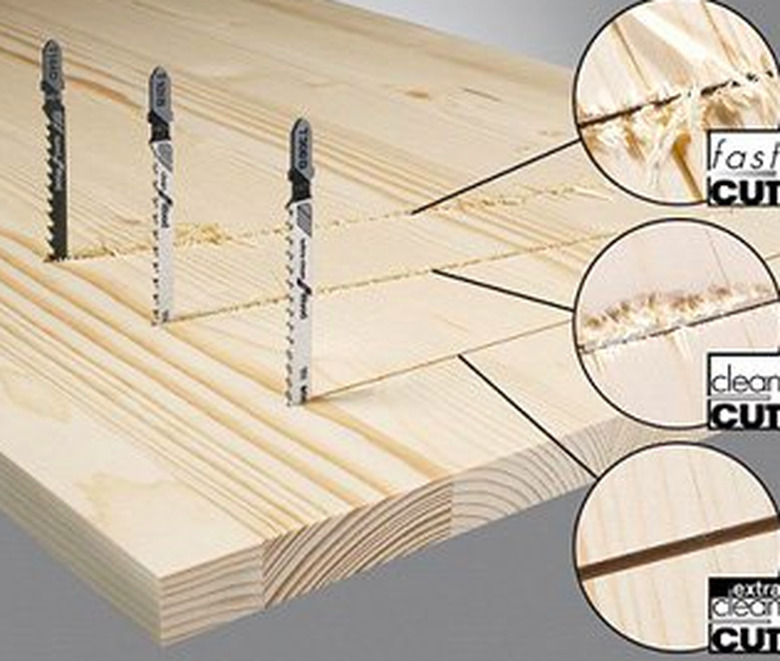
You'll need a jigsaw to cut curves in plywood and other sheet goods. Just as there are different types of blades for circular saws and table saws, there are different types of jigsaw blades, and these are rated in teeth-per-inch, or TPI. If you need to cut a section out of a piece of OSB for a window opening, you're probably more interested in getting the job done quickly than you are in getting a clean edge, so a 6 TPI utility blade will do the job. Upgrade to a higher TPI if you're worried about chip out, but don't go higher than 20. Blades with more teeth cut more slowly, and they frequently burn the wood.
The biggest mistakes you can make when cutting sheet material with a jigsaw are to fail to support the wood properly and to allow the foot of the saw to lift. In both cases, the resultant vibrations can not only ruin the cut, but they can also cause the blade to break. This won't happen if you support the material you're cutting on a 2-by-4 frame and keep firm control of the saw.
Jigsaw blades cut on the upstroke, so cutting with the good side of the panel down will help minimize chip-out. Cutting with the finish face up often results in chipping as the teeth exit the wood.