How To Use A Circular Saw

The power circular saw probably originated in Europe, but folk wisdom has it that an American Shaker woman named Tabitha Babbitt, inspired by her spinning wheel, came up with her own design in 1813. However, she never patented the device because doing so would have been against her religious beliefs.
Saws with circular blades were originally used for milling lumber, and they still are, but when tradespeople and DIYers refer to circular saws, they are usually talking about the handheld electric tools first marketed by Skilsaw Power Tools in 1924. Because of its early market entry, Skilsaw earned the distinction of having its brand become synonymous with the generic tool, much like Sheetrock is synonymous with drywall. However, so many tool manufacturers offer circular saw models today that the equivalence is fading.
Circular saws come in many forms. Chops saws, radial arm saws and table saws are all circular saws. However, in everyday use the term refers exclusively to the handheld variety, which these days is just as likely to be a battery-powered cordless tool as a corded plug-in model. You can buy tiny circular saws with 3-inch blades or utility saws with 6 1/2- or 7 1/4-inch blades. The heaviest-duty circular saws employ worm-drive gears for extra cutting power. Circular saws are designed for safety as well as convenience, but they are still potentially dangerous, so if you're using one for the first time it's good to have a few best practice guidelines under your belt before you start cutting.
Understand the Design and Safety Features

Understand the Design and Safety Features
When you hold a circular saw and press the trigger, a powerful motor spins a carbide-toothed blade at thousands of revolutions per minute (typically 2,000 to 5,000 RPM), and the tool immediately becomes capable of slicing through pretty much anything except thick steel or concrete. Obviously, you want to keep the saw under control, but what happens if you slip? That's what the retractable blade guard is for. It protects you from the blade, and just as important, it protects the blade. If you set the saw down before the blade stops spinning, the blade guard prevents the blade from destroying or being destroyed by the surface on which you set it. Before you plug the saw in, check the guard to make sure it retracts smoothly without sticking and springs back into the closed position easily.
At some point, you'll have to change the blade. Always unplug the saw or remove the battery before you do this. The arbor nut has reverse threads, which means you turn it clockwise to loosen it and counterclockwise to tighten it. Mount the blade so that the label is facing out and visible. This ensures that the teeth are pointed in the right direction, which is toward the front of the saw.
Every circular saw has a knob or wing nut to set the depth of the blade and one to set the blade angle. For most cuts, you'll want the blade set at full depth and at a 90-degree angle to the foot of the saw. When using the saw for the first time, it's a good idea to check this angle with a speed square to make sure it's at 90 degrees. Unplug the saw or remove the battery before you pull back the blade guard to do this. If you're cutting thin wood, such as plywood, it's sometimes a good idea to adjust the depth of the blade to about half an inch more than the thickness of the material to minimize chip-out.
Making Rip Cuts
Making Rip Cuts
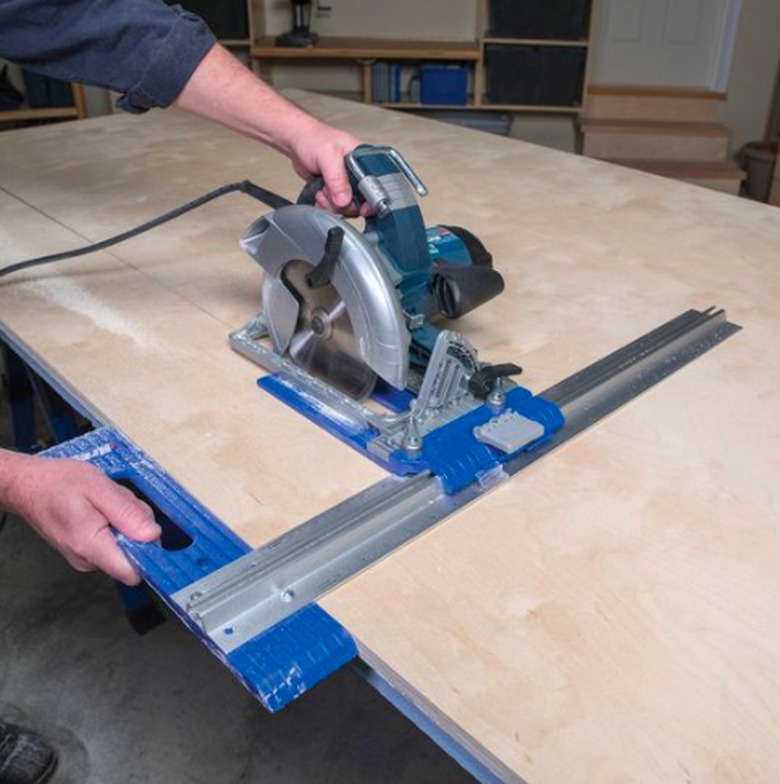
Ripping lumber or plywood means that you are cutting longitudinally, in the same direction as the wood grain. A circular saw can do this as well as any tool, including a table saw, but there's one catch— you need an adjustable edge guide to get the best results. The edge guide clamps onto the foot of the saw and hooks onto the edge of the wood, and as long as you keep the guide in contact with the wood, you'll get a straight cut. There are also clamp-on guides that work like long straightedges. After clamping the guide onto the workpiece, the foot of the saw rides against the guide as you make the long rip cut.
You can also rip freehand, and many woodworkers do, but you need concentration and a steady hand to avoid wandering off the cut line you marked with a pencil and straightedge. Wandering is something you want to avoid because when you try to angle the saw back on course, it can kick back, which is potentially dangerous and can also damage the wood. Avoid kickback by feeding the saw slowly and keeping the saw pointed in the same direction at all times. Circular saws don't cut curves.
Making Cross Cuts and Angle Cuts

Making Cross Cuts and Angle Cuts
Most of the cuts you make with a circular saw will probably be crosscuts, which are cuts across the width of the wood, perpendicular to the wood grain. Once you have the hang of using a circular saw, you'll probably be able to hold the saw with one hand, the wood with the other, and cut cleanly across your cut line (always draw a cut line, using a speed square and a pencil).
At first, though, it's a great idea to clamp the wood to a workbench so you can use both hands to hold the saw. Let the off-cut portion hang over the edge of the bench. Lift the blade guard handle with one hand while you press the trigger with other, and release the guard after the saw has progressed about an inch into the wood. This prevents the guard from catching on the edge of the wood. Keep the saw straight, cut slowly, and move the saw steadily through the cut until the waste piece separates. Don't stop early, or the wood might break off in a splinter, and there goes your clean edge.
Cutting the end of a piece of lumber at an angle is called mitering, and it's something you can do easily with a circular saw. Before you start the cut, lift the blade guard and line the blade up with the cut line, making sure it's parallel. Keep the guard up when you start the cut and release it when the blade has progressed an inch or so. When cutting at an angle to the wood grain, the saw blade has a tendency to wander, so make sure to hold the saw firmly.
Making Bevel Cuts and Plunge Cuts

Making Bevel Cuts and Plunge Cuts
Two of the most challenging cuts you can make with a circular saw are bevel cuts and plunge cuts. To make a bevel cut, set the angle adjustment with the saw while it is unplugged or with the battery removed, and if you need an especially accurate cut, make check the angle with a bevel gauge— a tool designed for measuring angles. Position the foot of the saw flat on the wood and hold back the blade guard while you align the blade with the cut line. Hold the blade guard back when you start the cut because it almost always catches on an angled edge. Be sure to keep the foot of the saw flat on the wood when you make the cut—it's a common mistake to lift the saw slightly and ruin the bevel.
Plunge cuts are strictly for those who have mastered all the other cuts you can make with a circular saw. You start a plunge cut in the middle of a piece of wood by holding the foot of the saw upward at an angle with the front of the saw foot firmly against the wood and the blade guard retracted. After starting the saw blade, you then pivot the back of the saw slowly down into the wood. This is a tricky technique and kickbacks are common, but once you learn how to do it, you'll find various uses for the method. When making large cutouts in a sheet of plywood, for example, this is the best way to get straight edges on the cut.