How To Replace A Sink Drain P-Trap

We may receive a commission on purchases made from links.
If you've ever had to clear a clog from a sink drain, you're likely already familiar with the drain trap assembly that forms the transition from the sink to the home's branch drain system. The drain trap—sometimes called the P-trap due to its distinctive shape—is the curved section of pipe that you see immediately under the sink.
The drain trap can be made from several different types of pipe material. PVC plastic is the most common in modern installations, but the trap can also be made of copper, chrome, brass, or ABS plastic. Normally the parts of the drain trap are joined together with easy-to-assemble slip fittings, but plastic drain trap parts can be solvent-glued, and metal traps can be soldered. Where sink drains are exposed, such as with pedestal sinks, most people opt for chrome or brass drain trap fittings. Drain traps hidden inside base cabinets or vanities are usually PVC plastic.
Modern PVC drain traps are relatively trouble-free and can last for many decades, but older chrome traps may corrode and rust, so replacing a chrome trap is a very common DIY project. You may also need to replace a drain trap when a sink is being replaced, since the drain configuration may be slightly different.
Anatomy of the Drain Trap
Anatomy of the Drain Trap
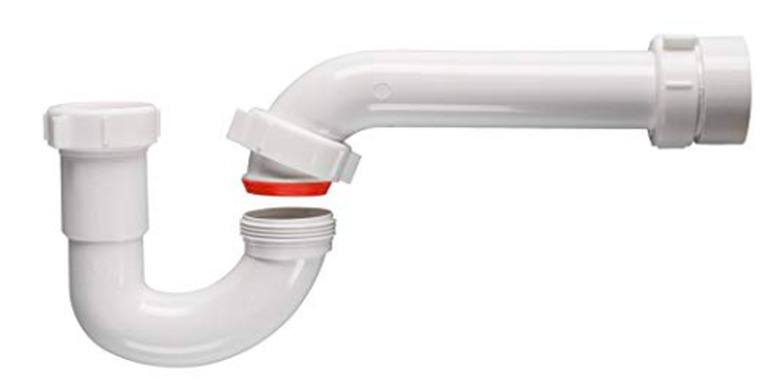
A drain trap typically consists of two pieces: a trap bend and a waste arm.
- The trap bend is a U-shaped bend. One end connects to the vertical tailpiece that descends from the sink drain, and the other end connecting to the waste arm. The trap bend is designed to be easily removable in order to clear clogs, or it may have a small cleanout plug on the bottom of the bend.
- The waste arm (also called a trap arm or J-bend) is a straight length of pipe with one straight end that fits into the branch drain opening in the wall. The other end curves down to connect to the trap bend.
The Function of the Drain Trap
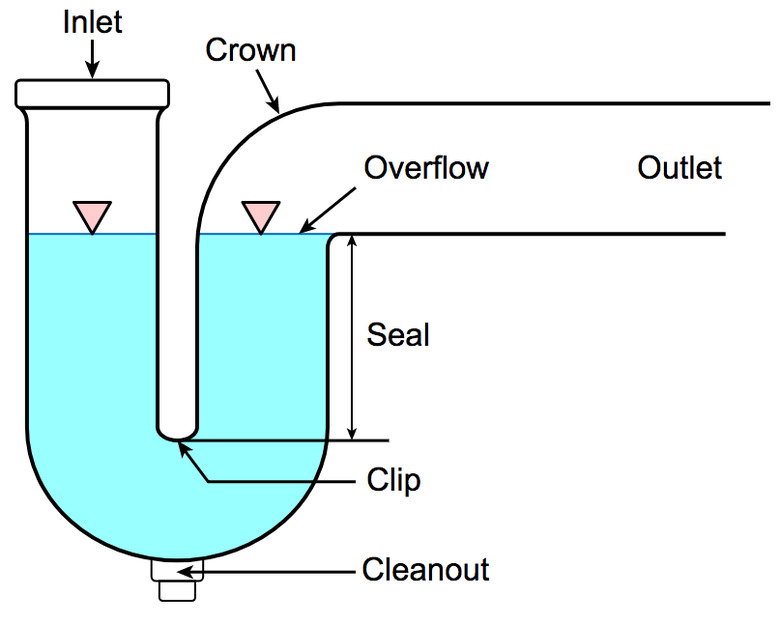
The Function of the Drain Trap
A drain trap's signature P-shape is essential to its function. The curved bend in the trap is designed to trap a small amount of standing water each time the sink drains. This water forms a seal that prevents gases from inside the sewer system from rising up into the home. The sharp bend also makes the trap susceptible to clogs, but generally, the trap pieces are joined together with slip fittings that make for easy disassembly when it is necessary to clear a clog. This easy disassembly also makes it simple to snake into the branch drain in the event of a more serious clog further along the drain line.
How to Replace a Drain Trap
How to Replace a Drain Trap
Drain traps are normally sold in kits with all necessary parts included. Make sure the kit you buy resembles the existing drain trap in terms of pipe diameter and configuration. For example, there are kits specifically designed for the drain traps on double kitchen sinks, and for sinks with garbage disposals attached.
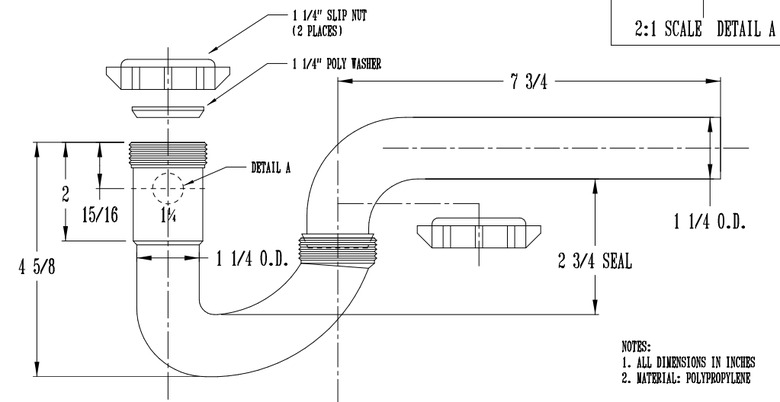
It's quite common to replace a chrome or brass drain trap with PVC, but make sure the pipe diameter matches the old fittings. Most drain traps use 1 1/4-inch or 1 1/2-inch diameter drain traps.
Warning
Drain trap kits using flexible tubing are increasingly popular due to the ease with which they can be installed, but few professional plumbers will use these kits. The corrugated shape of the flexible tubing is prone to catching debris, and such drain traps are much more susceptible to clogging. Although straight pipes are somewhat trickier to install, their smooth contours will make the drain trap much more trouble-free.
Things Needed
-
Drain trap kit
-
Hacksaw or PVC cutter (if necessary)
-
Bucket
-
Tongue-and-groove pliers
1. Remove the Old Drain Trap
Place a bucket under the old drain trap to catch any water. Loosen the slip nuts holding the curved trap bend to the sink tailpiece and the trap arm, using tongue-and-groove pliers. The trap bend should slide off fairly easily, though you may need to wiggle it slightly to loosen it. Empty the bend into the bucket.
Loosen the slip nut holding the waste arm to the branch drain opening, and slide the waste arm out of the opening. Again, a bit of wiggling may be necessary. Set aside the old drain parts, slip nuts, and slip washers.
2. Attach the New Waste Arm
Unpackage the new drain trap kit. Slide two slip nuts onto the end of the waste arm, with one nut at the curved end, open threads facing outward, the other nut near the straight end of the arm, open threads facing outward. Slide a beveled slip washer onto the straight end of the waste arm, bevel facing out.
Test-fit the waste arm by sliding the straight end into the branch drain opening. There should be enough play to allow you to adjust the length of the arm by sliding it in and out of the drain opening. Loosely thread the slip nut onto the threaded fitting on the branch drain opening. Do not fully tighten the nut yet, as some adjustment will be necessary.
3. Attach the Trap Bend
Slide a slip nut onto the vertical tailpiece of the sink drain, followed by a beveled slip washer. The beveled side of the washer should be facing downward.
Slide the trap bend onto the sink tailpiece, and position it so the opposite side accepts the curved end of the waste arm. Some slight adjustment of the waste arm in and out of branch drain opening may be necessary. Lightly tighten the tailpiece slip nut and the waste arm slip nut onto the trap bend's threaded fittings. As the nuts tighten onto the threads, they will compress the beveled slip washers to form a tight seal.
Tip
Occasionally, the waste arm may be too long for the sink configuration. The straight end of the waste arm can be easily cut down to size using a hacksaw or (for PVC pipe) a PVC pipe cutter. Some kits come with several different waste arms of different lengths to simplify installation.
4. Tighten the Fittings and Test the Drain
 GregorBister/E+/GettyImages
When the trap fittings all fit together correctly, tighten all slip nuts with the pliers. Take care not to overtighten—another 1/4 turn after hand-tightening is all that is needed.
Run water through the drain and check all the fittings for leaks. If there is any seeping or leakage, tighten the slip nuts a bit further.