How To Run Wires Through Walls
Many home improvement projects require you to install new electrical cables inside finished walls. The process is often called "snaking" or "fishing," with good reason. Cables often must be bent, slithered and coaxed around stud spaces and through small holes in the framing. And there's usually a bit of mystery about what's inside those dark wall cavities. Like fishing for your dinner, threading cables in walls takes some patience and some estimation of what lies below the surface. There usually are several different ways to approach each installation, and it pays to spend some time figuring out the puzzle before you start cutting holes in wall surfaces and framing.
 adamkaz/E+/GettyImages
Plan Your Route
Plan Your Route
The primary challenge when installing new wiring in existing walls is routing the wiring through the intervening framing. This usually requires drilling holes through wall studs and/or the top or bottom wall plates—the horizontal members at the top or bottom ends of the studs. Therefore, the first step in planning your route is to identify where the framing is, using a stud finder to mark all of the studs in the installation area.
Once the framing is marked, think about the most efficient way to gain access to each of the studs or plates you need to drill through. Some projects require making just one or two holes in the drywall, but if you need a lot of holes, it may be easier to cut out a long horizontal strip of drywall to create a "wiring trough." A trough provides easy access to a number of adjacent studs, and patching a long, narrow strip isn't a lot more work than patching a few smaller holes.
 Structured Home Wiring
A wiring trough can be cut in the middle of the wall (or roughly at outlet or switch height, whichever is more convenient) or down near the floor, preferably behind baseboard molding. If the baseboard is tall enough, it may hide the cuts you make for the trough.
Another option is to run wiring up or down through the wall plates and into an unfinished attic or basement (or crawlspace). In the unfinished space, you can run the wiring horizontally then back down or up into the wall stud cavity where you will install the new outlet, switch or another device.
In any case, keep in mind that any hole you must cut for a new electrical box can be used to drill holes in framing and to fish wiring. If you're tapping into a circuit at an existing outlet or switch box, you'll probably need to remove the old box and replace it with a new remodeling box (also called a retro or "old work” box. This means the box hole will be open for drilling access as well.
The sample project described below imagines that a circuit is being extended from an existing outlet box. But the same techniques are used if you are running an entirely new circuit that will terminate at the main circuit breaker box.
Things Needed
-
Non-contact voltage tester
-
Stud finder
-
Pencil
-
Screwdrivers
-
Reciprocating saw or hacksaw blade
-
Remodeling electrical boxes
-
Tape measure
-
Drywall saw
-
Level
-
Drill-driver
-
7/8-inch drill bit
-
Type NM-B electrical cable
-
Wire cutters
-
Cable clamps (as needed)
-
Cable protector plates (as needed)
-
Drywall screws
-
Drywall finishing and painting supplies (as needed)
-
Coat hanger
-
Insulated cable staples
-
Hammer
How to Run Cable Horizontally Through a Finished Wall
1. Turn off the Power
Turn off the power to all electrical circuits in the installation area by switching off the correct circuit breakers in the home's service panel (breaker box). Test outlets, switches or other devices on each circuit to confirm the power is off, using a non-contact voltage tester.
2. Mark the Wall Studs
Use a stud finder and a pencil to mark both side edges of each stud in the area. Plan your wiring route based on the locations of the studs and any existing or new box holes.
3. Remove the Old Box
Remove the outlet or another device from the box you will tap into, as applicable. Cut through the nails or mounting tabs securing the box to the wall stud, using a reciprocating saw or a hacksaw blade, sliding the saw blade between the edge of the box and the drywall. Pull the box from the wall and remove the circuit cable(s) from the box.
4. Cut New Box Holes
Mark each new box hole so the box is about 1 inch away from the nearest wall stud; this provides space for the remodeling box mounting tabs to swivel out behind the drywall. Cut out the box outline with a drywall saw (keyhole saw).
5. Cut Access Holes
Mark and cut additional holes or troughs in the drywall to access the studs between the boxes. If you need to drill through two studs that aren't near box holes, you can cut a short trough that extends from the center of one stud to the center of the next, allowing you to drill into each stud, angling from the sides. Centering the slot over the studs leaves some backing for reinstalling the drywall cutout. Make the trough longer, as needed, to access more studs. Mark cutouts for troughs with a level to so the edges are straight, making them about 2 inches wide.
Note: Cut holes and troughs so that the wiring will be about 2 inches above or below the boxes. This makes it easy to route the wiring to each box.
6. Drill Through the Studs
Use a 7/8-inch drill bit to drill a hole through each stud, centering the hole (front to back) in the stud as much as possible. Use a long bit to reach studs through box holes, as needed.
7. Feed the Cable
Thread new non-metallic electrical cable through the holes in the studs, starting from the box holes or access holes or troughs, as applicable. Reach into the holes to grab the cable as it emerges from the framing holes.
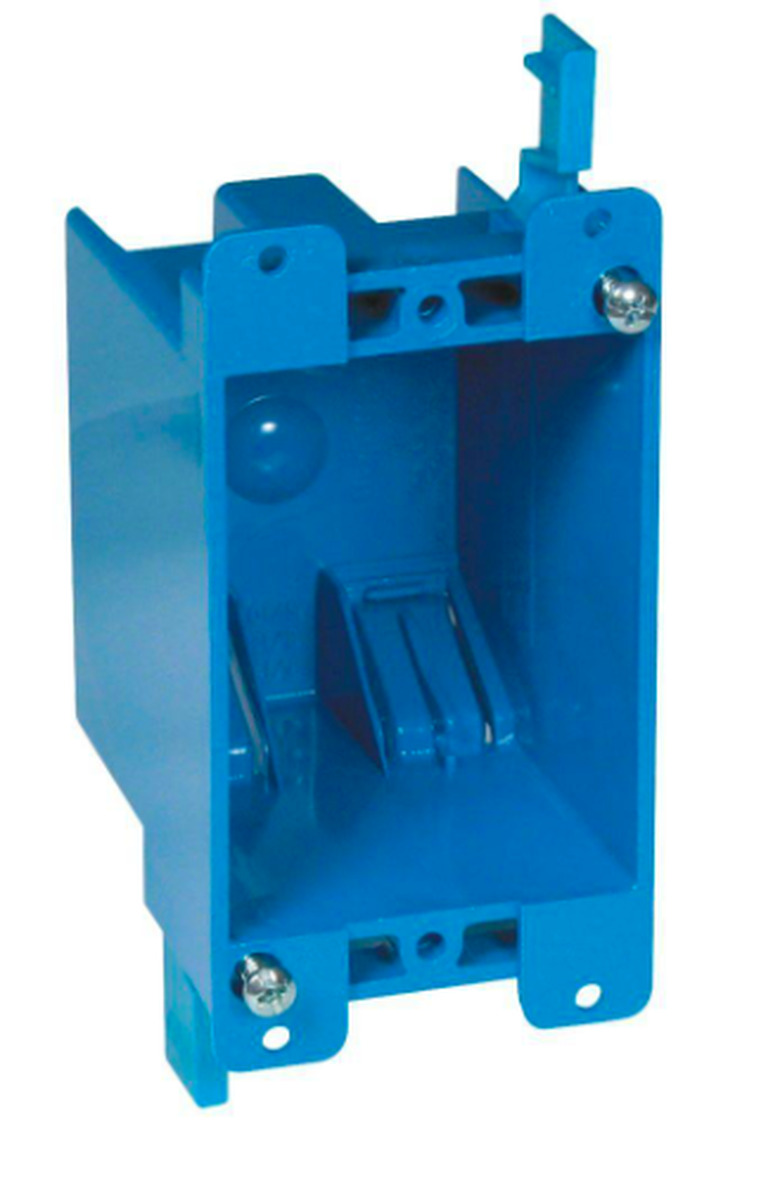
8. Install the Boxes
Feed the cable ends into the boxes and secure each with the box's internal spring tab or built-in clamp or by adding a separate locknut-type clamp. Fit each box into its hole and secure it to the drywall as directed by the manufacturer. You may need to pull the cable through the internal clamp to take up slack as you insert the box. The cable should extend at least 6 inches beyond the front edge of the box when the box is in place.
 Home Depot
9. Patch the Wall
Install metal cable protector plates over the exposed edges of the studs, as needed, if the wiring hole is closer than 1 1/4 inch from that edge. This protects the wiring from screws or nails in the future. These plates simply hammer into place.
Reinstall the drywall cutouts (or cut new pieces) and secure them with drywall screws. Patch the wall with drywall joint tape and compound, then prime and paint the area to match.
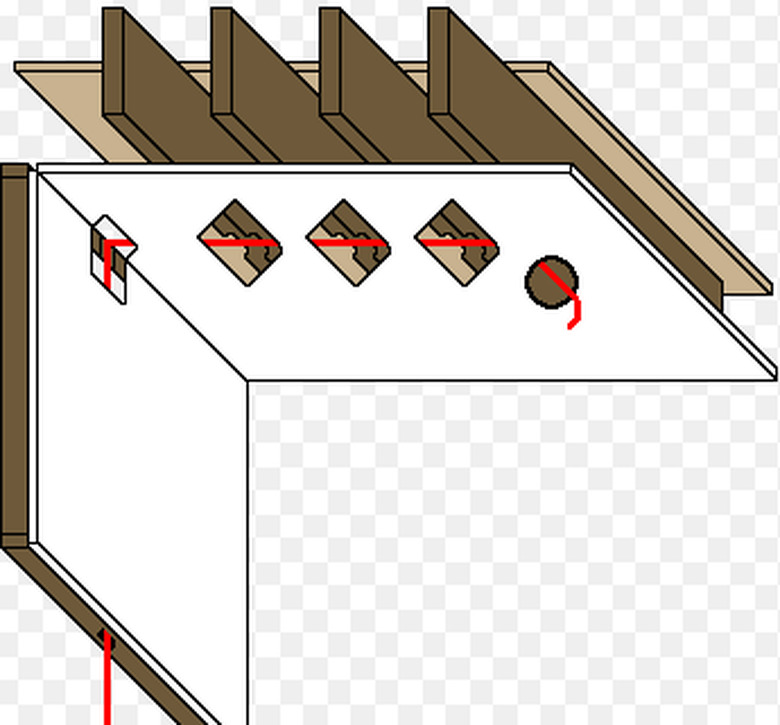
How to Run Cable from a Basement or Attic
1. Drill the Plates
Follow steps 1 through 4 above to turn off the power, mark the wall studs, remove the old electrical boxes and mark and cut new box holes, as applicable.
Locate the stud bay you will drill into by measuring from the existing box to a nearby wall corner or a duct, pipe or another element that carries through from the living space to the basement or attic. Drill through the wall plate and into the approximate center of the stud bay, using a long 7/8-inch drill bit. In the basement, you will drill through the subflooring before drilling through a single bottom wall plate. In the attic, if there is rough flooring over the joists, you may have to cut out a small access hole in the flooring to reach the wall's single or double top plate.
Drill a similar hole into any stud bays where you will add new boxes.
2. Fish the Cable to the First Box
Starting from the basement or attic, feed the end of non-metallic (NM) electrical cable through the wall-plate hole and into the stud bay. Have a helper reach into the cavity through the box hole, grab the end of the cable and pull it out about 1 foot into the room. Alternatively, the helper can use a straightened coat hanger with a hook end to grab the cable inside the cavity.
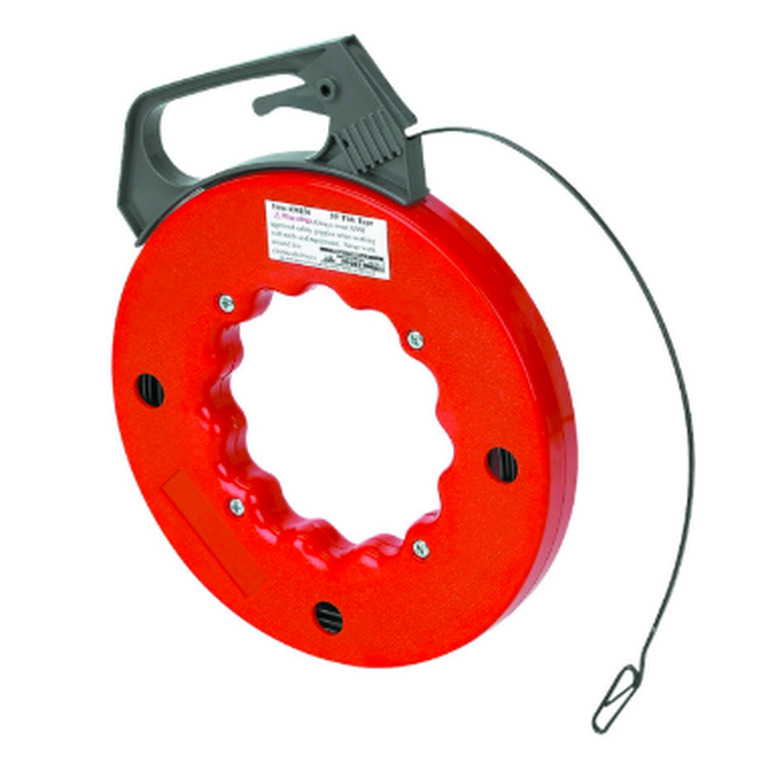
Tip
Electricians use a special tool called a fish tape (a stiff wire with a hooked end wound onto a spool) to thread cable through walls. If you have a fish tape, feed the tape into the cavity and out through the box hole, then secure the end of the NM cable onto the hook of the tape and pull the tape back through the cavity, towing the cable along with it.
 Harbor Freight
3. Install the Remaining Cable and Boxes
Roll out the cable through the basement or attic space to the next box location. Cut the cable—leaving plenty of slack—and feed the cut end into the wall cavity and out through the wall hole, as you did with the first box. If the wall above runs parallel to the attic or basement joist, this cable will be attached across the side of a joist. If the wall above run perpendicular to the joists, the cable will need to span several joists.
When the wall above is parallel to the joists, attach the cable to the sides of a joist with insulated cable staples driven no more than 4 1/2 feet apart. If the cable run crosses joists, drill access holes through the center of the joists and thread the cable through the holes to the next box location.
Follow step 8 above to secure each cable to a box and mount the boxes to the drywall.