How To Wire A GFCI Circuit Breaker
Things Needed
-
Safety glasses
-
Rubber gloves
-
Battery-operated light source
-
Voltage/polarity tester
-
Screwdriver
-
Wire stripper
-
Pliers
Warning
If the hot and neutral wires are reversed, the circuit may still test normally, but you may not have ground-fault protection. Verify that the wires are properly connected by testing an outlet on the circuit for correct polarity. A GFCI should not be used with lights, freezers, refrigerators or medical equipment. A GFCI cannot be used with appliances which are individually grounded, such as ovens or dryers.
The Ground Fault Circuit Interrupter (GFCI) saves lives. There are two different kinds for home use–electrical outlets and circuit breakers. GFCI circuit breakers last longer than GFCI outlets and are a good idea if you do not test your GFCI outlets on a regular basis. Read on to learn more about proper installation.
Step 1
Turn off the main breaker in the service panel and remove the panel cover. Check the circuits with your voltage tester to make sure that they are not hot. Pull out the old breaker and disconnect the wires.
Step 2

Verify that the GFCI breaker matches the circuit wiring. Use a 15-amp breaker with 14-gauge wire and a 20-amp breaker with 12-gauge wire.
Step 3
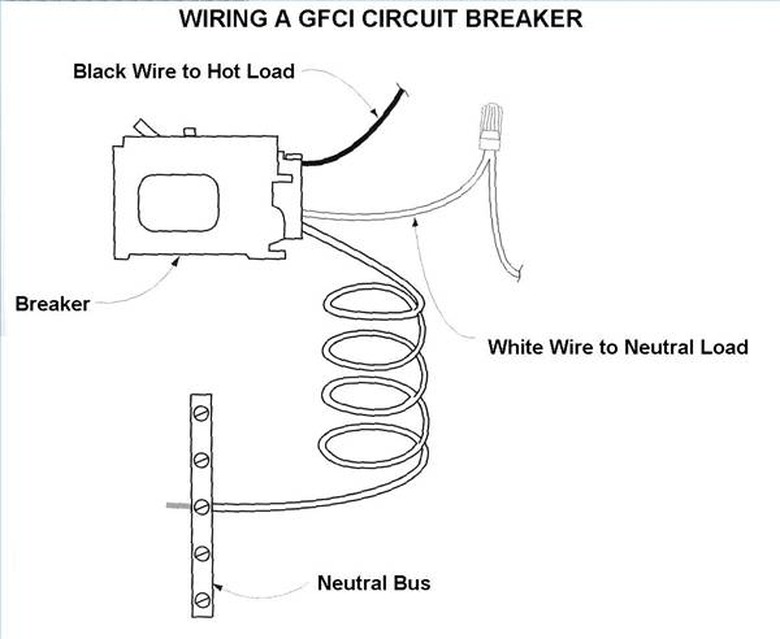
Attach the curly white wire from the breaker to the neutral bus. The neutral bus is the strip with the screws located on the outside edge of the service panel.
Step 4
Connect the white circuit wire to the neutral breaker terminal and the black circuit wire to the hot breaker terminal. No more than 1/4 inch of exposed wire should show outside the breaker.
Step 5
Follow the breaker manufacturer's directions for inserting the breaker into the panel. The wiring end of the breaker is usually inserted first and the other end is then pushed down until fully seated on the center tab.
Step 6
Turn the power back on and press the "Test" button on the breaker. Reset the GFCI by pushing the switch fully off and then on.