How To Fix A Burnt-Out Wall Outlet
You need to take immediate action if you've discovered a burnt electrical outlet and plug in your house. This is a red flag for potential fire safety and electrical hazard that has to be fixed as soon as possible.
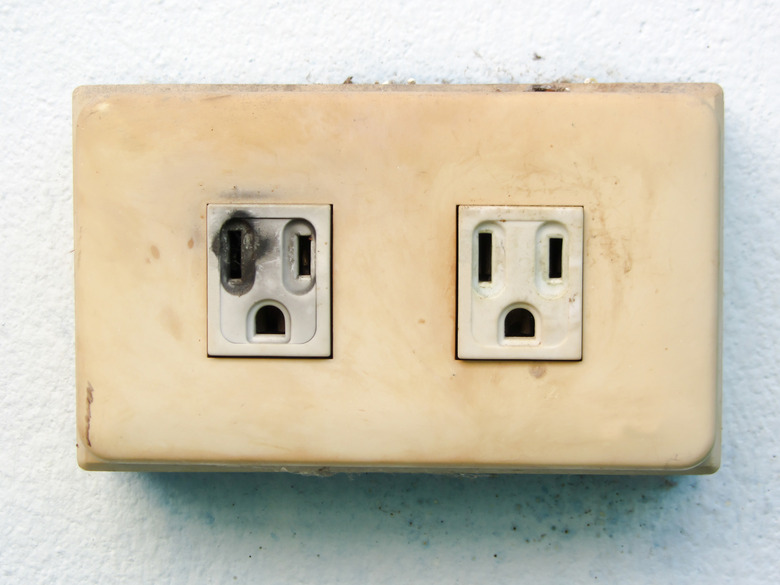
Usually, a blackened plug socket indicates that the power outlet may have sparked and flared up because of an overloaded circuit. It's also possible that there's a loose wire in your outlet that caused the arcing.
Here are a few things to do if you discover a blackened socket in your home.
Warning
Fixing an outlet short circuit and removing wiring is typically best left up to a professional electrician unless you are very comfortable working with electrical systems.
Fixing an Outlet Short Circuit
Fixing an Outlet Short Circuit
The first step to fixing a burnt outlet is to repair the outlet short circuit:
- First, ensure that you have unplugged every appliance from this burnt outlet and turned off the main power.
- Use a voltage tester to check if the terminals are indeed out of power.
- Next, unscrew the faceplate of the burnt outlet, then pull this out from the box carefully. It's recommended to replace with an arc-fault circuit interrupter (AFCI) unless it's a ground fault circuit interrupter outlet (GFCI outlet).
- Loosen the screws holding the wires from the sides of the outlet to inspect the extent of the short circuit.
- Look for any scorched, nicks or marks in the wires.
- Discard the burnt outlet because you won't have a use for it anymore.
Removing the Burnt Wire
Removing the Burnt Wire
It's critical that you remove the burnt wire as soon as you notice it. Here's how:
- After you've determined where the wires have burned and caused a short circuit, cut it off using wire strippers.
- Next, strip the insulation down to about 3/4 inches.
- From there, twist the ends of the wire into a tight wire nut.
- Next, take out your new outlet and insert the newly fixed wires to the side. The black wire (hot) should go next to the gold terminal of the outlet, while the white wire (neutral) must be screwed to the silver terminal. The green wire (ground) goes to the green terminal. In some homes, the green wire may be brown or copper, which should still go to the green terminal.
- Put a piece of electrical tape over each terminal to secure and protect it.
- Next, affix the wires in place neatly inside the box of the power outlet before screwing in the new power outlet.
- Now, you can put the new outlet's faceplate and screw it shut as well.
Checking the Circuit Breaker
Checking the Circuit Breaker
Before turning the power back on, you also have to make sure that the circuit breaker was not what caused the power outlet to short circuit. Determine which particular circuit is protecting that outlet, then flip its switch on the main breaker. You should hear a definitive clicking sound.
However, if the switch goes back and forth even if you've flipped it, then you could have a bad circuit breaker. Removing some appliances connected to this power outlet should take care of the overload. But if this still doesn't resolve the problem, it's time for a professional electrician to take over.