How To Build A Walk-In Freezer
If your home or business needs for refrigeration aren't being met by reach-in freezers, building your own walk-in freezer could be an option. Walk-in freezers can be built in a wide range of sizes and with a variety of materials to suit specific purposes and spaces. A small walk-in freezer could occupy just one section of a room, or a large-scale freezer can fill an entire building, such as a shed or warehouse. There are commercially available walk-in freezer kits, and it is also possible to build your own from scratch.
Homemade Walk-in Freezer Basics
Homemade Walk-in Freezer Basics
To get started, evaluate your refrigeration needs and budget and select the freezer size appropriate to your needs. In a whitepaper by Buy Local Food, it is stated that a standard 8 x 8 x 8-foot walk-in freezer would use about 8,000 kWh of electricity per year. This would equate to about $1,200 per year in energy costs. To break even on energy usage alone, you would need to replace at least 16 standard-sized reach-in chest freezers.
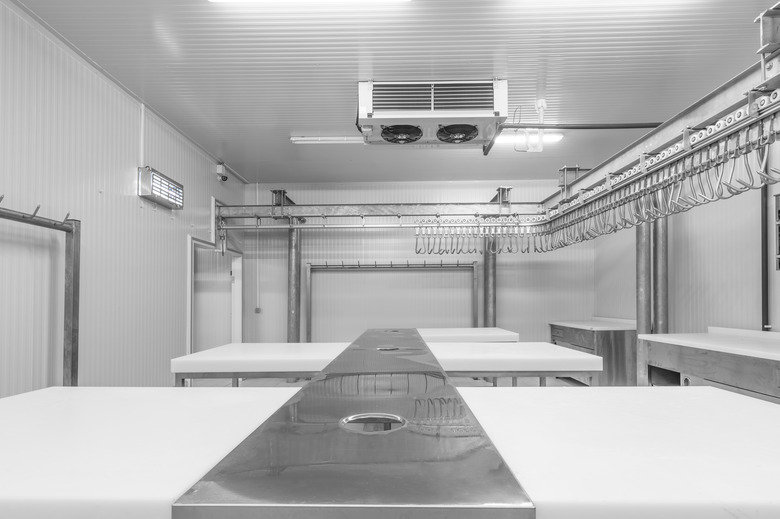
DIY Walk-In Freezer Insulation
DIY Walk-In Freezer Insulation
Once you've selected a size, it's time to build the insulated box. A walk-in freezer consists of the insulated box of the freezer, the compressor and evaporator to do the work of cooling. It also comes with controls to operate the freezer. A standard 8 x 8 x 8-foot walk-in freezer, when purchased as a package with all the refrigeration equipment, shipping and installation, costs about $15,000.
You can reduce this cost by building the insulated box yourself but be sure to select construction materials and assembly techniques that reduce unnecessary energy consumption and the potential for moisture getting in by having a tight seal.
Choosing insulation that works at low temperatures and is moisture-resistant is paramount. Extruded polystyrene and polyurethane are recommended. Many materials can be used for the skin, and your choice will depend on budget and aesthetic considerations (whether customers will be seeing the freezer, for example), but the general best (and most expensive) option for the outside skin is stainless steel. Aluminum, galvalume and G90 galvanized are other options, or you can pair other exteriors with stronger insulation and interior choices.
Laying the Freezer Floor
Laying the Freezer Floor
Begin by laying the floor, which will need the most insulation, as cold naturally sinks to the ground. The cold can also warp the materials below the freezer, making it necessary to lay pipes to allow warm air to flow below the freezer.
For example, a freezer built atop soil can heave the soil as the cold sinks, causing the freezer's concrete foundation to crack. This situation would also necessitate a layer of gravel for drainage.
Assess the structural stability of the ground or floor beneath your freezer and add airflow and drainage as appropriate. Either way, prepare your frame (pressure treated lumber is fine) and fill it with a double layer of insulation. Use caulk and tape to make sure everything is sealed.
Creating Freezer Walls
Creating Freezer Walls
Next, create the walls and roof of the freezer, sandwiching insulation between them and injecting foam to clamp them together. If you used a kit, it will already have the walls sandwiched together. The roof should also have extra insulation, as heat rises. Make sure you leave inlets for the compressor and evaporator units.
Adding the Walk-In Freezer Compressor
Adding the Walk-In Freezer Compressor
Installing the cooling system comes next. A kit or DIY system may come pre-charged and include an evaporator coil, condenser and compressor. Such systems may be called self-contained, drop-in, penthouse or capsule pack.
However, any system called remote or split, whether it's indoor or outdoor, means that installation will involve charging the system with refrigerant once it's connected. By federal law, this requires an EPA-licensed refrigeration technician. It will then also require control system wiring and plumbing to drain the evaporator coil during defrost. Once you have your freezer set up, it must be kept at or below 0 degrees Fahrenheit for proper food storage.
Converting a Walk-In Cooler
Converting a Walk-In Cooler
It's also possible to convert a walk-in cooler to a walk-in freezer, but it's much more than a matter of just turning down the temperature on an existing unit. While the insulation box can be re-used in such a conversion, the entire HVAC system would need to be switched out, and you may need different equipment to handle moisture. Consult an expert if you're planning to convert.