How To Shorten A Kitchen Cabinet
Things Needed
-
Drill/driver
-
Straightedge
-
Masking tape
-
Rubber mallet
-
Table saw
-
Hammer
-
Pin nailer
-
1 1/4-inch pin nails
-
Staple gun
-
3/4-inch staples
-
Miter gauge
-
3/16-inch drill bit
-
Pocket-hole jig
-
Wood glue
-
1 3/4-inch screws
-
Clamps
-
Putty crayon
Tip
If the cabinet door can't be cut off due to its design, it's sometimes possible to take the door apart, cut the vertical side pieces down, re-cut or fabricate the center panel separately — or have a cabinet shop make a new one — and reassemble the door.
Use an alternate top bevel, carbide-tipped blade with a tooth count of no less than 60 for the cleanest cuts. If the cabinet is too big to cut on a table saw, use a circular saw. Place strips of masking tape on the front of the cabinet and door before cutting it to prevent scratches from the table saw.
Warning
Examine the path of the saw blade before cutting. If screws are in the way, remove them. Saw blades will cut through nails and staples, but if possible, remove them. Wear eye protection.
 Lisa F. Young/iStock/Getty Images
Cabinet re-sizing is not uncommon. Often it's prompted by the installation of a taller refrigerator or the addition of a microwave or range hood. Cabinet installers shorten cabinets all the time to accommodate changing situations. Cabinets are no more than plywood boxes, and most can be changed readily. The process of shortening cabinets typically involves cutting out a section and cutting down doors to fit the shortened cabinet. Changes in cabinet dimensions can be done with a table saw. When done with care, the changes are almost imperceptible.
Re-sizing the Cabinet
Step 1
Unscrew and remove the screws securing the doors to the cabinet with a drill/driver. If the cabinet has a shelf and it's removable, remove it.
Step 2
Draw a line around the cabinet using a straightedge, on all four sides indicating the cut line — the place where the blade will pass through the cabinet. Place masking tape centered over the line. Draw an identical line on the tape for reference. The tape prevents veneer from chipping.
Step 3
Unscrew screws securing the face frame to the cabinet on the inside and remove them. Use the rubber mallet to bump the face frame off the cabinet.
Step 4
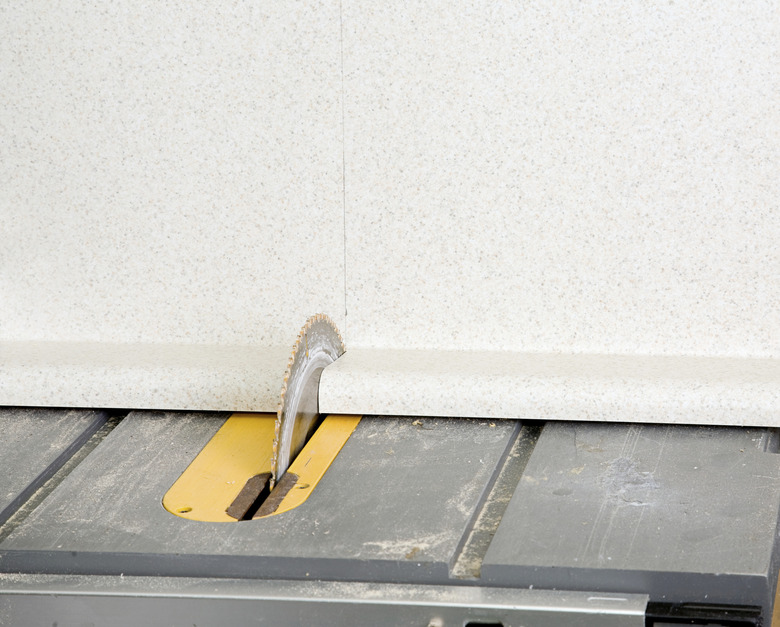
Set the blade of a table saw to 3/4 inch in height. Place the cabinet on the table saw face up. Slide the cabinet and fence together to the left or right as needed to align the blade with the pencil mark on the tape. Lock the fence.
Step 5
Push the cabinet across the blade with the help of an assistant. Turn off the saw. Rotate the cabinet a quarter turn at a time and repeat cutting each side.
Step 6
Tap the bottom out of the cut-off piece with a hammer. Remove the pin nails with diagonal pliers. Position the bottom in the cut-down cabinet. Shoot four, 1 1/4-inch pin nails through the sides to secure the bottom to the cabinet. Shoot 3/4-inch staples through the back to secure it.
Step 7
Measure the width of the horizontal piece of face frame — also known as a rail — at the bottom of the cut-off piece. The measurement will likely be 1 1/4 to 1 1/2 inches. Subtract the measurement from the setting on the fence. Cut the rail or bottom of the face frame off at the measurement with the table saw and miter gauge.
Step 8
Unscrew the screws securing the two small vertical pieces, also know as stiles, of the cut-off piece — the 90-degree pieces — of the face frame and remove them. If the cabinet has a center stile, remove the screws from it too.
Step 9
Drill two angled holes with a 3/16-inch bit and pocket-hole jig, through the vertical pieces or stiles at the bottom on the inside of the face frame. Apply glue to the ends where you drilled the holes. Use 1 3/4-inch screws to re-attach the horizontal rail to the vertical stiles with the drill/driver.
Step 10
Place the cabinet across two sawhorses face up. Apply glue to the cut-off cabinet. Place the face frame on the cabinet. Shoot four 1 1/4-inch pin nails through the face frame, one at each corner. Apply clamps around the perimeter. Remove the clamps when the glue is dry. Place the shelf back in the cabinet if you removed it.
Re-sizing the Door
Step 1
Cut the cabinet door in half, perpendicular to the length with the table saw.
Step 2
Remove the hardware from the door with a drill/driver. Measure the length of the shortened cabinet. Subtract the difference between the door length and cabinet length. Set the table saw at the measurement.
Step 3
Run the bottom half of the door through the saw. The fresh-cut edge should be against the fence.
Step 4
Drill two holes through the vertical sides of the top half of the cabinet door. Use the pocket-hole jig to drill the holes evenly spaced, to penetrate through the bottom of the fresh-cut end.
Step 5
Insert 1 3/4-inch screws in the holes. Apply glue to the bottom piece of the door. Reattach the bottom half of the door by driving in the screws with the drill/driver.
Step 6
Measure the hardware placement on an existing door. Use the measurement to reinstall the original hardware to match existing doors. Fill the previous screw holes with color-matched putty crayon.
Step 7
Screw the top hinge back onto the door using the screws that you removed. Screw the bottom hinge back onto the door using the same spacing as the top hinge. Screw the door back onto the cabinet. Fill the saw marks with a color-matched putty crayon. Screw the door back onto the cabinet using the original screws.