How To Build A Murphy Bar
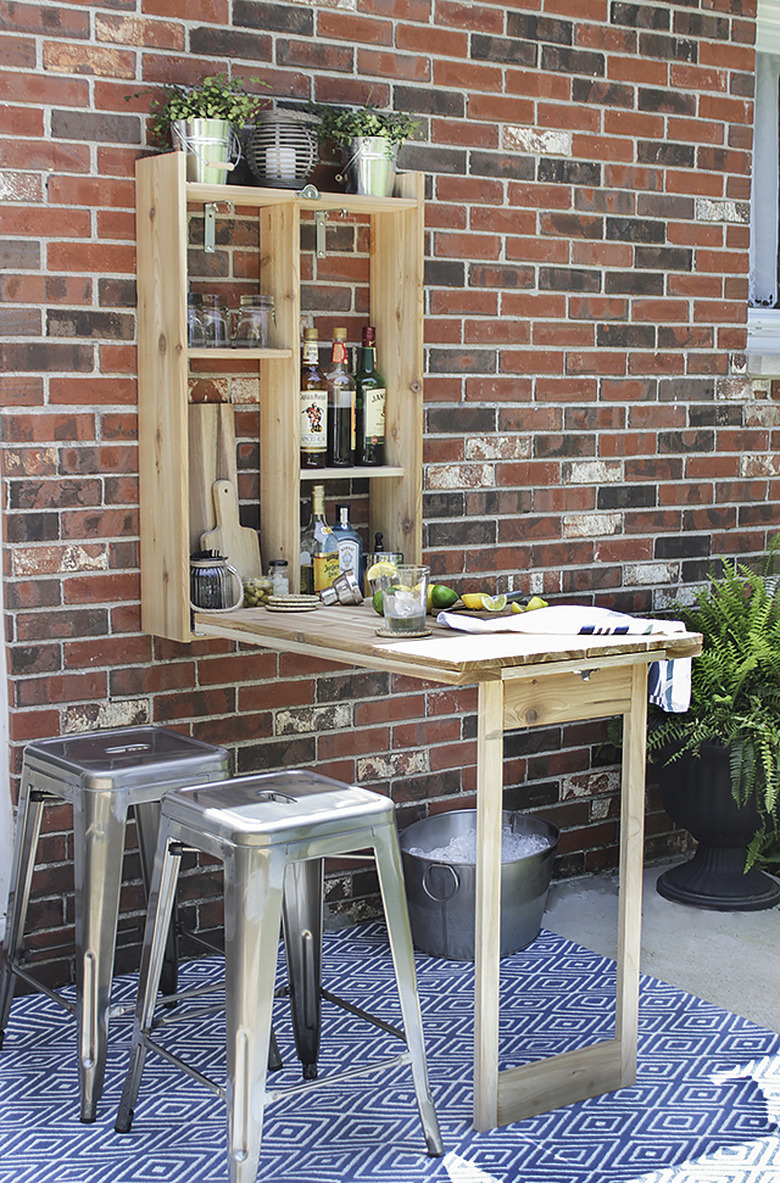
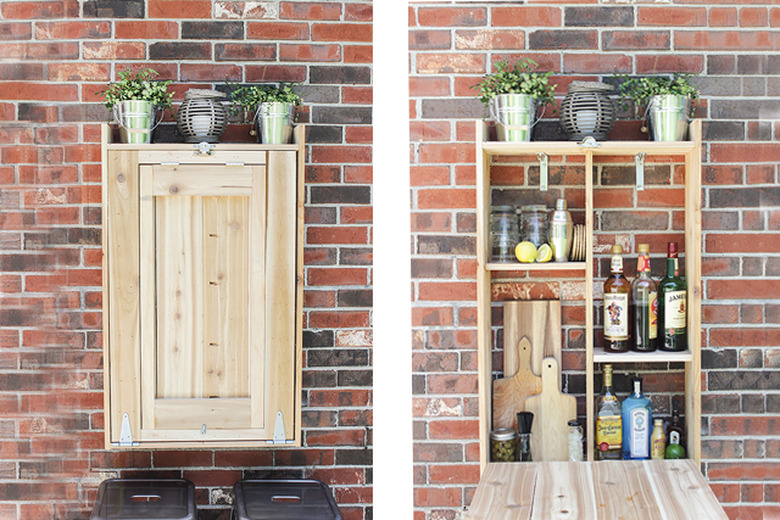
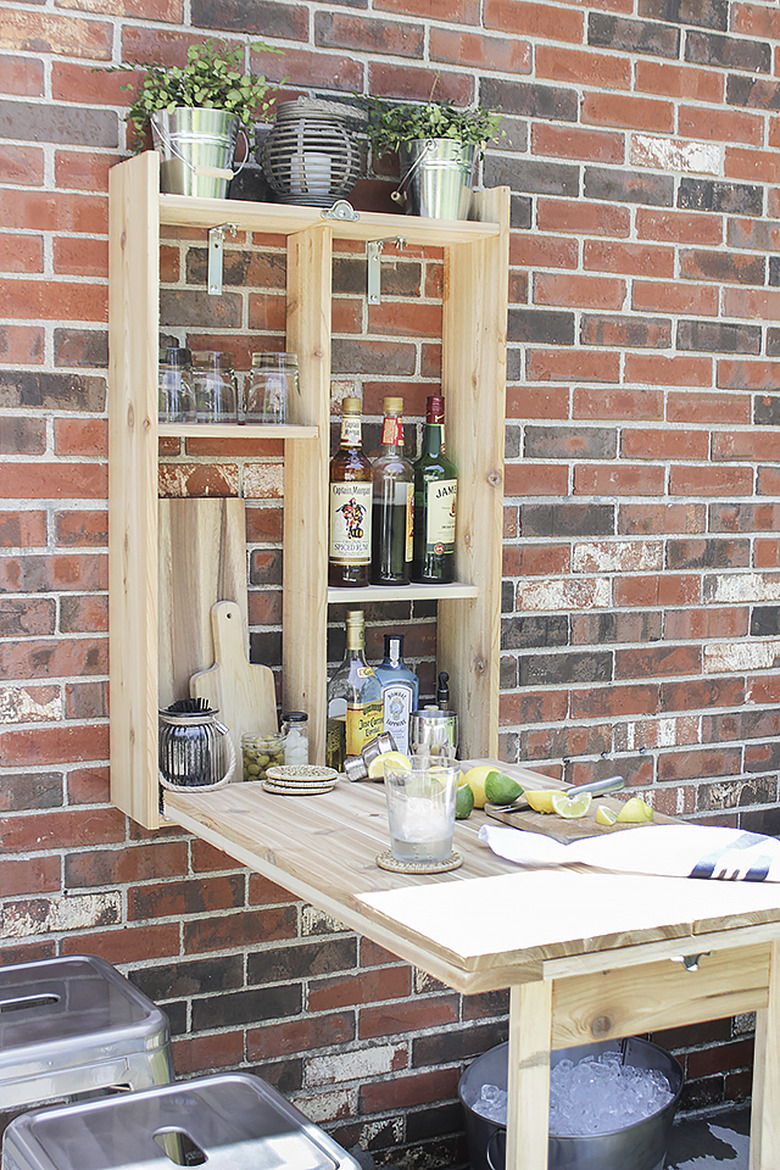
In the summertime, a back patio or deck can become an extension of your home with the right furniture. This outdoor Murphy bar made from cedar is easy to build and is functional, adding both additional seating and a prep station for an evening of cocktails or barbecue.
 Rachel Pereira
Things You Need
Things You Need
-
1 x 8 cedar board, 6 foot length, ( 2 )
-
1 x 6 cedar board, 6 foot length, ( 3 )
-
1 x 4 cedar board, 8 foot length, ( 1 )
-
1 x 2 cedar-tone weather-treated pine board, 8 foot length, ( 1 )
-
Measuring tape
-
Circular saw
-
Wood clamps, 3 foot length and 1 foot length
-
Safety goggles
-
Hearing protection
-
Pocket hole joinery system
-
Pocket hole screws, 1¼
inch or 1 inch size, ( 47 )
-
Wood glue
-
Electric screwdriver/drill
-
Speed-square
-
Nail gun with 1¼
inch nails, 18 gauge
-
Narrow hinges, zinc-plated, 2 inches wide, ( 2 )
-
Heavy duty Tee hinges, galvanized, 4 inches wide, ( 2 )
-
Sash lock, zinc-plated, 1
-
Flat brace L-bracket, zinc-plated, 4 inches, ( 2 )
-
Flat brace L-bracket, zinc-plated, 2 inches, ( 2 )
-
Half-turn button, galvanized, ( 1 )
-
Phillips pan head stainless steel machine screws, 1/4-20 by 1 ½-inches, ( 4 )
-
Stainless steel wing nuts, 1/4-20, ( 4 )
-
Exterior 3-inch screws (if drilling into wood siding) or 1 ½-inch stainless steel brick screws with lead anchors
Tip: Cedar is ideal for outdoor furniture because it is naturally rot- and bug-resistant, and it is a strong wood that will not warp or sag over time. If left unstained, it ages to a weathered gray finish. When purchased at a home improvement store, generally one side is rough and the other side is smooth.
Step 1: Cut the Wood to Size
Step 1: Cut the Wood to Size
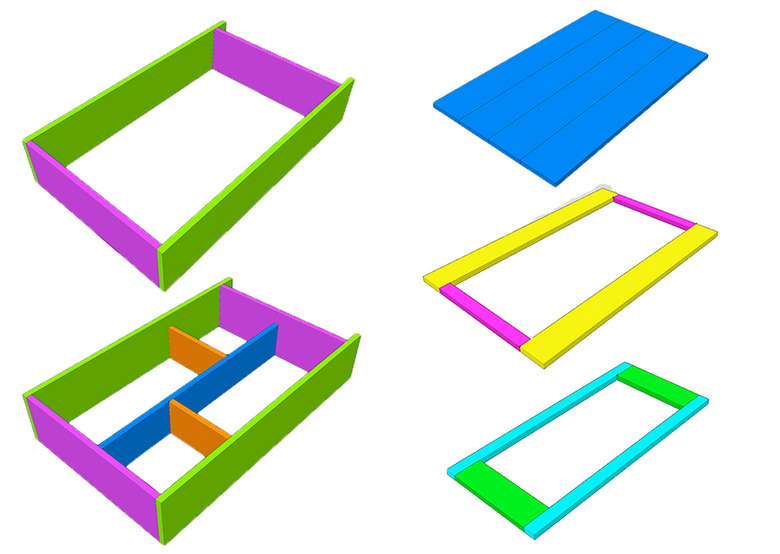
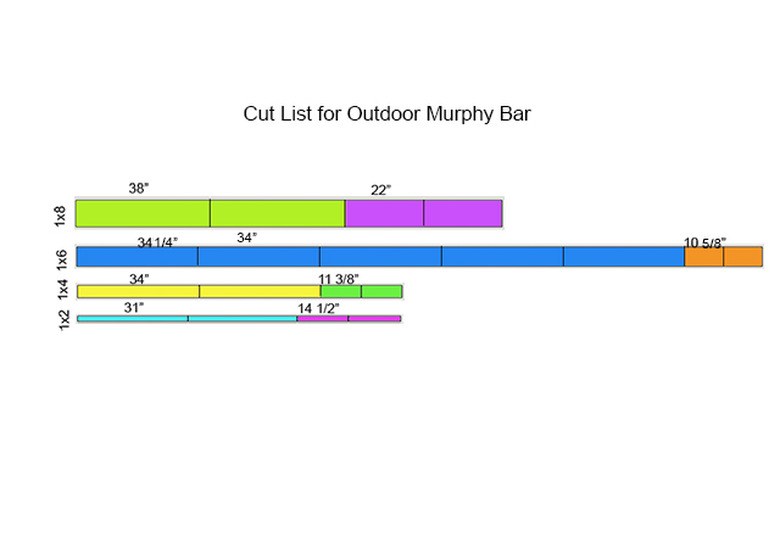
In the illustrations below, you will see the five different phases of what you will be building as well as the cut list for the various wood pieces. You will need to cut:
-
2 pieces from the 1 x 8 at 38 inches
-
2 pieces from the 1 x 8 at 22 inches
-
1 piece from the 1 x 6 at 34 ¼
inches
-
4 pieces from the 1 x 6 at 34 inches
-
2 pieces from the 1 x 6 at 10 5/8 inches
-
2 pieces from the 1 x 4 at 34 inches
-
2 pieces from the 1 x 4 at 11 3/8 inches
-
2 pieces from the 1 x 2 at 31 inches
-
2 pieces from the 1 x 2 at 14 ½
inches
 Shades of Blue Interiors
 Shades of Blue Interiors
Step 2: Build the Box Frame
Step 2: Build the Box Frame
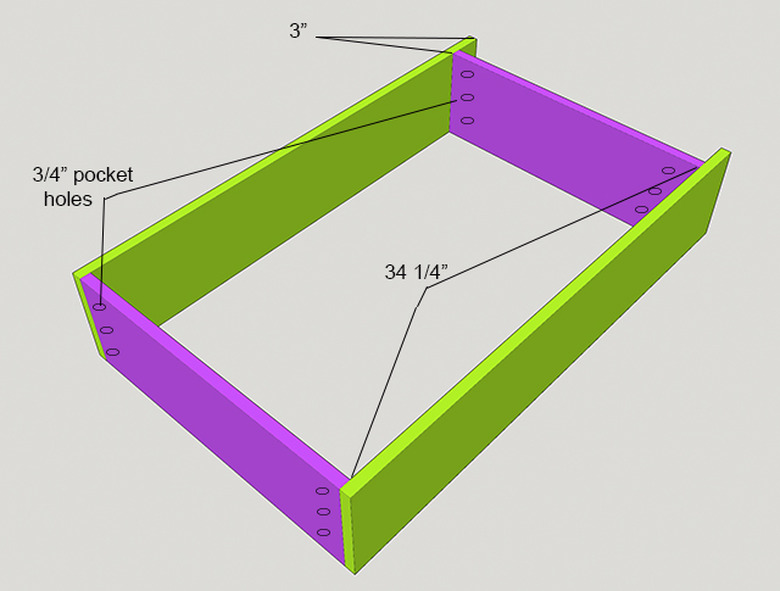
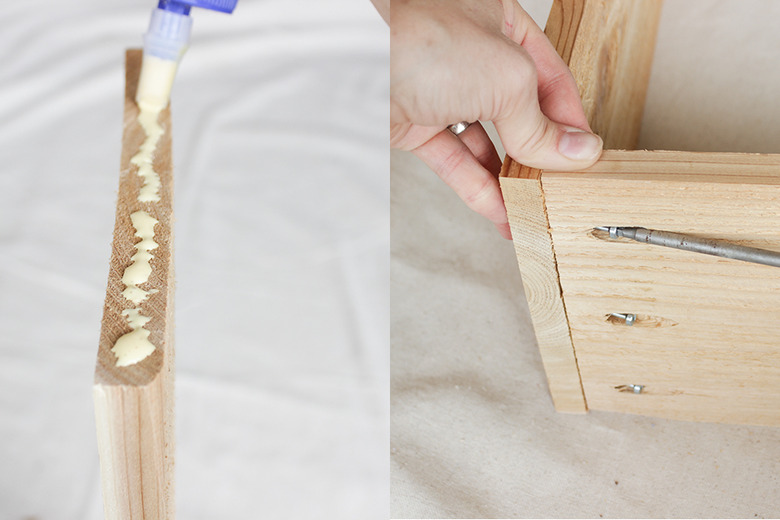
Use the four 1 x 8 pieces to create the box frame. Using the pocket hole joinery system, drill three 3 ¾-inch pocket holes on either end of the short 1 x 8 pieces (top and bottom), about two inches apart. Make sure to drill the pocket holes on the rough side of the board. Attach the bottom piece first, flush with the side pieces, using 1 ¼-inch pocket hole screws and wood glue. Then attach the top piece, three inches down from the top of the sides, using the same method as the bottom piece. Be sure to wipe up any excess wood glue with a damp rag. The opening between the top and bottom piece should be 34 ¼ inches.
 Shades of Blue Interiors
 Shades of Blue Interiors
 Shades of Blue Interiors
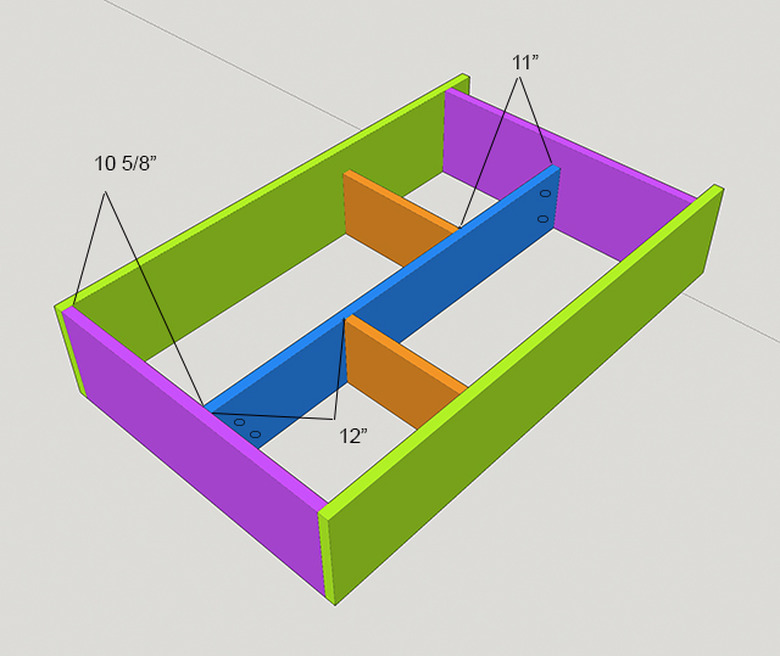
Step 3: Attach the Divider & Shelves
Step 3: Attach the Divider & Shelves
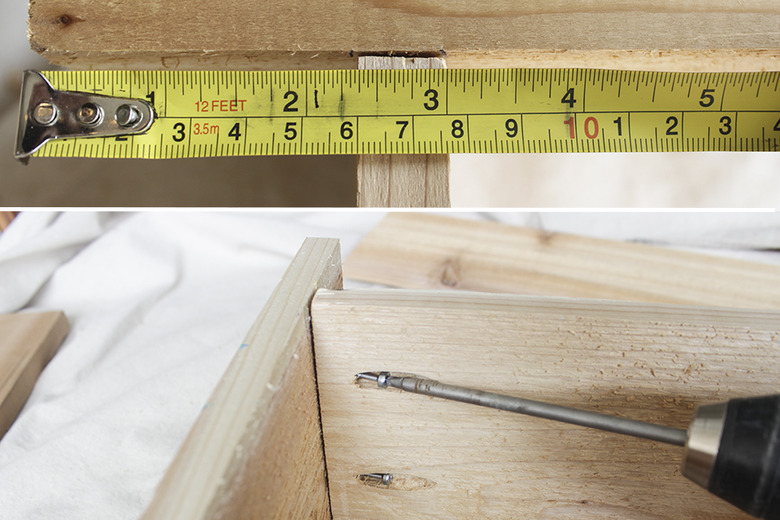
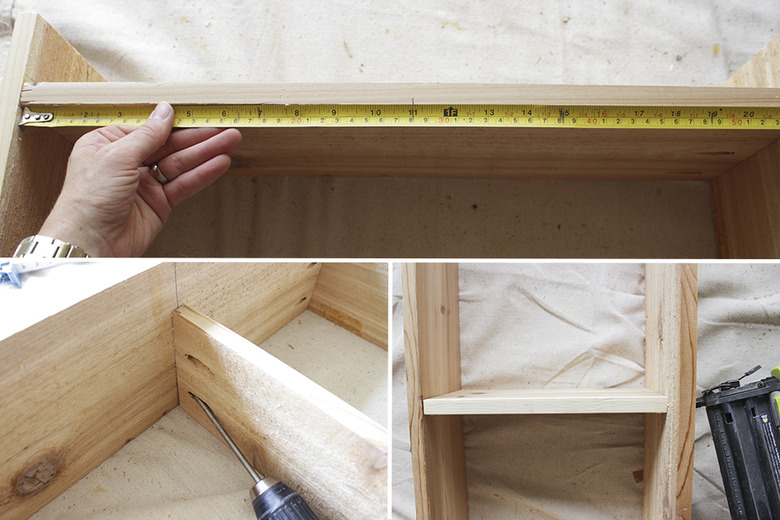
Drill two evenly spaced ¾-inch pocket holes on either end of the long divider 1 x 6 board. Measure the center mark at 11 inches on the top and bottom of the box frame and make a line all the way down using a speed square. Line the 1 x 6 board up so the top and bottom marks are at the center of the 1 x 6, and then attach it to the box frame using 1 ¼-inch pocket hole screws and wood glue. For the shelves, place the short one-by-six pieces to your desired heights and attach them on either side of the divider with an electric nail gun and 1 ¼-inch nails. In this project, the lower shelf was attached 1 foot from the bottom and the upper shelf 11 inches from the top.
 Shades of Blue Interiors
 Shades of Blue Interiors
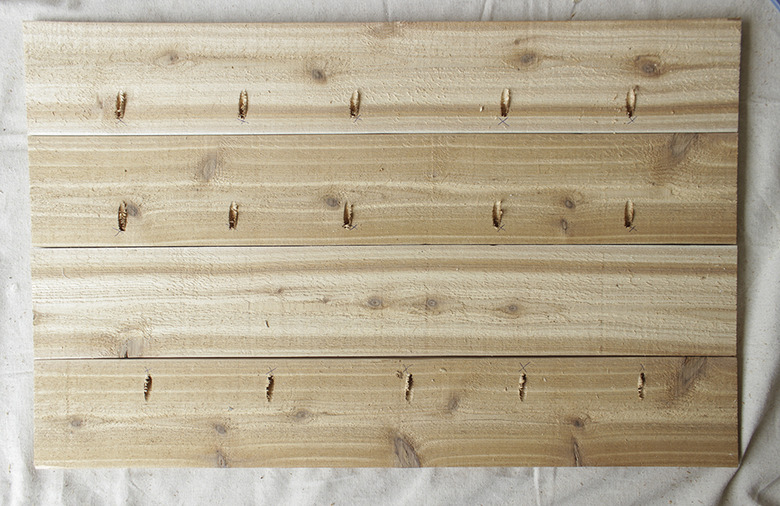
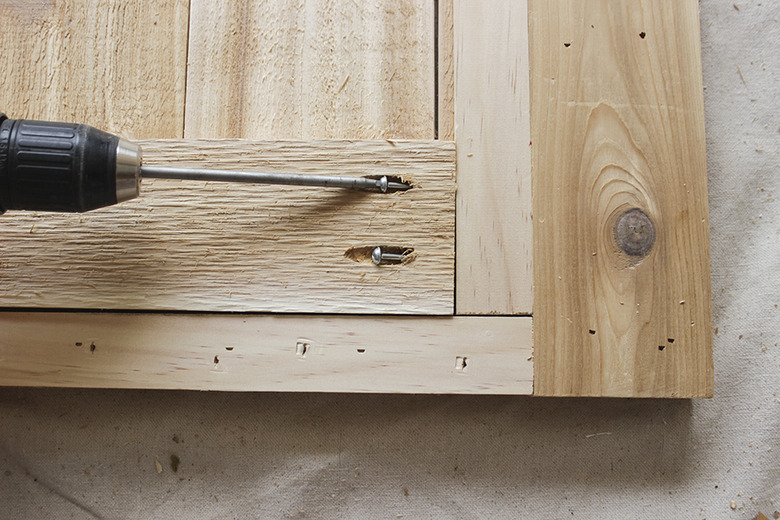
Step 4: Build the Planked Tabletop
Step 4: Build the Planked Tabletop
The top of the fold-out bar will be built with four 1x6s. To attach them together, drill five ¾-inch pocket holes evenly spaced on the rough side of three of the boards. Assemble them flush together so the rough side is facing up, with one of the boards in the middle not having any pocket holes drilled. If needed, step on the top of the boards as you screw them together using 1 ¼-inch pocket hole screws and wood glue, so as to keep the top flat. Work slowly and don't over-screw into the wood, as you don't want the screws to poke out of the other side. This is where you can choose to use the optional 1-inch pocket hole screws instead, so as to not risk the screws coming out of the other side.
 Shades of Blue Interiors
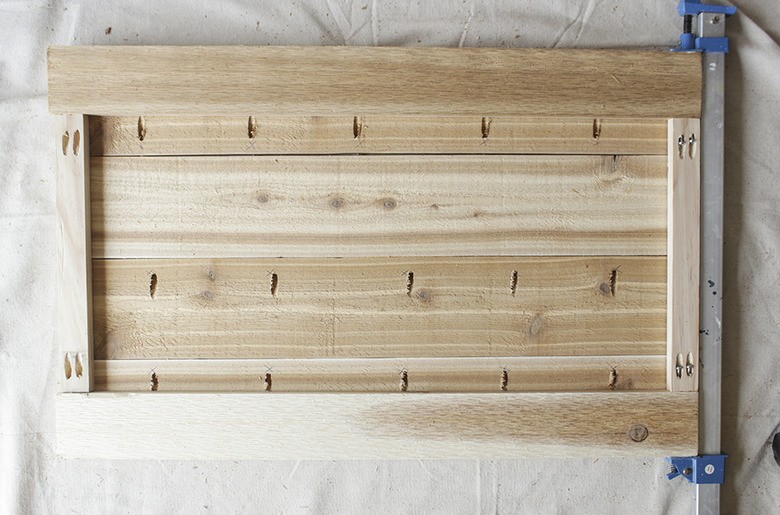
Step 5: Build the Support Frame for the Tabletop
Step 5: Build the Support Frame for the Tabletop
Drill two ¾-inch pocket hole screws on either end of the 14 ½-inch 1 x 2s. Assemble the one-by-twos and the 34-inch 1 x 4s on top of the tabletop planks you just screwed together so that the 1 x 4s are flush with the long edge and the one-by-twos are flush with the short edge. This is so you make sure the sizes are exactly the same. Use clamps and wood glue to attach the one-by-twos flush on either end of the one-by-fours, making sure the rough sides are facing up. Note: you are not actually attaching the support frame pieces to the tabletop in this step.
 Shades of Blue Interiors
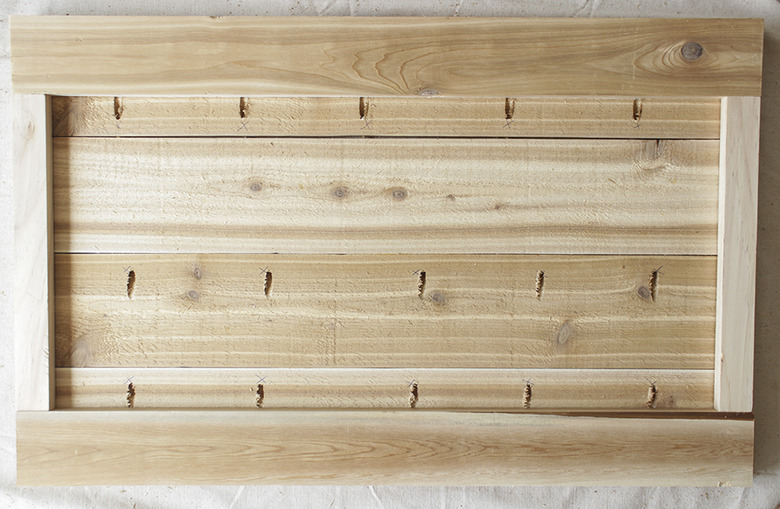
Step 6: Attach the Support Frame to the Tabletop
Step 6: Attach the Support Frame to the Tabletop
Flip the support frame over so the rough side with the pocket holes is facing down toward the rough side of the tabletop. Put wood glue between them and then attach the frame to the tabletop using a nail gun and 1 ¼-inch nails.
 Shades of Blue Interiors
 Shades of Blue Interiors
Step 7: Assemble the Fold-Out Leg Frame
Step 7: Assemble the Fold-Out Leg Frame
Drill two ¾-inch pocket holes on either end of the shortest 1 x 4s. Place the 31-inch 1 x 2s inside the support frame along both long sides and the short o1 x 4s on either side of the short sides, with the rough sides facing up. On one end, allow a small gap between the 1 x 4 of the leg frame and the 1 x 2 of the tabletop support frame so the 2-inch hinges will fit. Keep the hinges there while you attach the leg frame pieces together using 1 ¼-inch pocket hole screws, making sure to put wood glue between the joints first. Note: you are not actually attaching the leg frame pieces to the tabletop in this step.
 Shades of Blue Interiors
 Shades of Blue Interiors
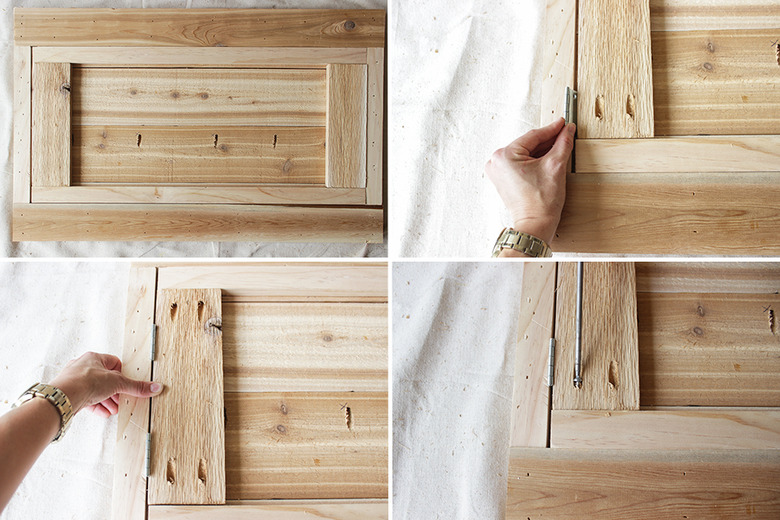
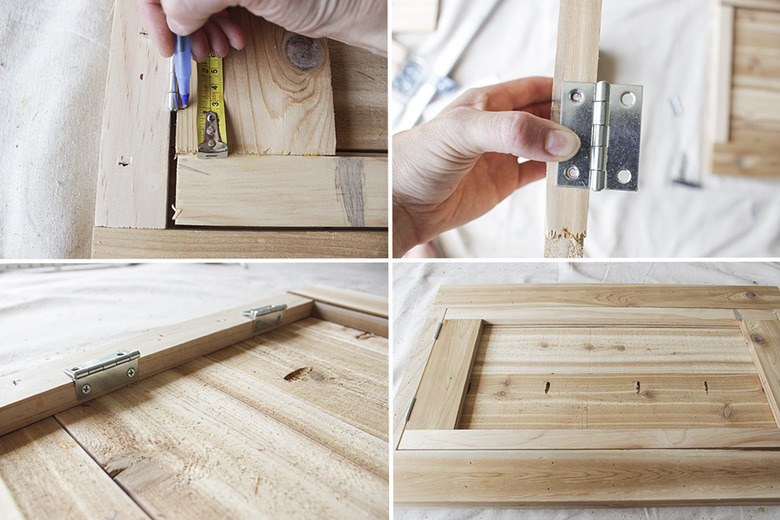
Step 8: Attach Hinges to the Leg and Support Frames
Step 8: Attach Hinges to the Leg and Support Frames
Flip the leg frame over so the rough side is facing the rough side of the tabletop. Measure and mark with a pencil or pen where the position of the hinges will be to join the leg frame and support frame. In this project, the hinges were positioned 1 inch from the edge of the 1 x 4 of the leg. Pre-drill holes where you made the marks and attach the hinges with the provided screws.
 Shades of Blue Interiors
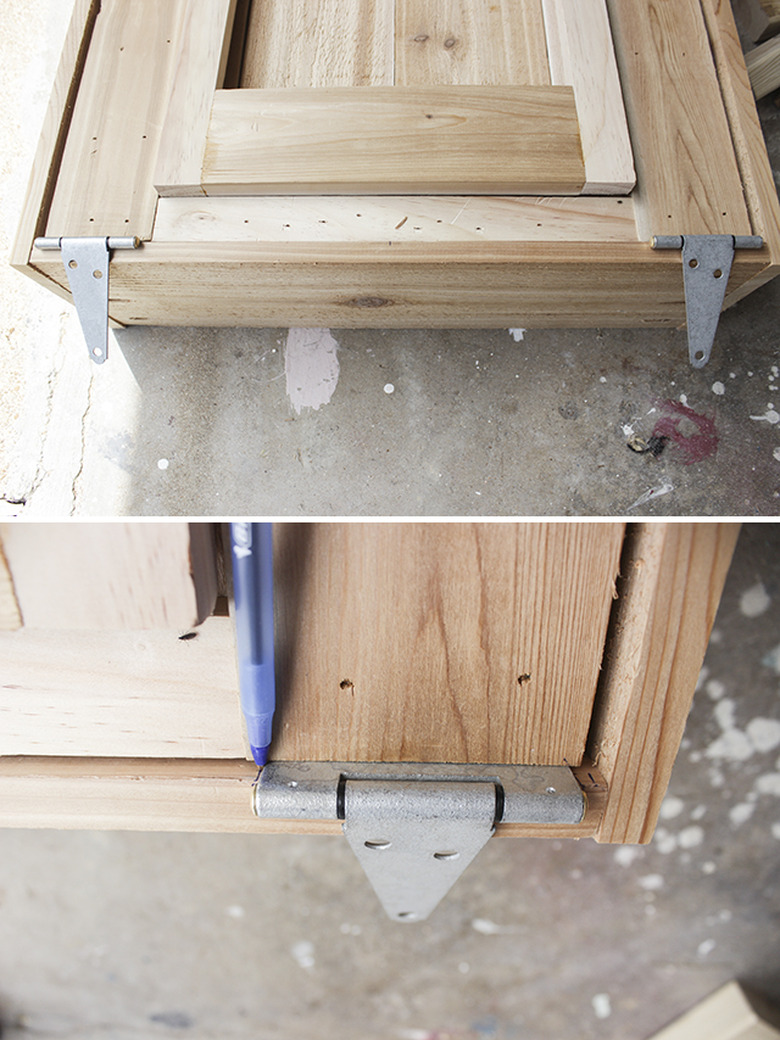
Step 9: Attach Hinges to the Box Frame
Step 9: Attach Hinges to the Box Frame
Place the tabletop with legs attached on top of the box frame. Orient the tabletop so the planks are facing inward and the bottom of the legs are closest to the bottom of the box frame. Push the bar up, allowing a small gap to form at the bottom where the hinges will be placed. Slide the 4-inch hinges in between the one-by-four of the support frame and the edge of the box frame. Mark the location of the holes with a pencil or pen. Pre-drill the holes and then attach the hinges with the screws provided.
 Shades of Blue Interiors
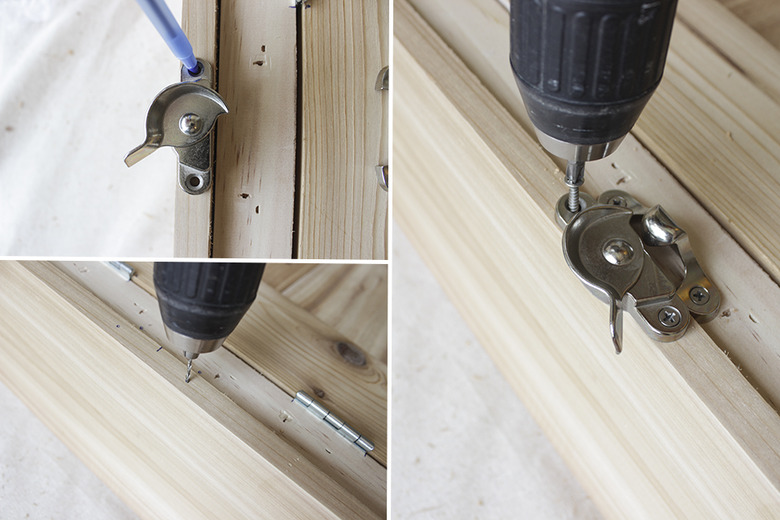
Step 10: Attach a Half-Turn Button for the Leg
Once the hinges are attached, you might notice the bottom of the leg pops out a little bit and doesn't fit flush (see photo in Step 9). To keep the leg flush, you will need to install a half-turn button on the one-by-two of the support frame that it touches. Measure the middle mark on the 1 x 2, pre-drill a hole, and screw in the galvanized half-turn button. Don't tighten it all the way, so the button can move over the bottom of the leg and keep it flush with the rest of the unit.
Step 11: Attach a Sash Lock to the Box Frame
Step 11: Attach a Sash Lock to the Box Frame
Using the pre-marked 11-inch center on the box frame, mark where the screw holes will be on the box frame for the sash lock. Align the other side of the sash lock on the 1 x 2 of the support frame and mark where the screw holes are. Pre-drill holes and attach with the screws provided.
 Shades of Blue Interiors
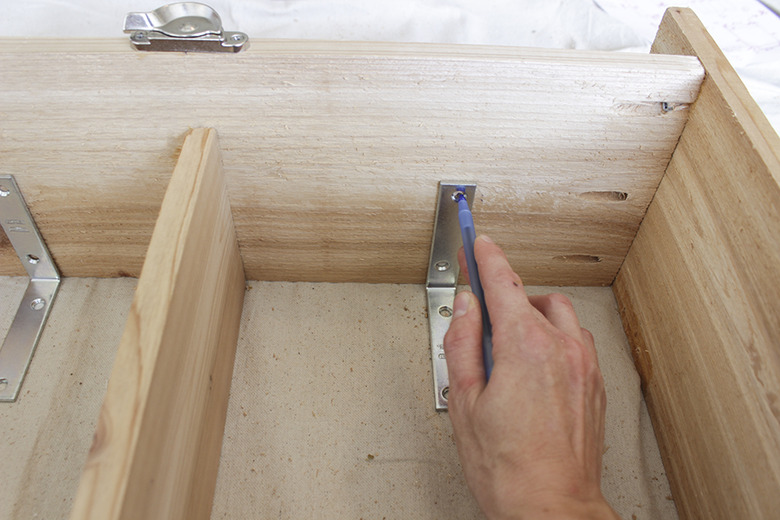
Step 12: Attach the L-brackets
Step 12: Attach the L-brackets
On the the inside of the box frame, at the top, center on either side of the opening where the 4-inch L-brackets will be attached, and mark with a pencil or pen. Drill the four holes (two on each bracket) with a 1/4-inch drill bit. Attach the 4-inch L-brackets with the 1/4-20 bolts and corresponding size wing nuts, so the wing nuts attach on the inside. Repeat the process on the bottom of the box frame using the smaller 2-inch L-brackets, attaching the wing nuts on the underside. This keeps the inside surface usable. You can also countersink the bolt, so it doesn't stick up at all. The top L-brackets hold the weight of the bar and the bottom ones just keep it sturdy.
 Shades of Blue Interiors
Step 13: Mount the Bar on an Exterior Wall
Step 13: Mount the Bar on an Exterior Wall
Have a helper position the Murphy bar so the base of the unit is 32 inches off the ground. Mount the Murphy bar in your desired location, using 3-inch exterior wood screws if you have wood or vinyl siding, or 1 ½-inch stainless steel brick screws with lead anchors, pre-drilling the holes first.
 Rachel Pereira
Tip: If you want to richen the color of the wood and keep it the cedar tone, you can fill the nail holes with wood filler, sand the entire thing with 220 grit sandpaper, and stain to the desired tone.
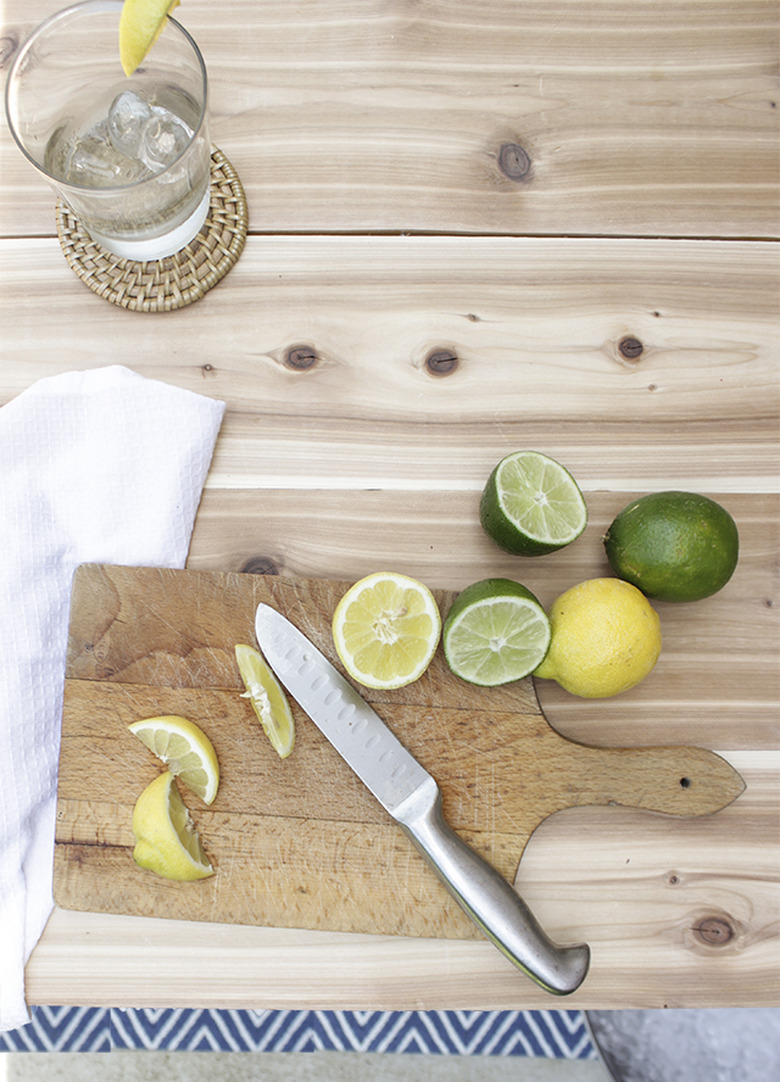
This outdoor Murphy bar is the perfect size to prepare cocktails and drinks for an evening get-together...
 Shades of Blue Interiors
...or you can stock it with seasonings, sauces, and grilling utensils as the perfect prep and serving station for an outdoor grill.
 Rachel Pereira