How To Adjust A Dual-Flush Toilet
We may receive a commission on purchases made from links.
Dual-flush toilets are a great way to be more eco-friendly and save money on your water bill. These toilets have two flushing mechanisms to give a full flush or a half flush depending on the waste inside the toilet.
This usually comes in the form of two buttons on top of the toilet tank lid, with a smaller blue or green button for a half flush and a larger white or gray button for a full flush. On some models, the two buttons must be pushed at the same time to get a full flush, but you may be able to adjust your toilet to change the flush volume.
Parts of a Dual-Flush Toilet
Parts of a Dual-Flush Toilet
Toilets generally require some adjustment or maintenance, and dual-flush toilets are no different. Though the mechanism is slightly more complicated, these modern toilets are generally made to be easy to adjust. If you are not getting the desired flush volume or the water is going all the time, there may be several issues in play.
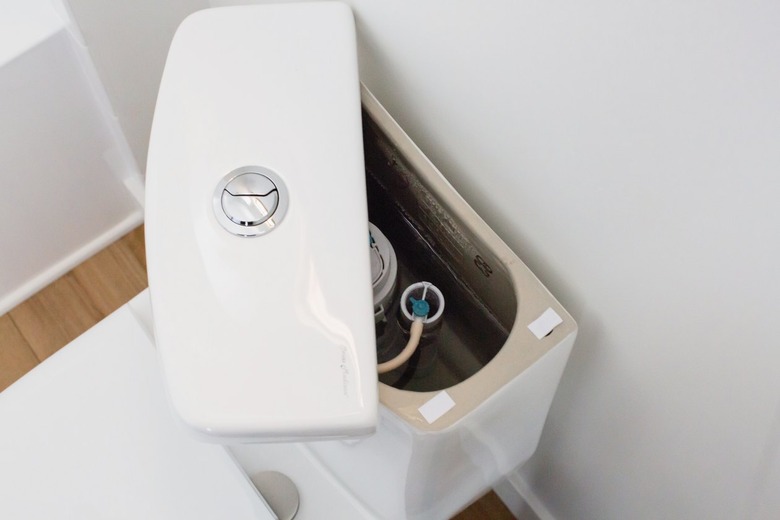
Like other toilets, dual-flush toilets have a fill valve and an overflow valve. Sloan explains that the fill valve will generally be on the left side of the toilet and will be connected to the float that responds to the water level.
The float rests on the water and moves up or down as the water level rises or falls. This is the mechanism that determines the level to which the tank fills or how much water the tank holds. The overflow valve gets rid of excess water if there is too much water in the tank. The overflow valve is generally located toward the back and close to the center of the fill valve.
Push-Button Dual-Flush Toilets
Push-button dual-flush toilets will also have a flush valve or plunger assembly, with two rods leading from the buttons on the lid to push different parts of the plunger assembly. When removing the lid and placing it out of the way, be sure not to bend or damage these rods.
The plunger assembly generally sits atop a hole in the center of the bottom of the tank that leads to the toilet bowl. Depressing either side of the plunger assembly lifts the plunger for a full flush or a half flush.
Adjustments If Flushes Are Weak
Adjustments If Flushes Are Weak
Before attempting adjustments, turn the water to the toilet off and remove the tank lid, placing it upside down on the bathroom rug or a towel or newspaper to avoid scratching the ceramic.
If the flushes on your dual-flush toilet are weak, this could be because the water level is set too low or the plunger assembly is not properly calibrated. First, try removing the plunger assembly. Most plunger assemblies will twist off with a partial counterclockwise twist that unlocks tabs holding the assembly in place. Carefully remove the plunger assembly and check either side.
Most dual-flush plunger assemblies can be calibrated on both the full flush and half flush sides to adjust the flush capacity. After adjusting the flush capacity to the desired level, put the plunger assembly back in, turn the water back on and test both flushes.
Adjusting the Water Level
Adjusting the Water Level
If calibrating the plunger mechanism doesn't work, try adjusting the water level. The fill valve will generally have two ways to adjust it: a coarse adjustment that makes big changes and a fine adjustment to make small changes. The fine adjustment will usually be a screw on the float that can be turned clockwise with a flat-head screwdriver to raise the water level and get a bigger flush.
For larger adjustments, the fill valve may have a cylinder on the outside main part of it that can be moved up and down. Look for a latch, tab or pin that can be removed or switched to open. Open or unhook this latch or pin and adjust the cylinder up or down.
You want to keep the water line about 1/2 inch below the overflow valve. Most tanks will mark this line on the back of the tank. Adjust the water level, close or replace the latch or pin, turn the water back on and test both flushes.
Adjustments If Water Is Running
Adjustments If Water Is Running
If the water is constantly running, the rods may be too long, the water level may be set too high or there may be an issue with the plunger causing it to be slightly open. First, if the toilet stops running when you remove the lid, the issue is likely the rods. Turn the lid upside down and turn the nuts on the rods clockwise to make them shorter.
According to Niagara Conservation, the rods should be about 1/16 inch from the buttons. Replace the lid and test both flushes. If the water level is too high, adjust it as described above so that it is below the level of the overflow valve.
If the water level is set correctly, check the plunger assembly. Empty the tank of water and remove the plunger assembly. Run your finger alongside the gasket on the plunger and the lip on the hole in the tank where the plunger goes, checking for debris or calcium deposits. Calcium buildup is a common issue.
If you detect debris or deposits, use a calcium and lime cleaning product to remove them. If the gasket is damaged, order a replacement from the toilet manufacturer. Replace the plunger and refill the water to see if it is still running.