How To Build An Outdoor Charcoal Grill
Things Needed
-
Bricks
-
Re bar
-
Metal grill
-
Drip pan
-
Fiber reinforced concrete
-
Bucket or wheelbarrow for mixing concrete
-
Hammer
-
Carpenter's chisel
-
Hand level
-
Straight-line string
-
Trowel
-
Tape measure
-
Chalk
-
Nails
-
Shovel
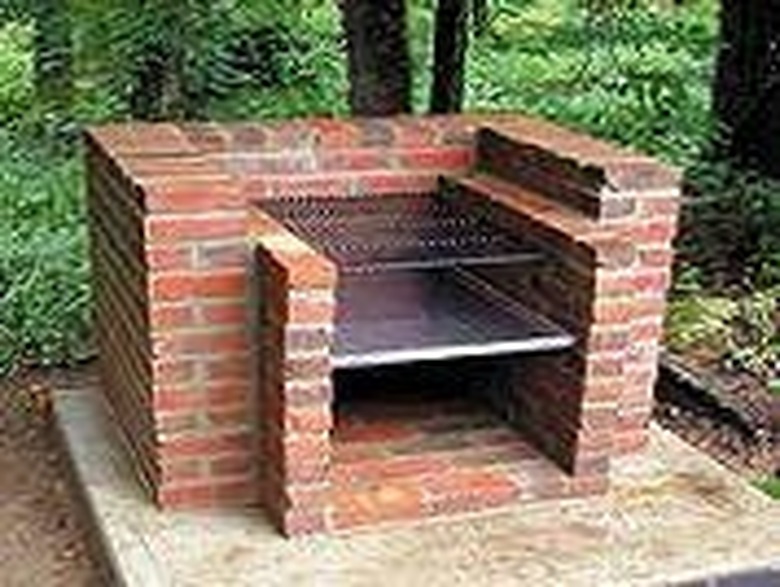
There is nothing like entertaining guests in the backyard and making barbecue. Many people prefer using propane grills, but for those who love the taste of food on a charcoal grill, making your own charcoal grill is ideal. A brick charcoal grill will last for years, not like the metal kinds that eventually get burned through on the bottom. An open-faced brick grill is also simple to clean. Build this now so you can be ready for football season.
Step 1
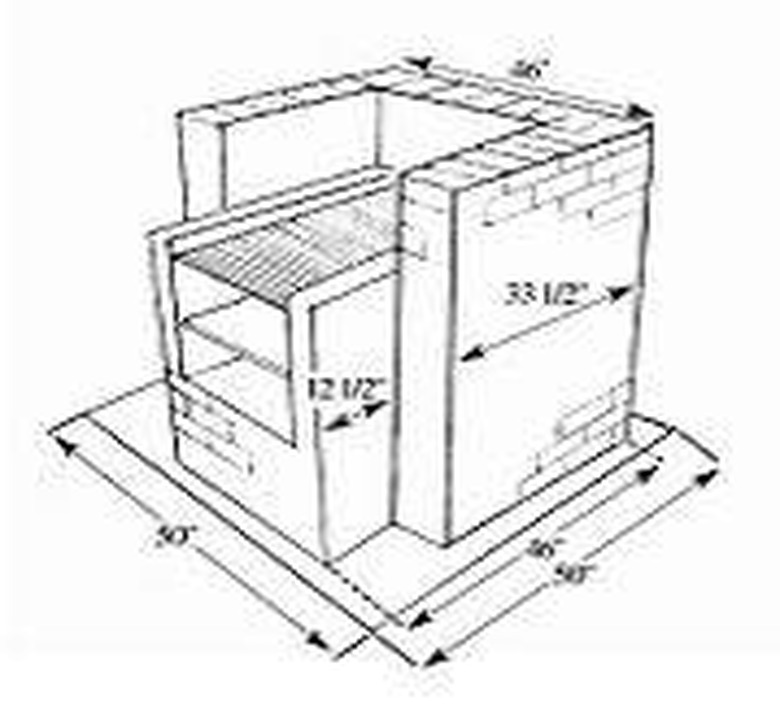
Determine where the pit will be located. Stay away from tree branches. At this spot, mark a 50x50-inch foundation for the barbecue pit foundation, which will be made out of concrete. Shovel the dirt out of the foundation area to at least 6 inches deep. Smooth away all rocks and debris and make sure the ground is level. Note: This barbecue pit is in two sections. The first section is a U shape. The inner section fits inside the U.
Step 2
Mix the fiber-re-enforced cement according to package directions and place in the foundation area. Smooth the surface of the concrete, using the trowel. Make the side of the foundation, which will be the back of the barbecue pit, slightly higher than the front so water will run off when not in use. Let dry overnight.
Step 3
Soak the bricks overnight also. This will help the concrete adhere to the bricks. Use the straight-line string and make a square on the surface of the concrete approximately 2 inches from the edge of the concrete.
Step 4
Lay the bricks out across the back, beginning at the back of the barbecue pit, leaving a 1/2-inch space between each brick for the mortar in a later step. The back row needs to be approximately 46 inches.
Step 5
Place the side bricks approximately 32 inches toward the front of the barbecue pit, again leaving a 1/2-inch space between the bricks. Once the bricks are placed in this approximate U shape, lay the second layer on top of this layer. If the bricks are even and level, proceed to next step.
Step 6
Mix the concrete according to package directions and, using the trowel, remove the bricks and spread a bed of concrete for the first layer to stick to the foundation. Push the concrete into the spaces between the bricks. Frequently check the level of the bricks. Tap the bricks to level them. Repeat this step for all the bricks in the U shape until the desired height is reached. As you work, clean off any excess concrete at this time to keep the excess from drying on the outside of the pit. Allow to dry overnight.
Step 7
Begin the inner section or hearth of the barbecue pit by laying a row of bricks on the inside walls of the U-shaped section. The bricks should stick out approximately 12½ inches from the first section. Apply the concrete in the same manner. Stack one row of bricks on each side approximately ¾ of the way up the outside section—or what is a comfortable height for you.
Step 8
Push three sections of re bar into the wet concrete and evenly spaced from back to front. This will hold the grill. Repeat two to three rows lower and repeat this to hold the drip pan if a drip pan is desired. Once again, the height will be up to you.
Step 9
Continue placing bricks across the bottom of the inner section and stacking up only until you have a large enough area to build the charcoal fire in. Allow all to dry.