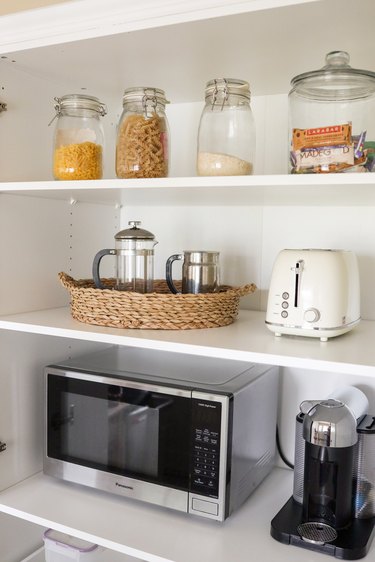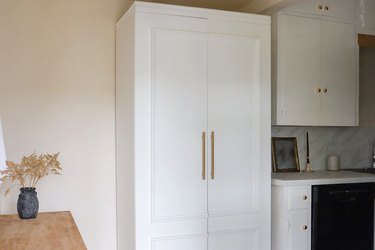
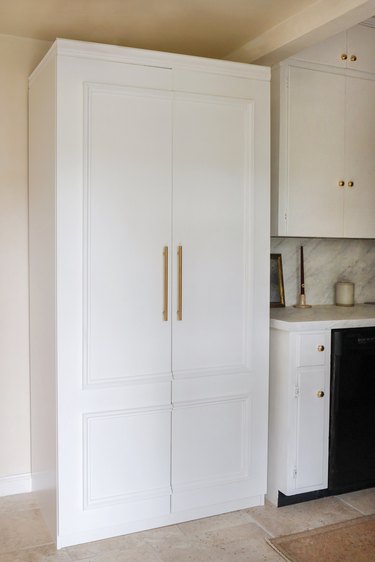
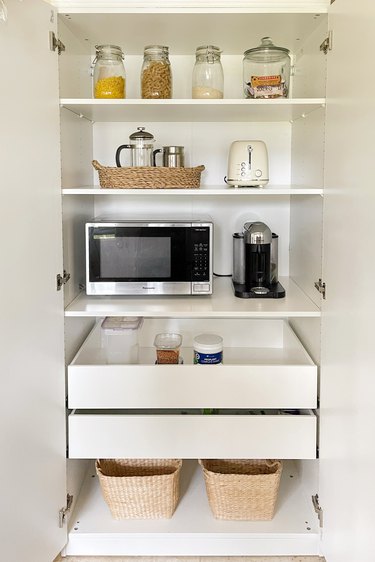
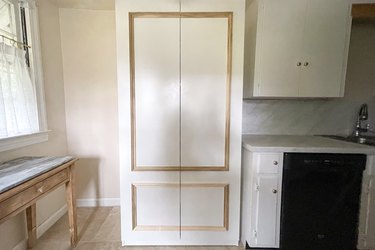
If your kitchen lacks a pantry or you're simply short on cabinet storage, an IKEA Pax wardrobe may just be what your space needs. More than just a clothes closet, the Pax system offers a flexible solution for your storage woes. You can choose from any combination of shelves, drawers, baskets, and pull-out trays to organize your pantry items and house small appliances, such as a microwave, toaster, or coffee maker. It's also super easy to zhuzh it up with decorative molding, pretty hardware, and paint for a custom built-in look that matches the rest of your kitchen — or stands alone as a bespoke showpiece.
Video of the Day
Things You'll Need
Forsand doors, (2)
Komplement hinges, (2)
Scrap wood
Paintbrush and/or foam roller
Tip
The PAX wardrobe comes in various sizes, so be sure to pay close attention to the dimensions when selecting the doors, drawers, and shelves to ensure they will all fit properly. Also consider the height of your ceilings, too, before selecting the wardrobe that will best fit within your space.
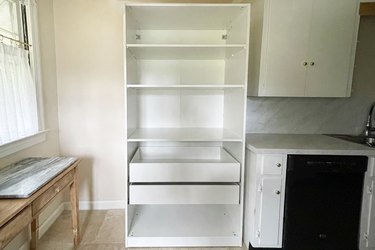
Step 1: Assemble the Wardrobe
Follow the instructions in the packaging to assemble the Pax wardrobe unit. It helps to assemble it in the area you plan to use it, since it is quite bulky to move once it's put together. Before installing the drawers and shelves, take note of the specific peg holes at the top, bottom, and center of the wardrobe where the doors will need to be attached — so you won't accidentally use those holes.
Video of the Day
Then follow the directions in the packaging to install the drawers and shelves inside the wardrobe. If you plan to house any appliances like a microwave or coffee maker inside the pantry, be sure to space the shelving appropriately to accommodate their height. Likewise, if you plan to store any items like tall cereal boxes, storage jars, or clear storage containers, make sure they can fit within the spacing of each drawer or shelf.
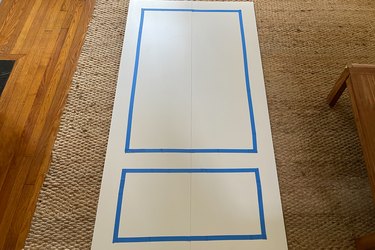
Step 2: Plan the Molding Design on the Doors
Lay the doors flat on the floor, and use painter's tape to mock up the design for your molding trim on your doors. This will help you visualize what the trim will look like. We decided on one long top box and one short bottom box that stretched across both doors, but you could do one long box on each door, or one long and one short on each door, or any other option you prefer. We determined that four-inch spacing between all molding pieces looked balanced (four inches from the top, bottom, and sides of the cabinet, and four inches between the two boxes).
Tip
We opted to only add molding to the front doors, but you may decide you'd like to add decorative molding to the sides of the cabinet as well.
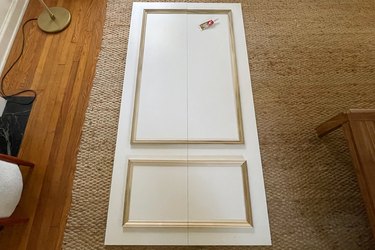
Step 3: Cut Decorative Molding for the Doors
Once you've figured out your design and the spacing, calculate the length you'll need to cut each molding piece. Mark the dimensions on the molding with a pencil, and use a miter saw or a miter box to cut the molding with 45-degree angled ends. To ensure your angles are always facing the proper direction, remember the the thicker side of the molding should always be the longer side of the angled cut.

Step 4: Glue Molding to the Doors
Remove the taped design from the doors, and glue the molding pieces in the desired arrangement onto the doors with construction adhesive.
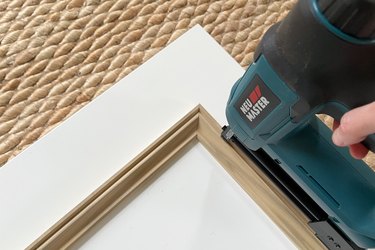
Step 5: Nail Molding to the Doors
Once the glue has set for about 15 minutes, follow up by brad nailing the molding to the doors to ensure the pieces are securely attached. A few nails along each piece is sufficient.
Step 6: Attach the Doors
The Komplement hinges come separately from the Forsand doors (there should be three hinges per door). Follow the directions to first attach the hinges to the doors, and then attach the other side of the hinges to the wardrobe. It helps to set the doors on a couple of books stacked on the ground to raise them up to the proper height while attaching them.
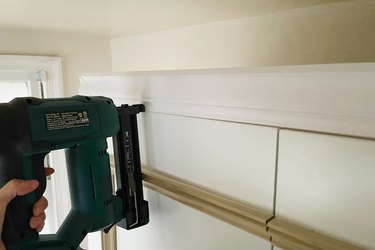
Step 7: Attach Scrap Wood to Top of Wardrobe
Since you can't attach the crown molding directly to the top of the wardrobe, you'll have to secure a few pieces of scrap wood to the top, and then brad nail the crown molding to the scrap wood. Be sure to use scrap wood that is thick enough to nail into but not any taller than the crown molding itself.
Position a piece of scrap wood along the top front of the wardrobe so that when the crown molding is attached, it will be flush with the front of the doors. Similarly, position a piece of scrap wood on each side of the cabinet so the crown molding will be flush with the sides of the wardrobe when attached. To secure each piece of scrap wood in place, drill a few wood screws from the inside of the wardrobe's ceiling up into the scrap wood.

Step 8: Attach Crown Molding to the Scrap Wood
Measure and mark the dimensions for the crown molding, and use a miter saw to cut the pieces accordingly. We only needed to cut three pieces of crown molding — one long one for the front, and two shorter ones for each side. Since the back of the cabinet wouldn't be visible, we didn't add any crown to it. Use a brad nailer to attach each piece of crown molding to the scrap wood, making sure to match up the corners.
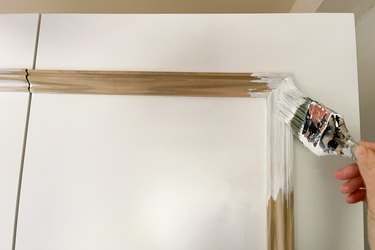
Step 9: Caulk the Molding
To create a seamless look, use a caulking gun to caulk along the inner and outer edges of the trim molding as well as any visible gaps along the crown molding. You can also use it to fill any nail holes. Use a paper towel to wipe away any excess, and then let the caulk dry about 30 minutes.

Step 10: Prime and Paint
Be sure to use either a shellac-based primer or a high-adhesion bonding primer since the Pax wardrobe and Forsand doors have a laminate surface. This will avoid any paint-peeling mishaps down the road. Apply one coat of primer on the molding and entire wardrobe surface, and allow it to dry for an hour. Once the primer has dried, apply two coats of your desired paint color (we used Behr Polar Bear to match the rest of our cabinetry), allowing for adequate drying time between each coat.
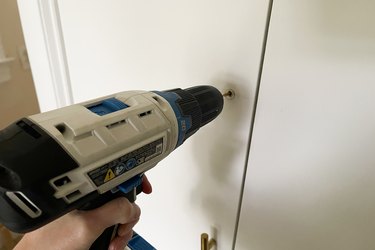
Step 11: Attach the Door Handles
Once the paint has completely dried, mark the desired placement for your door handles on the doors, and use a power drill to attach them to the doors with the screws that came with them.
Now you have a beautifully customized pantry that you can stock with your favorite goodies and style the shelves to your heart's content!