A pocket hole is a specialized hole drilled to accommodate a pocket screw for joining two pieces of wood. Pocket holes and pocket screws are most typically used in cabinet-making to create face frames and box (carcase) pieces. Pocket holes and pocket screws are often used in lieu of biscuits or dowels for strengthening glued joints and sometimes in addition to biscuits and dowels for extra reinforcement of the joint. One advantage of using pocket screws is that the screw serves as the clamp for gluing, so no additional clamping is necessary, and you can continue assembly while the glue cures. When using dowels and biscuits as joint support, clamping is needed to push the two pieces into firm contact, and construction must wait until joints are dry.
Video of the Day
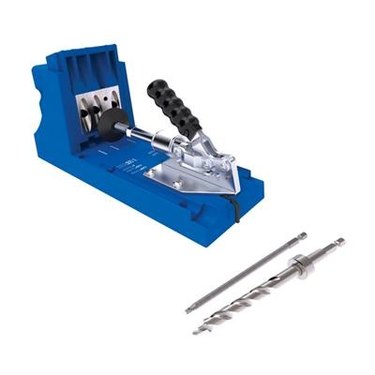
Drilling a pocket hole is easiest when using a jig. A jig is a specialized tool used to make repetitive tasks easy to accomplish with a high rate of accuracy and speed. Two types of jigs are available for drilling pocket holes. One is a simple plastic or metal drill guide that you clamp onto the workpiece. The other type has its own clamp for holding workpiece and more options for precise adjustments for hole placement. A third jig is available for cabinet-making shops; it is for large volume work and won't be discussed here.
Video of the Day
A pocket hole can also be drilled without a jig, though it is a little harder and not as accurate.

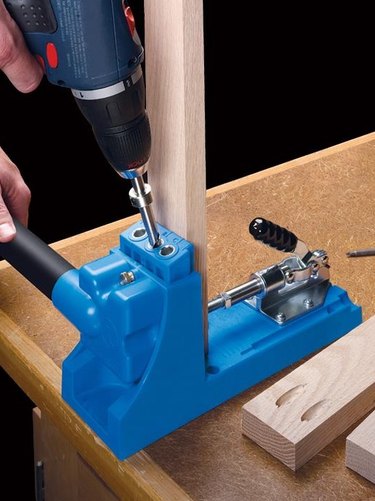
Drilling a Pocket Hole With a Simple Jig
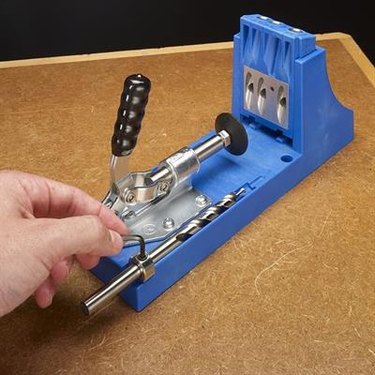
To drill a pocket hole with the simple jig, you will need the jig, two clamps, and a specialized stepped drill bit with a stop collar. You can drill the holes with a regular drill bit and stop collar, but the stepped bit provides a pilot hole that increases the accuracy of screw placement.
Follow the directions that came with the jig to adjust for the thickness of the material.
- Clamp the jig in place in the proper position on the interior face of the workpiece. Remember that the screws need to go into the side of the receiving piece, not into end grain (see Tip).
- Clamp the workpiece to a stable surface.
- Slip the depth collar onto the shank of the step bit. Measure from the step to the collar and lock in place according to the directions.
- Lock the step bit into a high-speed drill, slide the bit into the jig hole, and drill the hole in one smooth motion, in and out, at high speed.
- Move the jig to the next hole location and repeat. Unless you change material thickness, the stop collar position does not need to be changed.
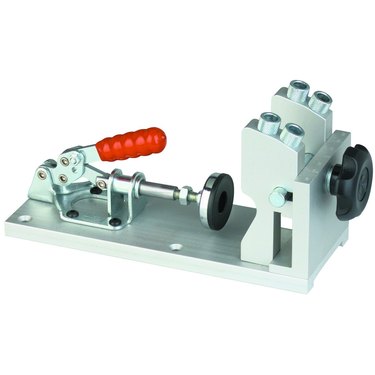
Drilling a Pocket Hole With an Advanced Jig
Advanced jigs are designed to drill two or more pocket holes once you clamp the workpiece into the jig.
- Attach the jig to the edge of a solid work surface with a clamp or with screws through the mounting screw holes.
- Set the drill bit depth with the stop collar. Slide the stop collar over the shank of the step bit. Use either a provided chart or the bit depth ruler on the jig to set the depth and tighten the stop collar with the provided hex wrench.
- Adjust the drill guide to depth and tighten, or refer to product directions to choose the proper guide holes to use.
- Place the workpiece into the jig and adjust the clamp to hold the piece firmly in place. Be aware that over tightening the clamp can mar soft woods like pine and cedar. The interior of the workpiece should be facing you to receive the pocket holes. Remember that the screws need to go into the side of the receiving piece, not into end grain (see Tip).
- Slide the drill bit into the correct guide hole and drill the pocket hole in one smooth in and out motion with the drill on high speed. Pull the drill bit all the way out of the jig to remove the sawdust.
- Most jigs of this type are set up for you to drill two pocket holes at a time for cabinet face frame rails. Drill the second hole if needed, or move the work piece to the next hole location and drill.
Tip
It is important that the pocket hole is set up going the proper direction for joint strength. For example, if you are making a face frame or a door with horizontal rails and vertical stiles, the pocket holes should be drilled in the ends of the rails rather than the sides of the stiles. If you instead drill the pocket holes so that the screw goes from the stile into the end grain of the rail, the screw will have no holding power. Screws driven into end grain need to be very long to have holding power, and the pocket screw is quite short. Just remember that the pocket screw should extend out the end of one piece into the side of another. If you are joining pieces side to side, then it does not matter.
Drilling a Pocket Hole Without a Jig
If you are assembling a casual project something for the workshop or for the outdoors made from 2 x 4s—in other words, not fine cabinetry or furniture—you can drill pocket holes without a jig. If you are making something with expensive hardwoods, it pays to spend $22 dollars on a simple mini jig. Just one mistake will easily cost you more in lumber than the jig costs!
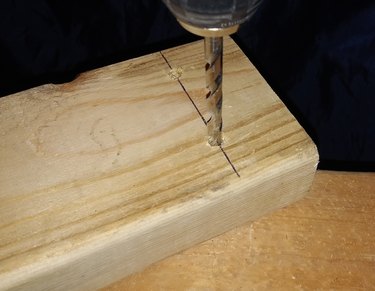
- To drill a pocket hole without a jig to attach a 2 x 4 to another 2 x 4 or 4 x 4, mark a line 1 1/2 inch from the end of the workpiece. Remember that the screws need to go into the side of the receiving piece, not into end grain (see Tip).
- Clamp the workpiece to a stable surface.
- Use a 1/4-inch or 3/8-inch drill bit to drill a pilot hole perpendicular to the workpiece at the line. Drill to a depth of about 1/4 inch.
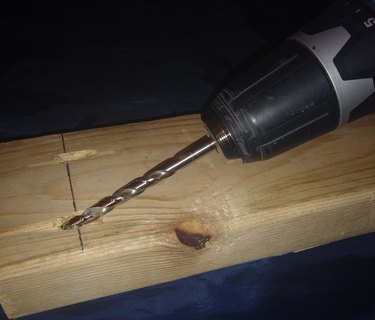
- Then, tilt the drill as far as you can so the bit is pointed toward the end of the work piece. Drill to a depth about half way between the marked line and the end.
- If you wish, you can counterbore the pocket holes with a larger size bit so that the heads of the pocket screws will be recessed below the surface of the wood.
Tip
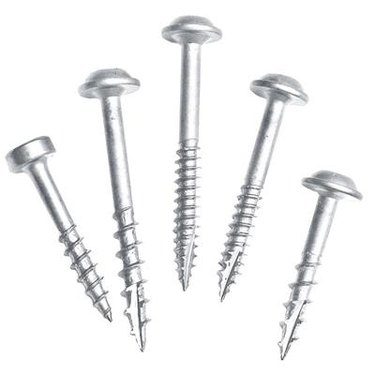
Specialized pocket screws will make using pocket holes even easier. Some features of specialized pocket screws are:
- Self tapping—will not split wood
- Integrated washer—prevents over-driving
- Matched to jig—takes the guesswork out of sizing
- Thread choices—available in coarse or fine threads for a variety of woods