
How to Create Faux Exposed Brick Wall Using Venetian Plaster & Stone Veneer

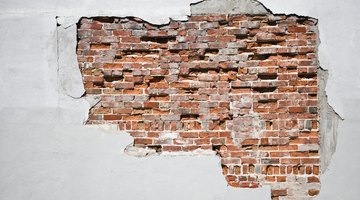
In the past, when a brick home was constructed, plaster was often used to cover the interior walls to provide a finished look. As time wore on, the plaster would begin to crack, and in some places, fall off of the wall. You can replicate this appearance by installing veneer and plaster onto your interior walls.
Veneer is concrete cast to resemble stone or brick.
Things You Will Need
- Water
- Bleach
- Portland cement
- Washed sand
- 5 gallon bucket
- Masonry brush
- Trowel
- Veneer bricks
- Wet saw
- Safety goggles
- Grout
- Grout bag
- Joint tool
- Concrete sealer
- Veneer plaster
- Hawk
Installing the Veneer
-
Clean the wall and the back of the brick veneer with a mild cleanser consisting of four parts water to one part bleach. Clean surfaces allow the mortar to adhere better.
-
Mix together mortar consisting of one part Portland cement and two parts washed sand until it's as thick as mashed potatoes. Place the Portland cement and washed sand into a 5-gallon bucket, filling it about three-quarters full. Add 1 quart of water to the mix at a time, stirring it thoroughly with a trowel. Stop adding water when you reach the desired consistency. Make multiple batches of mortar as needed so that it doesn't begin to set before you can apply it to the wall.
-
Cover the back of the first veneer brick with water, thoroughly wetting the surface, with a masonry brush. This prevents the veneer from absorbing water from the mortar as it cures, which can cause cracks in the mortar.
-
Spread a 1/2-inch layer of mortar onto the back of the brick and the wall where it's being installed with a trowel, and smooth the surface. Place one layer on the wall, and one layer on the veneer brick. When applying it to the wall, place it in one of the bottom corners, and cover an area slightly larger than the brick. The veneer is installed working from one side of the wall to the other, then up toward the ceiling.
-
Place the veneer onto the wall where you applied the mortar, twisting it slightly to ensure a better bond for the mortar.
-
Install the rest of the veneer bricks onto the wall, using the same process. Keep a gap of about 3/8-inch between each brick, just as a real brick wall would have. Cut the veneer with a wet saw as needed, and stagger the bricks in every other row. Wear safety goggles when using the wet saw.
-
Apply grout to the joints between the bricks with a grout bag. Create a curved surface in the grout by running over the grout with a joint tool. Allow the mortar and grout to set for the time specified by the manufacturer.
-
Coat the veneer with concrete sealer to protect the surface. This is a product, usually made of acrylic, that protects the surface of the concrete from damage. Brush it onto the veneer, using just enough concrete sealer to cover the surface of the veneer. If you use too much, it can cloud the surface of the veneer, and on an interior project such as this, the veneer isn't exposed to the elements.
Applying the Plaster Finish
-
Mix veneer plaster, following the instructions on the packaging. When shopping for the plaster, look for veneer plaster, as it can be applied to concrete, such as the veneer bricks on the wall.
-
Brush water onto the surface of the hawk. This is a metal tray with a handle underneath that holds the plaster as you work. It is sold separately from other tools. Adding the water to the hawk prevents the plaster from sticking to it.
-
Place two scoops of plaster onto the hawk.
-
Scoop the plaster onto the bottom edge of the trowel by sliding the trowel over the hawk.
-
Place the trowel along the bottom of the wall at a 30-degree angle. Glide the trowel up along the wall, flattening it against the wall as you go. After the trowel is flat against the wall, turn it upside-down and glide it back over the surface of the plaster.
-
Continue to add plaster over the veneer, but leave certain areas of the wall bare to simulate plaster that has fallen off the wall. Create cracks in the plaster with the edge of the trowel. Allow the plaster to set for the time specified by the manufacturer.
The Drip Cap
- In the past, when a brick home was constructed, plaster was often used to cover the interior walls to provide a finished look.
- Veneer is concrete cast to resemble stone or brick.
- Make multiple batches of mortar as needed so that it doesn't begin to set before you can apply it to the wall.
- Spread a 1/2-inch layer of mortar onto the back of the brick and the wall where it's being installed with a trowel, and smooth the surface.
- Allow the mortar and grout to set for the time specified by the manufacturer.
- Mix veneer plaster, following the instructions on the packaging.
- When shopping for the plaster, look for veneer plaster, as it can be applied to concrete, such as the veneer bricks on the wall.
- Brush water onto the surface of the hawk.
- It is sold separately from other tools.
Writer Bio
Carson Barrett began writing professionally in 2009. He has been published on various websites. Barrett is currently attending Bucks County Community College, pursuing a Bachelor of Arts in sports management.
Photo Credits
- Jupiterimages/Photos.com/Getty Images
- Jupiterimages/Photos.com/Getty Images
More Articles