
How to Build a Kids' Rock Climbing Wall

Kids love to climb anything from chain link fences to kitchen drawers -- and many embrace rock climbing as they grow up. An indoor rock climbing wall is a wonderful gift for active children. It develops character, confidence, and provides an outlet for pent-up energy during those cold rainy days.
Prepare a surprise holiday gift by building their rock climbing wall behind closed garage doors and installing it in the playroom or basement on Christmas Eve.
Things You Will Need
- 4 foot by 8 foot 3/4-inch plywood panel
- Tape measure
- Pencil
- Chalk line
- 7/16-inch wood spade bit
- Drill/driver
- 3/8-inch four prong t-nuts
- Hammer
- PVC primer
- High-Gloss PVC paint
- Bolt-on climbing holds
- Stud finder
- Two-by-four furring strips
- 3-inch long #8 wood screws
- Drywall putty
- 120-grit sandpaper
- Cordless impact wrench
- Allen wrench attachment
- Sturdy ring bolts
- Braided climbing rope
- Padded gym mat
Tip
Have an adult supervise the children’s first three or four sessions until they become skilled climbers capable of taking care of themselves.
Drilling the Panel
-
Choose the best side of a 4 foot by 8 foot 3/4-inch plywood panel and use a tape measure and pencil to mark divisions on the board. Mark all four edges of the panel, 4 inches from the top and bottom, and 2 inches in from the sides. Snap chalk lines across these horizontal and vertical points.
-
Starting at the horizontal upper 4-inch line, divide the 8-foot sides into 8-inch segments, and snap chalk lines across the panel on these marks.
-
Mark points 6 inches in from the left side, and divide the top and bottom of the panel into five 8-inch segments starting at the left 6-inch line and ending at the right hand 2-inch line. Form a grid by snapping chalk lines down the length of the panel across these points.
-
Bore holes with a 7/16-inch wood spade bit and drill/driver through the grid points on each odd row across the width, as follows: Drill the first hole through the point 6 inches in from the upper left. Drill the remaining five holes across the panel at 8-inch intervals, ending 2 inches from the right. Repeat by drilling holes through the remaining five odd rows the same way. Be sure to drill through from the good side.
-
Continue drilling through the even rows. Start the second row by drilling from left to right as follows: Begin with the first hole through the left hand 2-inch mark. Drill the remaining five holes across the panel at 8-inch intervals, ending 6 inches from the right. Drill the remaining five even rows the same way. This gives you a staggered grid that provides a multitude of different mounting points for your climbing holds.
Climbing Hold Mounts
-
Flip the panel over. Insert 3/8-inch four prong t-nuts with a 7/16-inch barrel size into each hole. Hammer the t-nuts into the panel until the flange is flush with the surface, and turn the panel back over.
-
Apply a coat of PVC primer to the front of the panel. Allow to dry, and finish the panel with two coats of high-gloss pastel colored PVC paint of your choice. Allow the paint to dry thoroughly between coats.
-
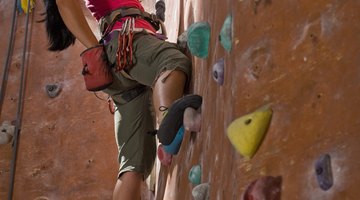
Select a variety of bright colored bolt-on climbing holds with different shapes and sizes for later installation.
-
Repeat the above steps if you prefer to use more than one panel for the rock climbing wall.
Climbing Wall Installation
-
Locate the vertical running studs on the mounting wall with a stud finder and snap a chalk line down the middle of the hidden studs spanning the width of the panel/s. Studs are normally set 24 inches apart, therefore, each panel is mounted against three studs, one at each end and one in the middle. If you’re mounting more than one panel, the end studs can be shared between each abutting panel.
-
Attach two-by-four furring strips to the wall with 3-inch long #8 wood screws. Start at the corner abutting the left or right panel, and screw the furring strips flat against the wall vertically into each stud, with the drill/driver. Space the mounting screws apart every 12 to 18 inches.
-
If you’re using a single panel, line up the edge of the end furring strip with the exposed edge of the panel. The same applies if you’re mounting more than one panel across the wall. The space provided between the wall and panel allows clearance for the ends of the climbing hold mounting bolts.
-
Snap chalk lines 24 inches apart down the center of each hidden furring strip. Finish securing the climbing wall to the strips with screws driven 12 to 18 inches apart. Fill the screw hole indentations with drywall putty. Allow 15 minutes drying time, sand the filler smooth with 120-grit sandpaper and touch up the high-gloss paint.
-
Attach the previously selected climbing holds randomly to the climbing wall. Space the holds apart to suit your youngest child’s physique. Bolt the holds to the panel with a cordless impact wrench and Allen wrench attachment, using the bolts supplied with the holds.
Safety
-
Drill a pilot hole, and screw a sturdy ring bolt into the upper center of each panel, 2 inches down from the top.
-
Tie a 12-foot length of braided climbing rope to each ring bolt with a bowline knot as follows: Pass the short end of the rope over itself, 6 inches from the end and from right to left. This forms a small loop. Hold the loop horizontally, and pass the end of the rope up through the loop, around the rope above the loop from right to left, through the eye-bolt, and back down the loop. Give the rope a sharp tug to tighten the knot. The safety rope will give the young climbers an emergency grab hold if needed.
-
Place a padded gym mat along the base of the climbing wall. This provides a soft landing spot to break the climbers fall in case of accidents.
The Drip Cap
- Kids love to climb anything from chain link fences to kitchen drawers -- and many embrace rock climbing as they grow up.
- An indoor rock climbing wall is a wonderful gift for active children.
- Snap chalk lines across these horizontal and vertical points.
- Bore holes with a 7/16-inch wood spade bit and drill/driver through the grid points on each odd row across the width, as follows: Drill the first hole through the point 6 inches in from the upper left.
- Be sure to drill through from the good side.
- Continue drilling through the even rows.
- Drill the remaining five holes across the panel at 8-inch intervals, ending 6 inches from the right.
- This gives you a staggered grid that provides a multitude of different mounting points for your climbing holds.
- Attach two-by-four furring strips to the wall with 3-inch long #8 wood screws.
- The safety rope will give the young climbers an emergency grab hold if needed.
References
Writer Bio
After graduating from the University of the Witwatersrand and qualifying as an aircraft engineer, Ian Kelly joined a Kitchen remodeling company and qualified as a Certified Kitchen Designer (CKD). Kelly then established an organization specializing in home improvement, including repair and maintenance of household appliances, garden equipment and lawn mowers.
Photo Credits
- Jupiterimages/Goodshoot/Getty Images
- Jupiterimages/Goodshoot/Getty Images
More Articles