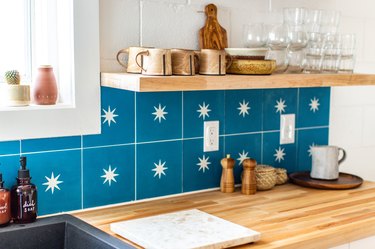
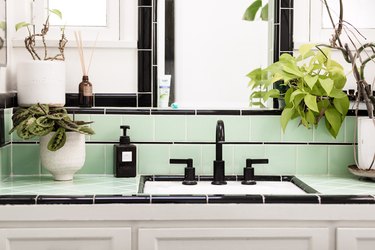
A tile backsplash with matching or contrasting grout is such a popular kitchen decor choice that some kitchen professionals mention nothing other than tile when discussing backsplash materials. In fact, there are many other options for a kitchen backsplash, including solid stone, wood, and stainless steel, but homeowners most often choose tile because it is waterproof, easy to clean, DIY-friendly, and inexpensive.
In addition, tile offers more design choices than other materials. You can choose ceramic tiles (glazed or unglazed), porcelain, natural stone, or glass tile in sizes that range from 1 inch to 12 inches square. You can also opt for rectangular subway tile or even irregular, multicolored tiles that you can form into a whimsical mosaic tile pattern.
Video of the Day
Video of the Day
The type of tile you choose doesn't have much bearing on the backsplash installation procedure, however, because it's basically the same for all of them. If the backsplash area — which typically encompasses the wall from the countertops to the bottom of the upper cabinets — is covered by drywall, you can install the tile directly on that, or you can install a layer of thin cement board, which is recommended for tiling over wallpapered walls.
Things to Know Before You Start
A tile backsplash typically covers the area between the countertop and upper cabinets, but in some cases, it makes sense to extend the backsplash area beyond the counter. When you do this, it's important to create a stable, temporary bottom edge to hold the tiles in a straight line. You can do so by screwing straight pieces of 1x2 lumber to the wall.
Tiling relatively small, visible areas, such as a kitchen backsplash or countertop, calls for a large number of precision cuts. You can use a basic score-and-snap tile cutter for this, but you're better off renting or buying a wet saw, which makes clean, accurate cuts easily. In any case, you'll also need a good set of tile nippers to cut curves and notches.
You'll also need plenty of room to work. Clear the countertops and pull large appliances well away from the wall, pulling the plugs and disconnecting the gas if necessary to allow you to make enough room to get behind them. It's a great idea to keep the kitchen out of commission while this DIY home improvement project is underway if that's at all possible.
Do You Need to Install Cement Backerboard?
When installing ceramic tile on the floor or a countertop, some type of backing material, such as cement board or an uncoupling membrane, is essential because it provides extra reinforcement and a flat surface that helps prevents cracking of the tile and grout. Builders also use cement board when tiling walls and ceilings in very wet areas, like showers. However, because a backsplash doesn't cover the entire wall, it's a special case. Cement board adds a little more than 1/4 inch of thickness to the tile bed, and that could create problems at the edges of the backsplash where the tiles transition to drywall or other wall materials. Caulk won't hide this transition; you usually need to install wood or metal trim.
Drywall or plaster in good condition can support tile, but it has to be flat and clean, and if it's painted with a shiny finish, the finish must be deglossed to ensure the adhesive will stick to it. Wavy drywall, drywall in bad condition, and wallpapered drywall are poor candidates for a tile bed and should be covered with cement board. You should also use cement board in high-moisture areas to prevent the moisture from degrading the tile adhesive and causing the tiles to loosen.
Things You'll Need
How to Install a Tile Backsplash
Step 1: Measure the Backsplash Area and Purchase Tile
Use a tape measure to measure the lengths and widths of all parts of the wall that constitute the backsplash and calculate the area. Divide that by the area of each tile you plan to use to get the number of tiles you need. Add a 10-percent overage to account for cutting waste and mistakes.
Step 2: Cover the Countertops
Clear everything from the countertops, cover them with sheet plastic, and tape down the plastic. If you need to mask the cabinets with painters' tape and masking paper, you can do it now, but it's best to wait until after you've washed the walls. This is also a good time to move the appliances out of the way and cover them with plastic.
Step 3: Remove Outlet Covers
Turn off the circuit breakers that control the electrical outlets and any lights controlled by switches in the backsplash area. Remove all of the outlet and switch cover plates with a screwdriver. Test for power inside each box using a noncontact voltage tester to confirm the power is off. Unscrew the outlets and switches from the boxes but don't disconnect them. You can gently pull them out a few inches and leave them sticking out of the boxes, and when the tiling is complete, you'll reattach them using electrical box extenders, if necessary, to extend the boxes out to the tile surface.
Step 4: Wash and Degloss the Walls
Tip
Skip this step if you're installing cement board.
Mix a solution of 1/2-cup trisodium phosphate (TSP) and water in a bucket and use a sponge to clean the walls. TSP is a strong detergent that dissolves grease, oils, and other contaminants that could interfere with the tile adhesive, and it also deglosses shiny finishes. It's caustic, so wear rubber gloves and goggles when using it. Let the wall dry completely. If the surface has enamel paint or a similar glossy material, scuff it by hand with 120-grit sandpaper to etch the finish, then wipe away all sanding dust with a rag.
Step 5: Install Cement Backerboard (as applicable)
Cut the cement board to fit by scoring it with a utility knife and breaking it or by cutting it with a circular saw and an 80-tooth carbide blade. Use a jigsaw with a metal-cutting blade to cut holes and notches for electrical outlets. Wear goggles and a respirator while cutting with power tools to protect yourself from the cement dust.
Affix the cement board to the studs by driving 1 1/4-inch cement board screws into the wall studs. Finish the seams by applying thinset mortar with a trowel, laying fiberglass cement board joint tape onto the mortar and troweling it flat. Let the mortar dry completely.
Step 6: Plan the Layout of the Tile Backsplash
Choose a good place to lay the first tile, which is typically directly behind the most prominent fixture, such as the sink faucet or the stove, to create a pattern centered around that fixture. It's a good idea to stick tile temporarily to the wall to get an idea of how it will look and to arrange the pattern to avoid having to cut very thin tiles at the edges of the backsplash area. Use tile spacers to keep the tiles a uniform distance from each other, and use a level to make sure the grout lines are straight and level.
During the tiling layout, be sure to leave a 1/8-inch expansion gap between the backsplash and the countertop, cabinets, and any other solid element. Ceramic tile and grout expand and contract with changing temperature and humidity, and the gap is necessary to prevent lifting and cracking. You typically caulk this gap with flexible silicone caulk after laying the tiles, and you can cover it with trim if you want.
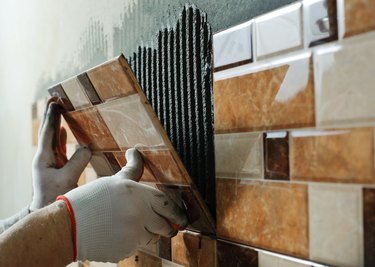
Step 7: Set the Tile
Apply thinset or mastic tile adhesive to the wall with a notched trowel (follow the adhesive manufacturer's specifications for notch size and shape) and press the tile into the adhesive, giving each tile a little wiggle to seat it. Lay the first tile at the position you chose in the previous step. Add more tiles, working toward the edges of the backsplash and using tile spacers between adjacent tiles to keep them uniformly separated. If you're installing tiles attached to a mesh backing, be sure to set the proper gaps between the tile sheets.
Cut the tiles as needed using a tile cutter or wet saw for straight and 45-degree angle cuts, and use tile nippers to cut curves and small notches. If you have to cut a notch in a tile that fits completely around an electrical box, make a series of straight cuts with the tile saw to create thin strips in the cutout area and then use the nippers to break off the strips. When all tiles are laid, let the tile adhesive fully cure as directed by the manufacturer.
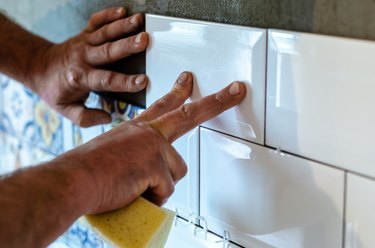
Step 8: Grout the Tile
Use unsanded grout if the tile spacing is less than 1/8 inch; otherwise, use sanded grout (do not use sanded grout with glass tile). You can buy premixed grout, but if you choose the powdered variety instead, mix the grout with water to a consistency similar to peanut butter and put it in a tray. Apply the grout with a grout float using the float to spread it over the entire backsplash and force it into all the grout lines. Use enough grout to bring the grout lines flush with the individual tile or about 1/16 inch below them and then make sweeping motions with the float to remove excess grout.
Let the grout stiffen for about 20 minutes and then wipe off the excess grout that remains with a damp sponge. It's a good idea to tool the grout with your finger while it's still pliable like you do when caulking to give it a smooth, slightly concave surface.
Step 9: Clean the Grout Haze
When the grout dries, a thin film known as grout haze will remain on the tiled surface. You should be able to remove this by rubbing it off with cheesecloth, but if it doesn't come off, use a commercial grout-haze remover according to the instructions that come with the product.
Step 10: Apply Sealer to Grout and Unglazed Tiles
After grouting, allow the grout to fully cure (which will take several days, per the manufacturer's instructions) and then seal it with a commercial sealer. If you used unglazed tile, it also needs to be sealed, and in this case, you can seal the tile and grout at the same time. (Many types of natural stone also need sealer; check with the tile supplier for recommendations.) Some sealers come in aerosol cans and can be sprayed, while others must be applied with a brush or rag. Follow the application instructions on the product you purchase.
Step 11: Replace the Electrical Outlets and Switches
Reattach the electrical outlets and switches to their boxes, using longer screws if necessary to tighten the tabs on the devices against the tile. In some cases, especially when you install cement board, you may need electrical box extenders. An extender is a plastic ring that fits against the front edge of the box and extends the box so it is flush with the face of the tile. Affix the extender to the box and then screw the outlet or switch to the extender. Add the cover plates to the outlets and switches. Turn on the circuit breakers to restore power.
Tile Backsplash Maintenance
A tile backsplash needs regular cleaning, especially the parts near the stove and food preparation areas where oil and grease are likely to fly around, but it's simple. Just wet down the tiles with a sponge soaked in warm water, which helps soften the grime and loosen its grip on the tile; wipe again with warm, soapy water; and wipe a third time with a clean sponge for rinsing. The job is even easier if you do it regularly every month or so.
If the tile and grout are well-sealed, mold shouldn't be able to get a foothold and will wash off with soapy water. Mold can permeate unsealed grout, however, and may have to be scrubbed off. An effective way to do this is to make a paste with baking soda and water, apply it, scrub with a toothbrush, and rinse.
Reapply grout sealer (and tile sealer as applicable) per the manufacturer's instructions. This may be recommended every three to five years. Sealer is the best defense against grout stains, which is the Achilles' heel of most tile installations.