
If you like jigsaw puzzles, you'll love laying laminate flooring because in many ways, it's like fitting together puzzle pieces. Instead of curved edges that can accept only one other piece of the puzzle, though, laminate planks have tongues and grooves that lock together with all other planks but only if the planks are facing in the same direction. You can't spin a plank around and lock it into the floor, which is important to remember if you don't want to make measuring and cutting mistakes that can waste material and cost you money.
Appropriate Installation Locations
Video of the Day
Perhaps more than any other type of flooring, laminate flooring is susceptible to moisture and isn't appropriate in a room that experiences more than 60 percent humidity, according to laminate flooring dealer Artisan Hardwood. The moisture makes the planks swell and push against each other, and the result is raised edges that can't be repaired.
Video of the Day
The same thing can happen if you install laminate flooring directly on a subfloor with too much moisture. You should always check the product specifications for moisture requirements, and if you suspect moisture may be a problem, test the subfloor with a moisture meter. Note that many manufacturers won't warranty their products if you install them below grade, which makes laminate flooring a less-than-ideal choice for most basements.
Subfloor Preparation and Underlayment
You can install laminate flooring on plywood, oriented strandboard, particleboard or concrete. The subfloor must be completely flat and free of bumps or depressions that could destabilize the edges and cause the planks to separate. If you're planning the floor installation on an old concrete pad or a subfloor from which you've just removed an existing floor covering, you may have to level the floor by sanding it or spreading floor-leveling compound.
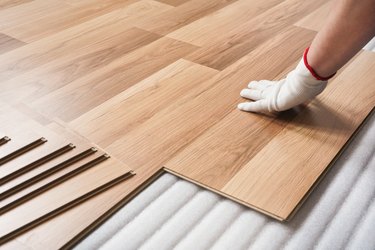
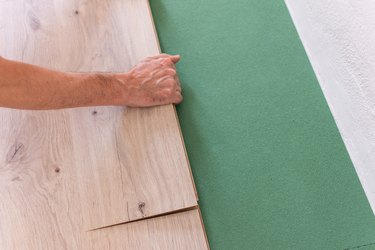
A moisture barrier underlayment is required when you install laminate flooring on concrete, and it's highly recommended on plywood as well, especially if the floor is on the ground level. You may also want an underlayment to provide sound and thermal insulation. Most laminate dealers sell underlayment that guards against moisture and provides insulation. It's always a good idea to install underlayment, and it may even be required to validate the manufacturer's warranty.
How to Lay the First Row
Few rooms are actually square, and when you're laying hardwood, you can often compensate for angled walls by laying the first row in the middle of the floor. This is more difficult to do with laminate, though, and unless they're continuing a floor from another room, most installers lay the first row against a wall.
You can use a simple procedure for laying the first row that compensates for out-of-square walls. Start by measuring the distance between the walls parallel to the floor at both ends of the room and calculate the difference. Make a mark on the subfloor that is half this distance from the starting wall at the corner of the widest part of the room, snap a chalk line from this mark to the opposite corner and lay the first row along this line.
This technique splits the difference created by the angled walls between both sides of the room so you don't come to the last row and find you have to cut a steep angle on the last plank, which is unsightly. When you lay the first row, it's a good idea to use spacers to keep the planks the right distance from the wall (to create an expansion gap) while you install the second row. You may have to use wider spacers at the wide end than the narrow end, depending on the angle.
Tips for Installing Laminate Flooring
A few basic tips will help the project go more smoothly and ensure the flooring looks its best. Be sure to follow the flooring manufacturer's installation instructions because different laminate products may use slightly different interlocking systems and involve specific installation techniques.
Stagger the End Joints
Staggering is the practice of arranging the planks so their end joints (seams) are offset from one row of flooring to the next. You do this by varying the lengths of the first planks in the rows, so that the joints fall in different places from row to row.
The minimum stagger distance between end joints in adjacent rows is 6 inches , and if you're installing planks wider than 3 inches, it should be even more. The National Wood Flooring Association recommends a maximum stagger distance of 10 inches.

It's best to stagger joints as randomly as possible, to prevent a detectable pattern in the floor overall. Also be careful to avoid H-patterns, which are coinciding end joints spaced by one or two intervening planks, and step-patterns, or lightning, which occur when you stagger end joints a fixed amount. The stagger pattern should be as random as you can make it.
Use a Tapping Block
Laminate planks are supposed to snap together effortlessly, but they often need the persuasion of a sharp tap to make that final click. Never tap directly with a hammer or use a spare piece of flooring as a buffer; use the plastic tapping block that comes with every laminate installation kit. It's designed to straddle the edge of the plank and distribute the force of the hammer so you don't shatter the edge of the plank or damage the surface finish.
Use a Pull Bar at the Edges
You can use the tapping block to seat planks together end to end until you come the last plank in the row. Laminate installation kits include a pull bar, which looks like a floor scraper with a raised handle. Fit the short end bar over the edge of the plank and tap the handle with your hammer to draw the plank into the joint.
Leave an Expansion Gap
Because laminate planks expand and contract with changing humidity, they need room at the edge of the floor. Manufacturers commonly recommend a 1/4- to 5/16-inch expansion gap. This gap will be covered by the baseboard. To maintain the gaps throughout the installation, place spacer blocks or pieces of scrap wood between the flooring and all of the walls. Remove the blocks when the installation is complete.
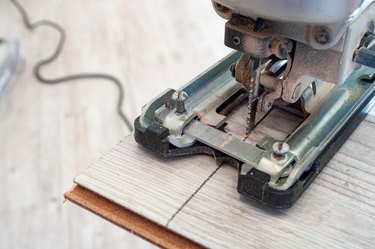
Cutting Laminate Planks
You can make crosscuts (to shorten a plank) and rip cuts (to make a plank narrower) with a circular saw or a jigsaw, but to avoid chipping the fragile edges, you should make these cuts from the backside of the material. You can also make crosscuts with a miter saw or a laminate-flooring cutter, which you can rent. Use a jigsaw to make curved cuts or to cut notches. A handsaw also works for notches and other small cutouts.
Laying Laminate Flooring Around Obstacles
It's difficult to lay a plank if there's a post right in the middle of it, so if the floor has posts, it's best to plan the layout so this doesn't happen. Ideally, two planks should meet at a post, either end to end or side to side, so you can cut half the shape of the post from one plank and half from the other, leaving the required expansion gap, and then snap the planks together. If you do have to accommodate a post in the middle of a plank, your best bet is to cut the plank across its width, cut the post shape from the two pieces and glue the end joints together.
Toilets seldom present a problem when installing laminate flooring because you have to remove the toilet before laying the floor. You typically use the same technique for laying the flooring around the toilet flange (the round fitting at the floor under the toilet) that you use when laying around a post. But in this case, you make rounded cutouts to fit around the flange. The edges of the planks will be hidden by the toilet once it is reinstalled.
When you approach a cabinet, the last plank before you reach it has to be notched, and this may require you to rip one or more planks. These edges won't be hidden by baseboard, so you should make these cuts on a table saw, if possible. When notching, measure the width of the notch, allowing for the expansion gap, and then cut the notch, lay the board on the floor and tap it into place.
How to Lay the Last Row
When you get to the wall opposite the starting wall, you'll have a gap to fill that is likely to be narrower than the width of a full plank, and if the walls aren't straight, the gap will be angled. It's best to cut and install each plank so it fits in the gap, confirming that it fits before installing the next one.
To rip-cut each plank to width, measure the width of the gap at each end of the plank, allowing for the expansion gap, and then transfer those measurements to a flooring plank and draw a line. You can make this cut with a circular saw, but you may be more comfortable using a jigsaw.
You will be cutting off the grooved edge of the plank, leaving the tongue edge intact so it can click into the second-to-last row of planks. The cut edges of the planks (along the wall) in the last row will be held down by the baseboard.