
How to Cut Notches in Wood

Notches are an essential element of woodworking. They serve as joints for tables, chairs and other furniture projects. Basic woodworking notches are made by cutting repeatedly within the notch area to produce a series of thin wafers that can be scraped or knocked out. They can be cut with almost any saw.
Notches in framing can be cut by hand with a chisel and drill. Cutting notches produces abundant sawdust and wood chips, so wear eye and breathing protection.
Things You Will Need
- Tri-square
- Safety glasses
- Dust mask
- Chop saw or miter saw
- Hammer
- Chisel
- Table saw
- Miter gauge
- Drill bit
- Drill/driver
- Circular saw
- Reciprocating saw
Chop or Miter Saw
-
Use a tri-square to draw the notch on the face and side of the wood. Don safety gear and place the wood on the saw.
-
Hold the wood against the fence with one hand. Use your other hand to turn on the saw. Lower the blade on the inside of the drawing of the notch. When the blade reaches the line indicated by the drawing for the depth, allow the blade to raise up above the surface of the wood.
-
Slide the wood to the left or right 1/8 inch and lower the saw to the depth line once again. Continue on in this manner until the notch drawing is cut out. Use a hammer and chisel to clean and define the notch.
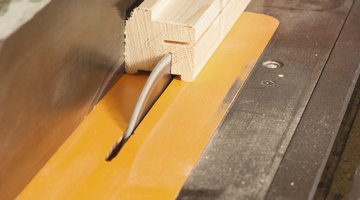
Table Saw
-
Draw the notch on the wood with a tri-square. Measure the depth of the notch. Raise the blade on the table saw to the measurement. Set the table-saw miter gauge at 90 degrees and place it on the table saw in the miter gauge slot.
-
Place the wood on the table saw with the notch drawing facing down. The wood should be flush against the miter gauge. Align the blade with the inside of the line drawing on the left or right.
-
Turn on the saw. Hold the wood tight against the miter gauge. Push the miter gauge and wood together over the blade and back again, returning it to its original location behind the blade.
-
Slide the wood to the left or right 1/8 inch as needed and cut again. Repeat until you reach the other side of the notch drawing. Use a hammer and chisel to clean and define the notch.
Stud Notches
-
Draw the notch on the stud using a tri-square. Select a drill bit that comes as close to the notch size as needed without exceeding it.
-
Drill into the drawing with the drill/driver and bit. Stop drilling when you reach the depth indicated by the drawing. Drill additional holes to remove as much of the drawn area as possible without removing it if the drill bit is too small.
-
Tap a chisel into the sides of the drawing with a hammer to clean and define the notch.
Large Beams
-
Draw the notch on the beam with a tri-square. Measure and set the blade of a circular saw to the depth needed. Cut across the beam perpendicular along the inside edges of the notch with the circular saw.
-
Cut diagonally from one side of the notch to the opposite cut on the bottom with a reciprocating saw. Cut horizontally, parallel across the bottom of the notch with the reciprocating saw.
-
Cut additional horizontal passes across the bottom with the saw to define the notch.
Tip
Use cross-cutting blades for the cleanest notches.
Warning
Notches for all structural framing beams are regulated. Some code regulations state that notches in bearing walls can't exceed 7/8 inch in depth. Notches in nonbearing walls can't exceed 1 7/16 inch in depth. Check your local code before attempting to notch studs or beams.
The Drip Cap
- Notches are an essential element of woodworking.
- They can be cut with almost any saw.
- Lower the blade on the inside of the drawing of the notch.
- When the blade reaches the line indicated by the drawing for the depth, allow the blade to raise up above the surface of the wood.
- Slide the wood to the left or right 1/8 inch and lower the saw to the depth line once again.
- Use a hammer and chisel to clean and define the notch.
- Draw the notch on the wood with a tri-square.
- Cut horizontally, parallel across the bottom of the notch with the reciprocating saw.
References
Writer Bio
Specializing in hardwood furniture, trim carpentry, cabinets, home improvement and architectural millwork, Wade Shaddy has worked in homebuilding since 1972. Shaddy has also worked as a newspaper reporter and writer, and as a contributing writer for Bicycling Magazine. Shaddy began publishing in various magazines in 1992, and published a novel, “Dark Canyon,” in 2008.
Photo Credits
- hemeroskopion/iStock/Getty Images
- hemeroskopion/iStock/Getty Images
More Articles