
How to Install a Flush Mount Ceiling Fan

Ceiling fans can lower energy costs. They help to move heated air off the ceiling in the winter, and circulate cool air around in the summer, reducing the load on an air conditioner. You can install a fan yourself. Fan kits are available at home supply stores, such as Lowe's, Home Depot and Menards.

These kits will contain everything you'll need to install a fan to replace a ceiling light or older fan.
Things You Will Need
- Ceiling fan kit
- Phillips screwdriver
- Flat blade screwdriver
- Stepladder
-
Unpack the ceiling fan. Compare the parts to the instruction sheet to make sure all parts were included when the fan was packed.
-
Remove the existing ceiling light or fan after making sure that the power is off..
-
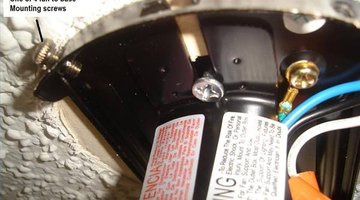
Install the mounting base for the fan to the electrical box the old fixture was connected to. Do not mount the fan to a plastic electrical box. Make certain the base is level. Use spacers if necessary to level. After mounting, pull down on the base to be certain the mounted base will support the weight of the fan while running.
-
Attach the fan mount to the fan motor. Because this is a flush mount, leave out the hanging tube.
-
Hang the fan motor on the base (there will be a hook provided) while connecting the wires from the fan motor to the wires in the box. It may be necessary to shorten the wires from the fan motor. Don't cut them too short, though; allow about six inches of extra wire to give yourself some working room.
-
Connect the black wire for the fan motor and the blue wire for the lights together on the black wire from the box. Use the wiring nuts provided in the kit to firmly make and insulate this connection. Connect the white wire from the fan to the white wire from the box with a second wire nut. Attach the green ground wire to the ground wire in the box. This may be a bare wire, or a green insulated wire.
-
Install the fan mount to the base mount by sliding the slotted holes onto the screws in the side of the base. Turn the fan motor to lock the base and fan mount together. There will be four screws. Two of the screws, directly across from each other, should be partially installed in the base before installing the fan mount to the base. The remaining two screws are installed after the fan mount is rotated to expose the two holes. Tighten all four screws firmly.
-
Assemble the fan blades to the support with the provided screws. The blades may be two-colored, offering you a choice of two finishes to see when the fan is completed. Install the screws from the side you do not want to see.
-
Install the fan blades to the fan motor with the supplied screws. Be sure to tighten the screws securely. The illustrated fan kit came with three rubber blocks installed on the blade mount section of the motor; remove and discard these.
-
Install the light kit after the fan blades are installed and tightened securely. This model had four screws (included) to attach the light kit to the fan motor.
-
Install the shades to the light. They will be held in place by setscrews or a collar which screws to the lamp holder.
-
Install the light bulbs.
-
Turn the power on and check the operation of your fan and lights.


Warning
Be certain the power is off before removing the old fan or light. The 110 volts in a house can kill you.
The Drip Cap
- Ceiling fans can lower energy costs.
- You can install a fan yourself.
- After mounting, pull down on the base to be certain the mounted base will support the weight of the fan while running.
- It may be necessary to shorten the wires from the fan motor.
- Use the wiring nuts provided in the kit to firmly make and insulate this connection.
- Connect the white wire from the fan to the white wire from the box with a second wire nut.
- Tighten all four screws firmly.
Writer Bio
K.K. Lowell is a freelance writer who has been writing professionally since June 2008, with articles appearing on various websites. A mechanic and truck driver for more than 40 years, Lowell is able to write knowledgeably on many automotive and mechanical subjects. He is currently pursuing a degree in English.
Photo Credits
- Photos by KKLowell
- Photos by KKLowell
More Articles