
How to Make a Grafting Wax Compound

Some newly grafted plants need a little help for their grafts to knit together successfully, similar to holding a fracture immobile so the bone can heal. Grafting wax helps hold the stems of two severed plants together until they can stand on their own.

Homemade grafting wax compounds are an easy-to-make and economical option to purchased waxes.
Grafting Wax Goal

All graft types don’t need sealing with grafting wax, such as splice or slant-cut grafts, which are typically used to graft heirloom tomatoes (Lycopersicon esculentum) and other plants with herbaceous stems. But if you’re using a graft type, such as a cleft or bark graft, for shrubs or trees with woody stems, you need grafting wax to hold the parts together. As soon as you fit the stock and scion together, wax should be applied so that all cut surfaces are protected from moisture loss and pathogen entry. If the cut surfaces are allowed to dry, the plant parts cannot knit together. If the cut surfaces are not sealed, pathogenic organisms can use tiny openings to enter a plant and infect it with a disease.
Hand Wax
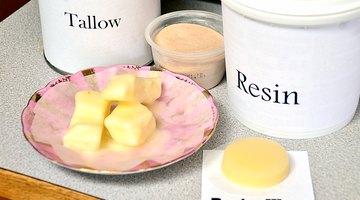
You apply one type of grafting wax by hand, appropriately called hand wax. Making hand wax is like pulling taffy candy. The Alabama Cooperative Extension System recommends three ingredients for making hand wax: 4 pounds of resin, 2 pounds of beeswax and 1 pound of tallow. After melting these together, pour the mixture into cold water and work it by pulling it until it’s the color of straw. Form the solid mixture into balls, each of which you use to wrap around a graft union to seal it. This mixture works well for making cloth or twine for grafting purposes. So you do not waste unused wax, place the wax balls inside a container and store it in a cool location for future grafting projects.
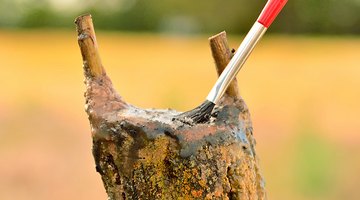
Brush Wax

The second type of grafting wax is called brush wax because you apply it to a graft union with a small paint brush. After melting 5 pounds of resin and 1 pound of beeswax, stir in 1/4 pint of linseed oil. Remove the mixture from the heat source, and gradually stir in 1/2 pound of powdered charcoal until the mixture is thoroughly blended. Paint the warm mixture onto the graft union to seal all the cut surfaces. Use extreme caution when heating the wax mixture over open flames as the ingredients are extremely flammable.
Wax Aftercare
Regardless of whether you use hand wax or brush wax, you need to check the graft the next day. Look for any pinholes that may have opened in the wax, or any exposed cut surfaces where the wax may have pulled away. If you see either of these, apply more wax to seal any exposed areas. Check the grafting wax again in a couple of weeks to see if the wax is solid. If you see any cracks in the wax, apply more wax to seal the graft completely.
The Drip Cap
- Some newly grafted plants need a little help for their grafts to knit together successfully, similar to holding a fracture immobile so the bone can heal.
- Form the solid mixture into balls, each of which you use to wrap around a graft union to seal it.
- This mixture works well for making cloth or twine for grafting purposes.
- The second type of grafting wax is called brush wax because you apply it to a graft union with a small paint brush.
- If you see either of these, apply more wax to seal any exposed areas.
References
Writer Bio
Victoria Lee Blackstone is a horticulturist and a professional writer who has authored research-based scientific/technical papers, horticultural articles, and magazine and newspaper articles. After studying botany and microbiology at Clemson University, Blackstone was hired as a University of Georgia Master Gardener Coordinator. She is also a former mortgage acquisition specialist for Freddie Mac in Atlanta, GA.
Photo Credits
- Howard Jokela/Demand Media
- Howard Jokela/Demand Media
- Howard Jokela/Demand Media
- Howard Jokela/Demand Media
- Howard Jokela/Demand Media
- Howard Jokela/Demand Media
More Articles