There's no doubt about it: Spray foam insulation outperforms virtually every other type of insulation, including fiberglass batts, loose-fill and rigid foam board. According to the American Institute of Architects, spray foam delivers 20 to 40 percent better performance than fiberglass or loose-fill rated for the same R-value. This is primarily because spray foam expands as you apply it, ultimately creating a gap-free thermal barrier while at the same time improving structural stability.
If you've ever installed fiberglass batts, and you see a picture of a worker spraying foam in bare walls, you probably think there's no comparison in effort. Spraying foam looks about as easy as spraying a coat of paint. While that's true in theory, the reality is different, and you should think twice before doing it yourself. Some jobs are very easy when you're an expert and a potential nightmare when you aren't, and spraying foam insulation is one of them. That doesn't mean you shouldn't buy a spray foam kit and do the job yourself, but don't expect it to be a cakewalk.
Video of the Day
Video of the Day
Spray Foam Insulation Is Sticky Stuff
Spray foam products traditionally consist of two parts that get mixed automatically when you spray them. The first part typically contains isocyanates, which are common in paints and elastomeric coatings. They are moderately hazardous chemicals that can irritate the skin and cause lung and respiratory problems. The second part contains polyols, which are complex chemicals that often find their way into sugar substitutes. When mixed, the two form polyurethane, which solidifies into a rigid foam when exposed to air.
Some manufacturers have figured out how to premix the two parts and maintain the mixture in the liquid state until it is sprayed, usually by keeping it in a sealed container. Cross-linking doesn't occur until the liquid is exposed to the atmosphere. Upon contact with air, the liquid expands and hardens into a rigid bubble-filled matrix.
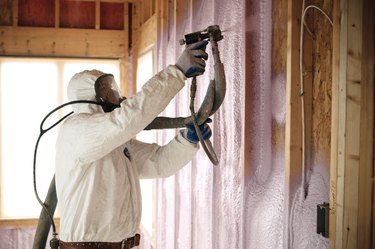
Once it hardens, spray foam is non-toxic and inert, but in the liquid state, it is hazardous. One of the main reasons is that the liquid is preternaturally sticky. Once it makes contact with a surface, it bonds permanently. You can't remove it by softening it with heat, nor can you dissolve it with a solvent. The stickiness of spray foam demands that whoever applies it wear protective clothing, goggles, head and foot protection, gloves and a respirator. All this gear gets in the way when you're spraying and makes the job more difficult, but you do need it.
DIY Spray Foam Insulation Tips

A spray foam pro uses a gun much like the type you use to apply paint. It has a long hose that allows access to an entire room without moving the pump or the liquid foam container. You can rent one of these if you plan to do the job yourself, but it's probably easier to use an application kit designed for DIYers. In one such kit, the two components of the foam mixture come in separate pressurized cylinders, and the gun connects to both of them. When you pull the trigger, the components automatically combine. You get a coverage of about 600 square feet per kit, which is enough for an average-sized room, including the ceiling. Be sure to read the instructions before you start, and prepare to move the cylinders around the room if the gun doesn't reach everywhere.
Spray foam can and does stick inside the gun. To avoid clogging the mechanism and possibly having to discard the nozzle, you need to keep your rest intervals to less than the cure time, which may be short—from 30 to 60 seconds. That isn't enough time to set up a ladder, so if you need one, you should set it up before you start spraying. You won't have time to move obstacles around, so make sure you remove all extraneous objects from the room. If you need to spray insulation in more than one room, create a strategy to make the transition with a minimum of downtime.
Using Spray Foam Insulation Cans

Canned spray foam is one of the most important innovations in the building trades in recent years. Now, instead of stuffing gaps around windows, doors and duct pipes with fiberglass or mineral wool, trying to fill them with caulk or installing excess weatherstripping, you can simply spray foam. The foam completely fills the gap in a single pass, and it insulates better than any other material.
The spray foam that comes in cans is the same sticky stuff that you use to spray entire rooms, so the same precautions apply. Wear protective gear, and watch where you're pointing that nozzle! Also, remember not to overfill, because the foam expands. Don't worry if you make one or two mistakes, though. The foam is easy to cut with a knife or saw once it has set.
Spray foam cans are intended for a single use. The foam hardens inside the nozzle after the cure time has passed, which can be anywhere from a minute to 2 hours, depending on the product. Once that happens, the can is useless. If you want to avoid buying multiple cans, you might consider saving your minor insulation jobs until there are enough to warrant breaking out a full can. If you have a job that can't wait, there are ways to save a partially used can, at least temporarily.
One way is to purchase a product with a detachable dispenser. After you're done spraying, remove the dispenser and clean it according to the manufacturer's recommendations or throw it away. Another way is to clean the nozzle and block it so air can't get in. Do this with a pipe cleaner soaked with a spray lubricant, such as WD-40. Push the pipe cleaner into the nozzle as far as it will go, leaving two inches on the end for you to grab. The can and nozzle should remain usable for up to 30 days.